Estimated reading time: 6 minutes and 44 seconds
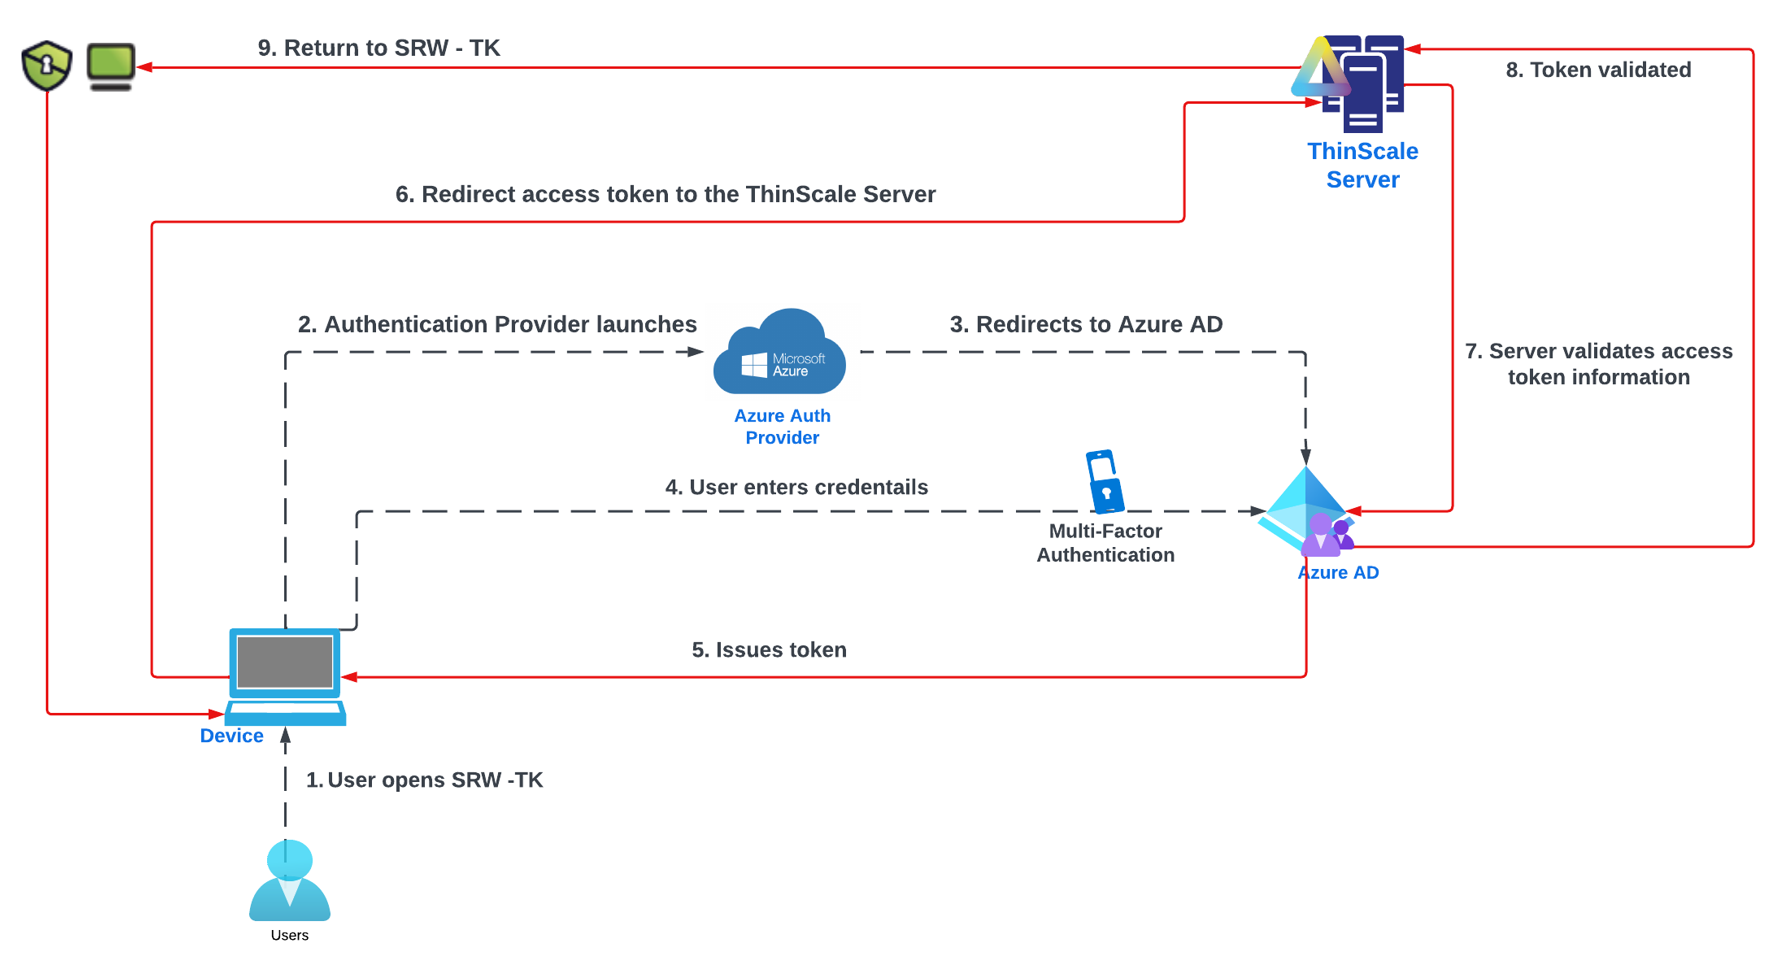
The Auth Providers will allow the administrator to authenticate the agent before launching the auth provider's SRW/TK session against your Azure AD and adding an extra security layer using our management console to validate the token, as you can see on the diagram below:
ATTENTION
Please expand the accordion according to the version you are using.
Prior to v7.x
STEP 1: SETUP AZURE
Warning
You must be an Azure Administrator or have enough permissions to create app registrations and grant API permissions.
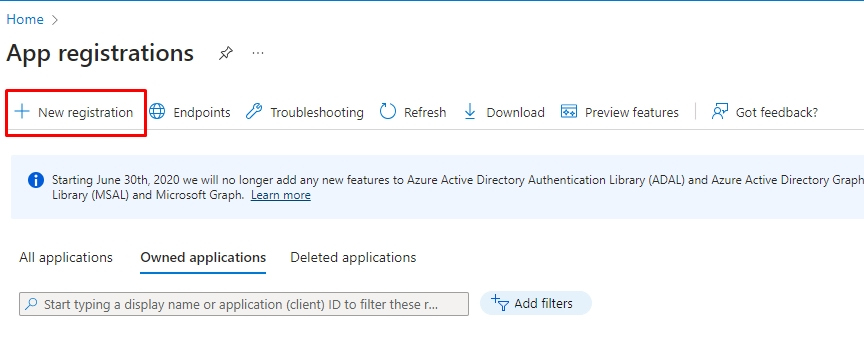
1.1. Sign in on your Azure instance and click on App Registrations.

Info
If you can't see "App Registrations" under your Azure Services, click "More services."
1.2. Create a new registration.

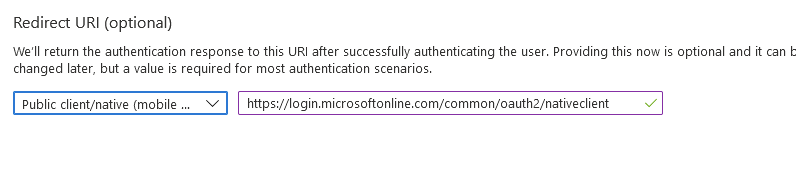
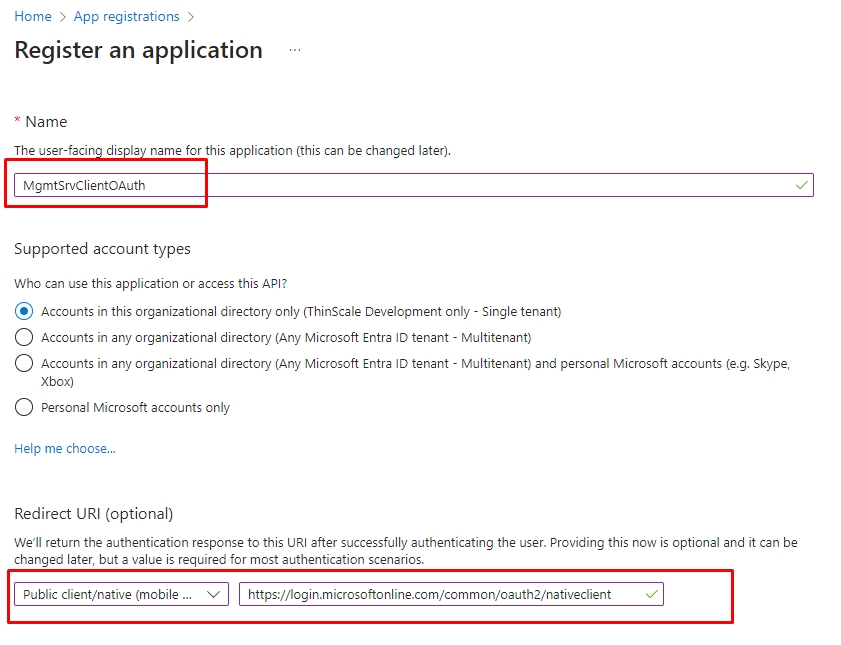
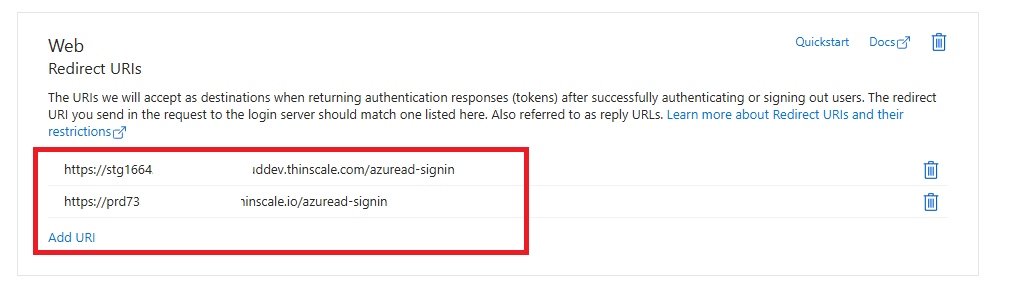
1.3. Set a Name for your registration application, and under "Redirect URI (optional)," select the option "Public client/native (mobile & desktop)." Please add this URL: https://login.microsoftonline.com/common/oauth2/nativeclient and click on the button "Register."
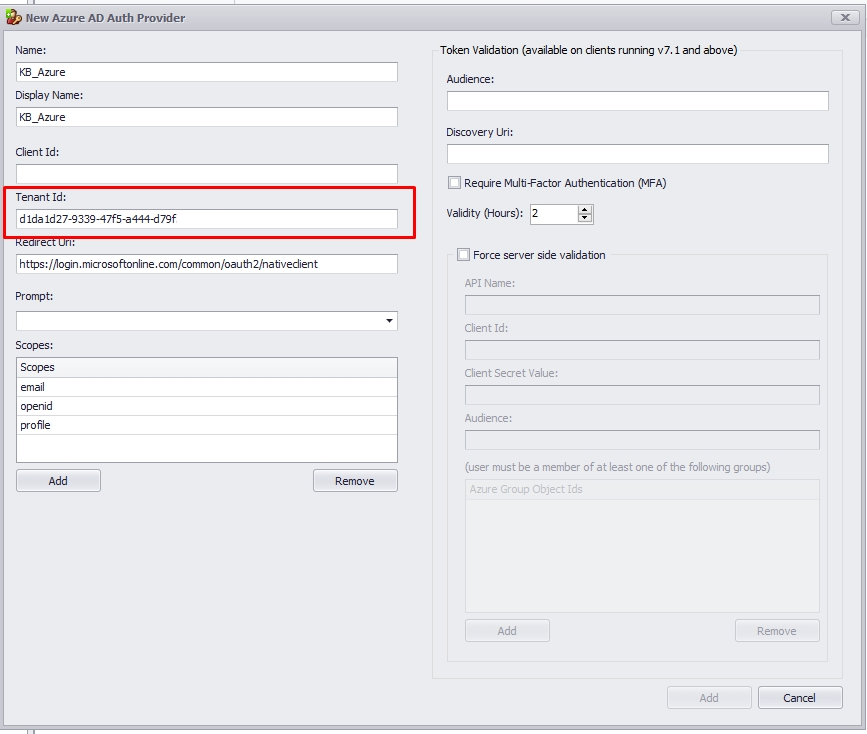
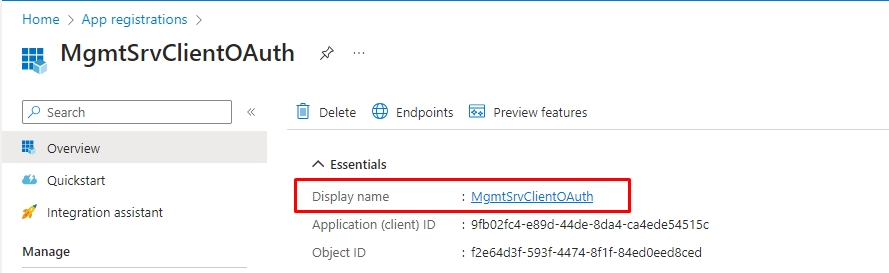
1.4. Copy your “Directory (tenant) ID.”

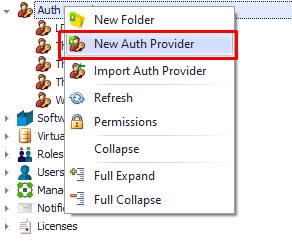
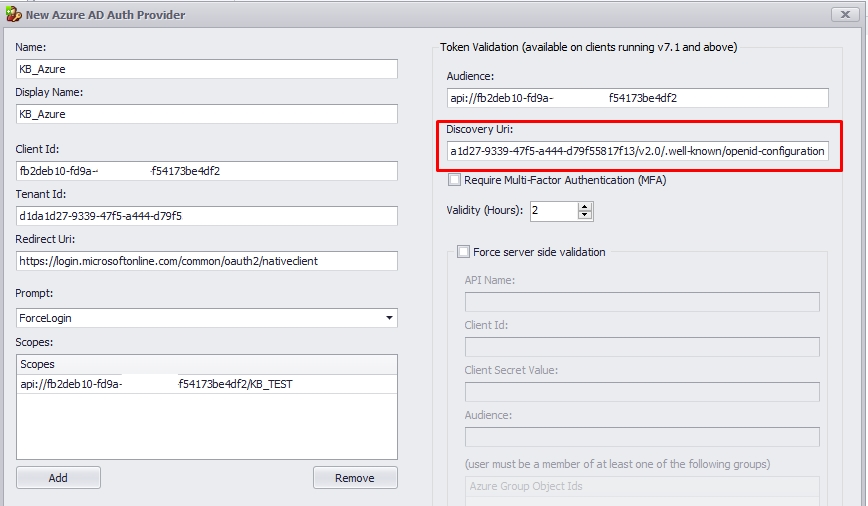
1.5. Create a new "Auth Provider" in your management console and select “Azure AD.”
1.6. Type the "Name" and "Display Name," and copy the "Directory (tenant) ID" to the "Tenant ID" field.
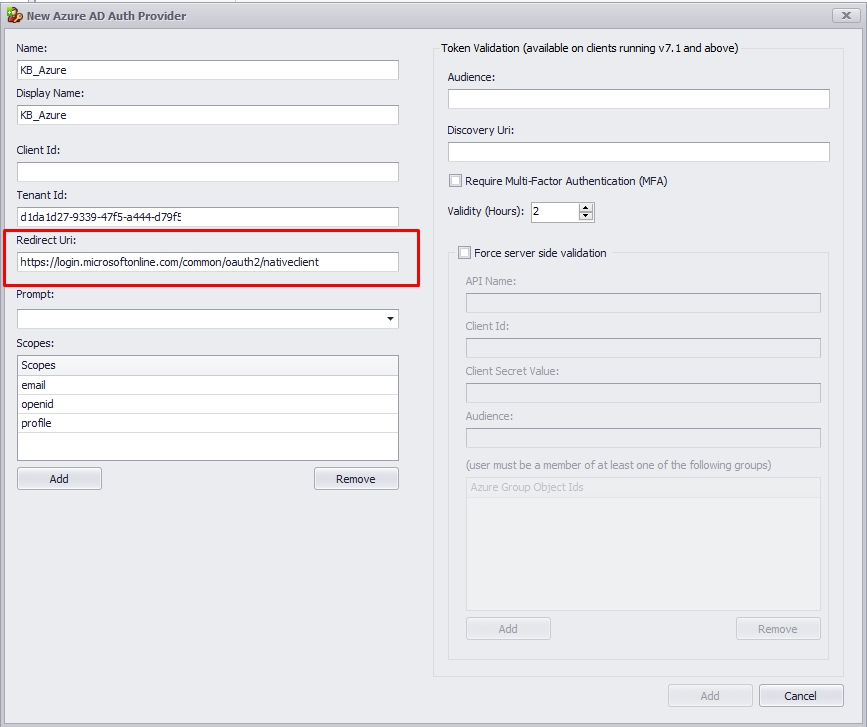
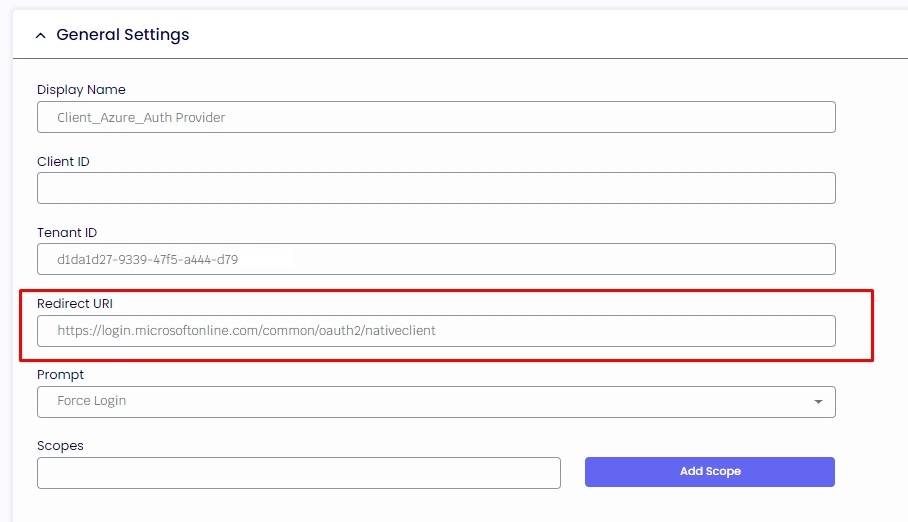
1.7. Now, return to your Azure and click "Authentication" on the left side to get the Redirect URIs. The management console will default prompt that URL https://login.microsoftonline.com/common/oauth2/nativeclient in the "Redirect Uri" field.

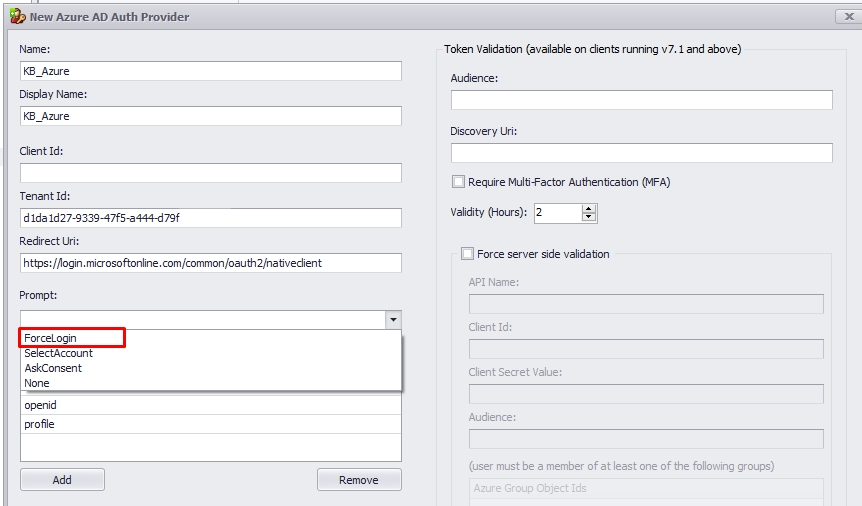
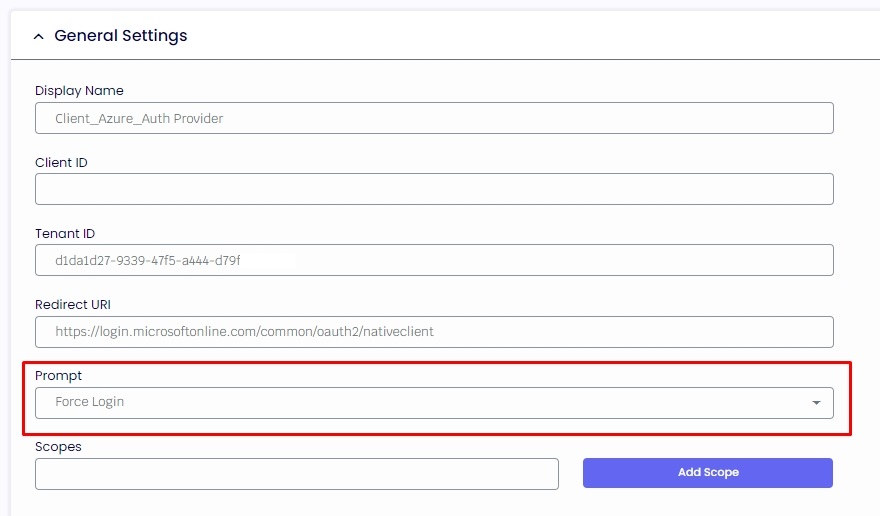
1.8. Please select the prompt user interaction according to your company's needs. The standard setup uses "Force Login."
ForceLogin = The user will be prompted for credentials.
SelectAccount = The authorization server's authorized endpoint, which would present to the user a list of accounts from which one can be selected for authentication.
AskConsent = Consent is the process of a user granting authorization to an application to access protected resources on their behalf. An admin or user can be asked for consent to access their organization/individual data.
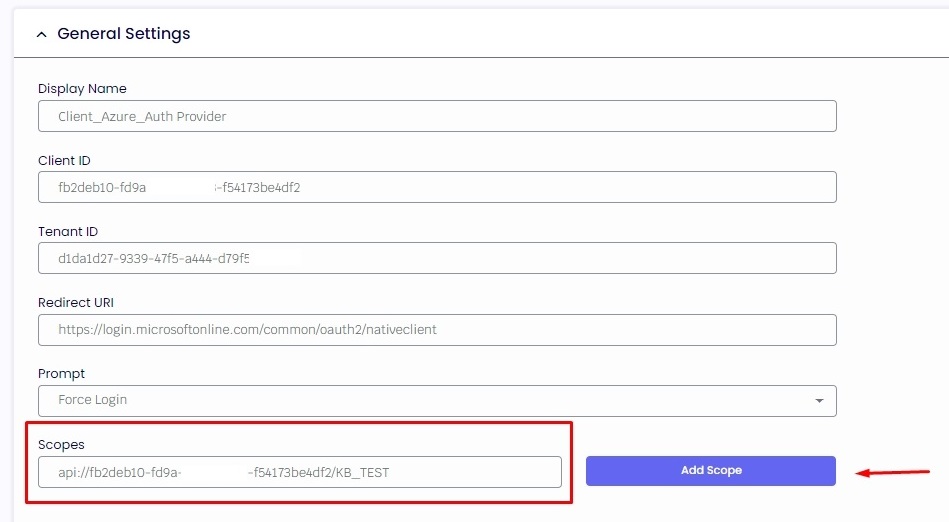
1.9. Now, return to your Azure and click "Expose an API" and "Add a scope." Click on the "Save and Continue" button.
2.0. Type a "Scope Name" and change the consent to "Admins and users." It's mandatory to enter an "Admin consent display name" and an "Admin consent description." Leave the State "Enabled" and click on the button "Add scope."


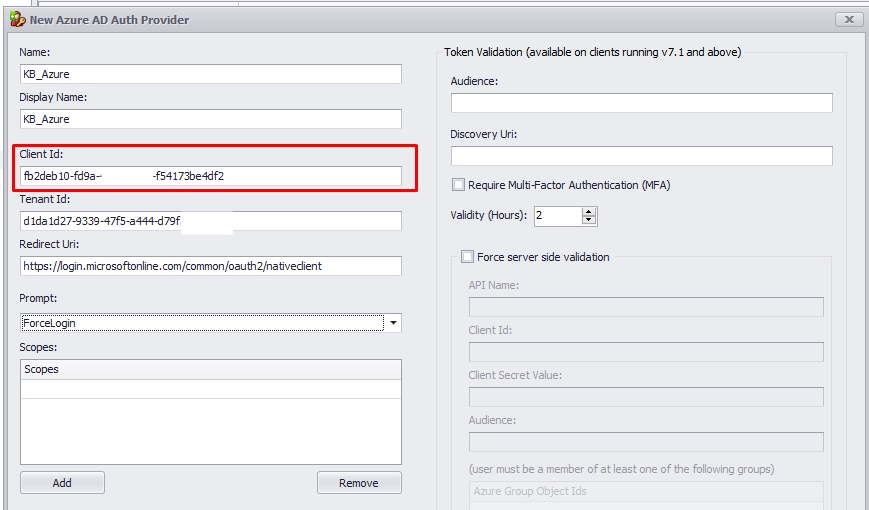
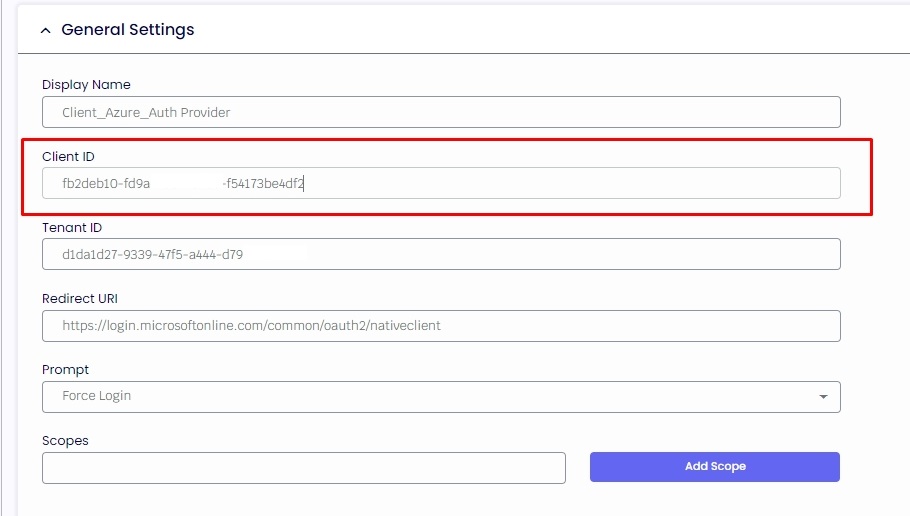
2.1. Copy the created Scope API and return it to your management console. On the "Client ID" field, you will paste the value without api:// and Scope Name.

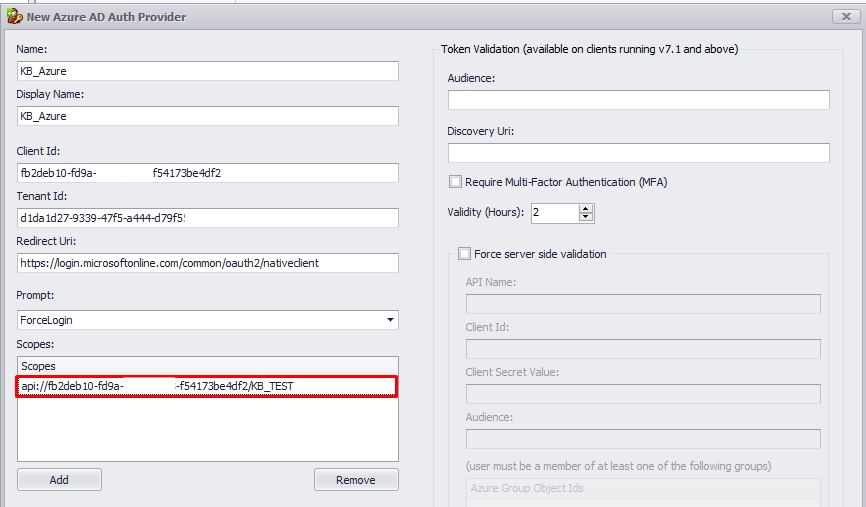
2.2. Delete all the scopes on the auth provider's field and paste your Scope API created with api://.
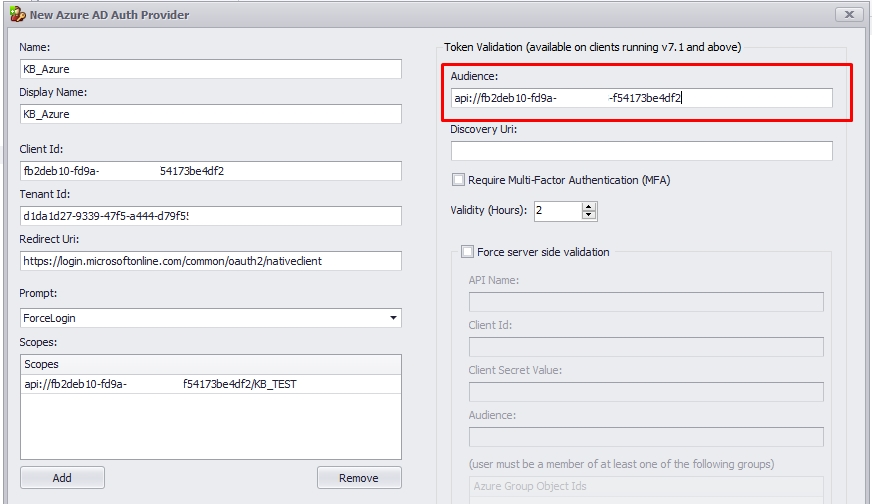
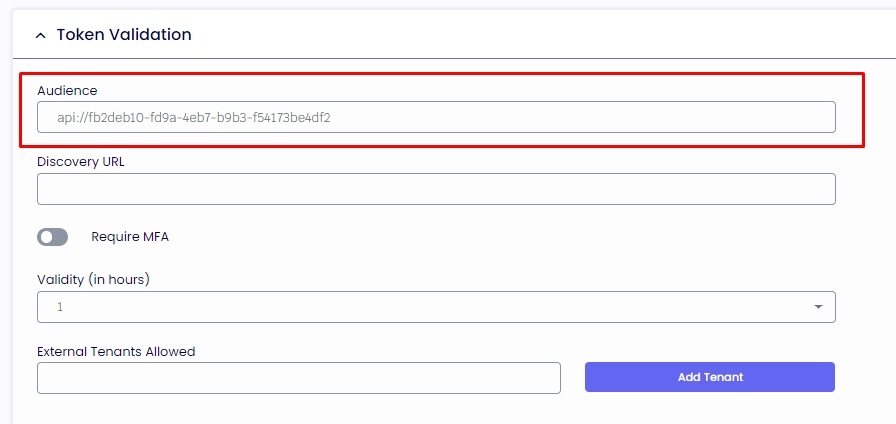
2.3. The audience of Token Validation is your app's Application ID, assigned to your app in the Azure portal, or simply the Scope API without the Scope Name.
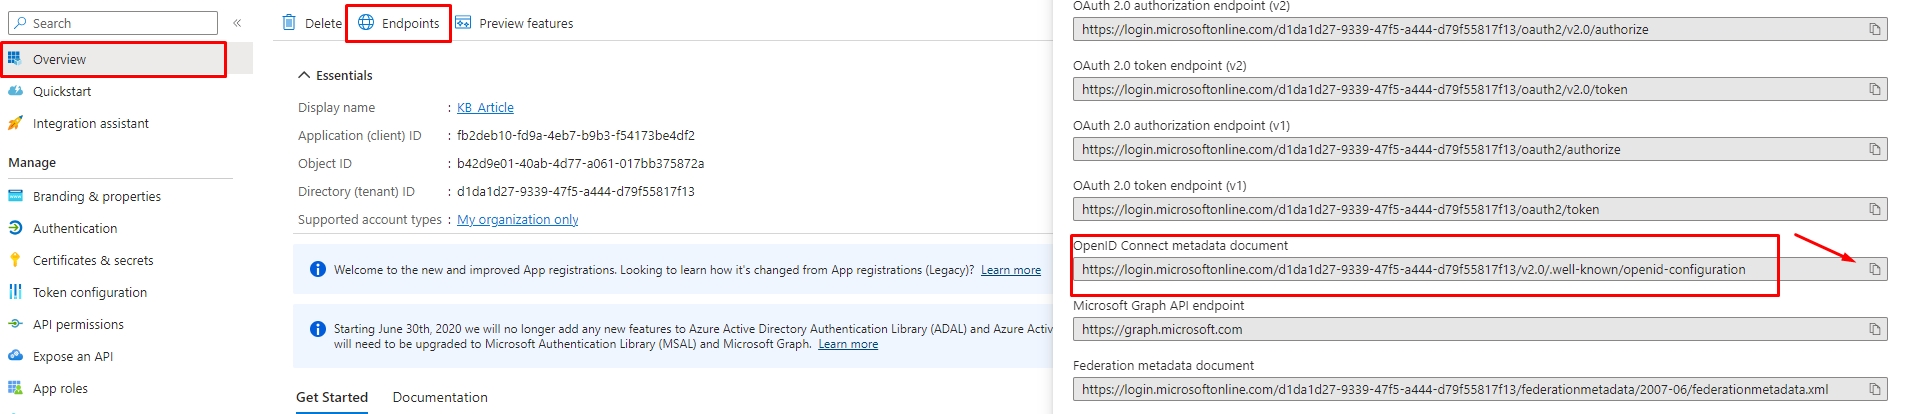
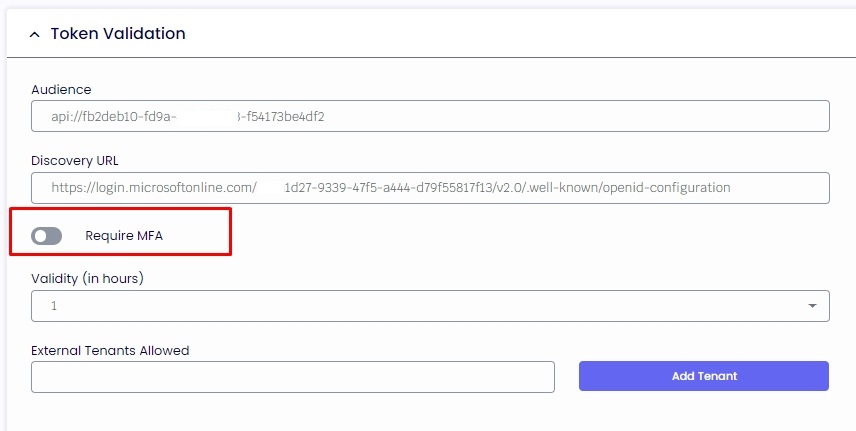
2.4. Please click on "Overview" on the left side and "Endpoints" and copy the "OpenID Connect metadata document."
2.5. If you enable MFA and the validation from the user account is set up, the agent will be asked to re-authenticate after the specified number of hours.
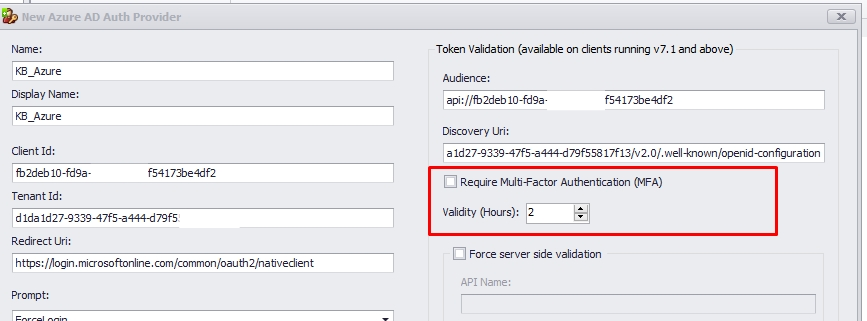
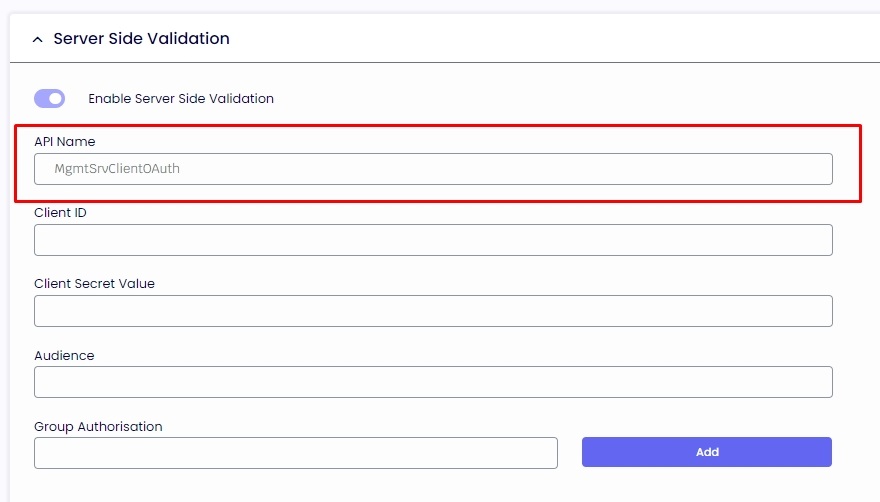
2.6. The Force Server-Side validation will ensure that not only the client Token is validated against an app registration in Azure, but it also gives the ThinScale server the capability to authenticate that the client token is a trust Token coming from the app registration and not an impersonate one.
2.7. Create a new app registration on Azure for the server-side validation and select the Redirect URL.
2.8. Set a Name for your registration application, and under "Redirect URI (optional)," select the option "Public client/native (mobile & desktop)." Please add this URL: https://login.microsoftonline.com/common/oauth2/nativeclient and click on the button "Register."
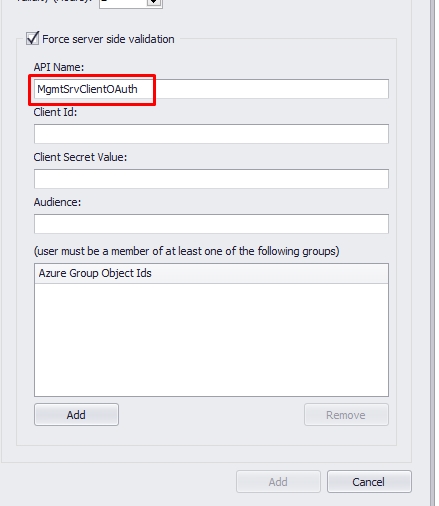
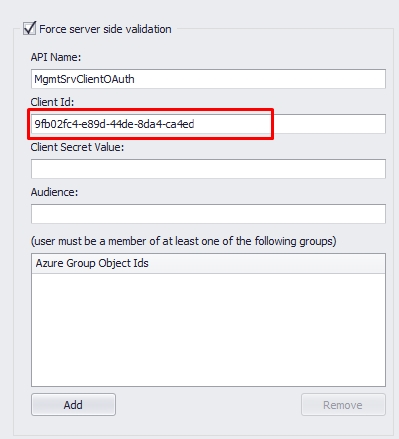
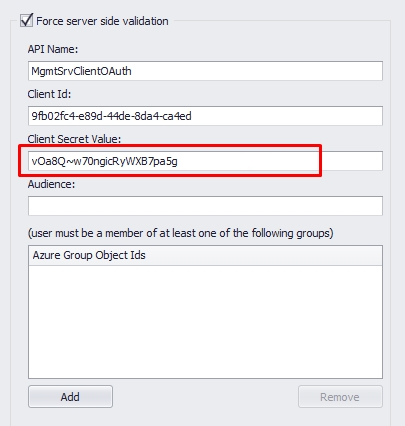
2.9. The display name you set for the registration will be the "API Name" on the management console.
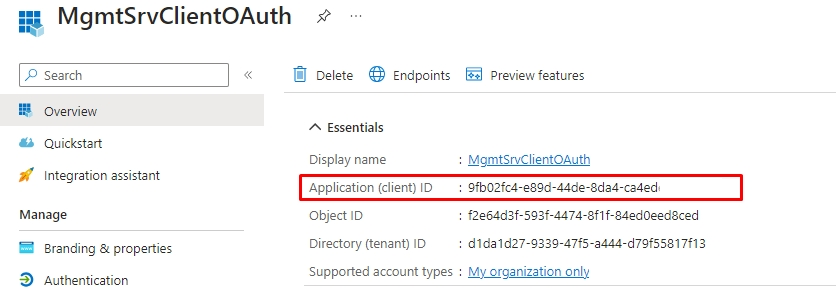
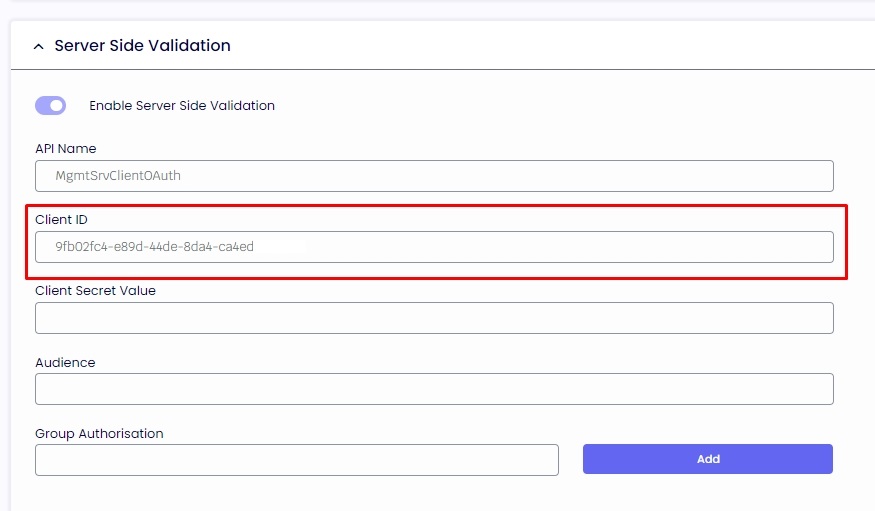
3.0. Copy the "Application (client) ID" and paste it to your "Client ID" on the management console.
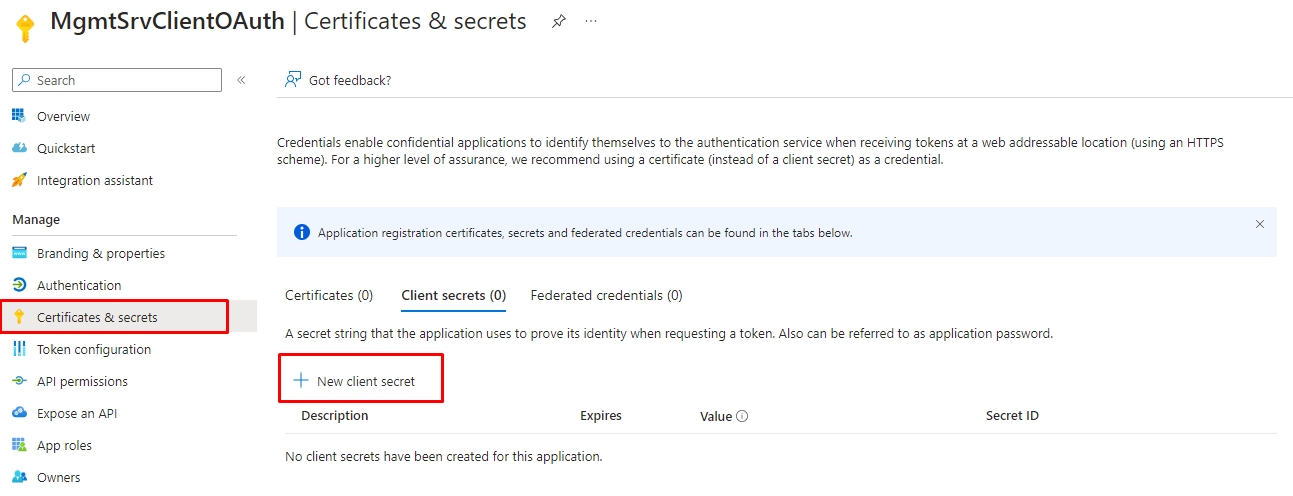
3.1. Back to your Azure, click "Certificates & Secrets" on the left side and "New client secret" on the new screen.
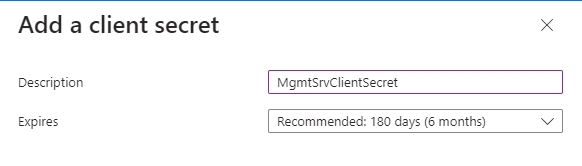
3.2. Set a description name for the client's secret and expiration date and click on the button "Add."
Attention
The administrator needs to maintain the key in good standing, which means they can't let it expire; otherwise, it will cause issues for the agent to authenticate. If you let the key expire, Azure will require you to create a new one, so please update your Auth Provider on the console as well.
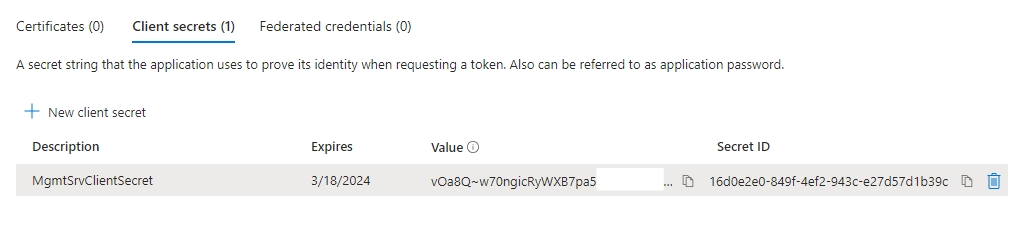
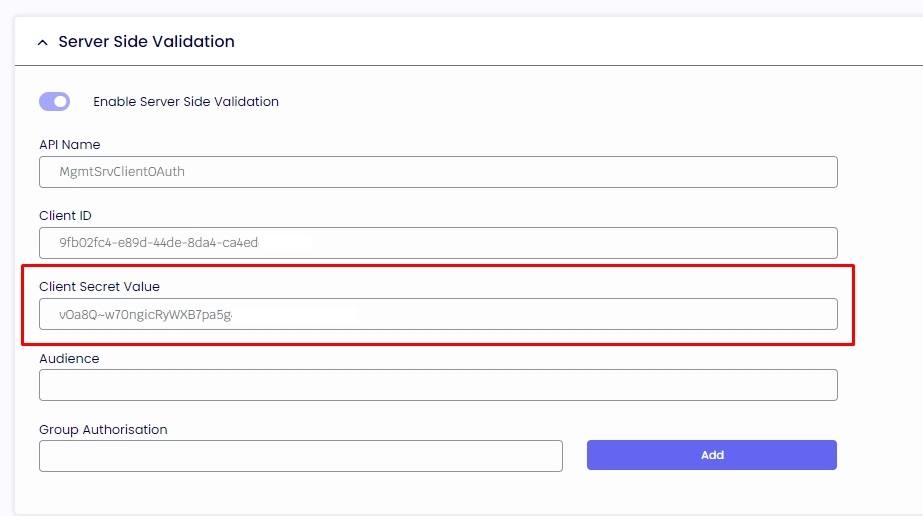
3.3. Please copy the "Value" key created. It will be your "Client Secret Value" on the management console.
Warning
Ensure you copy your value key; leaving that screen, you will not be able to see the key anymore and will be required to create a new one.
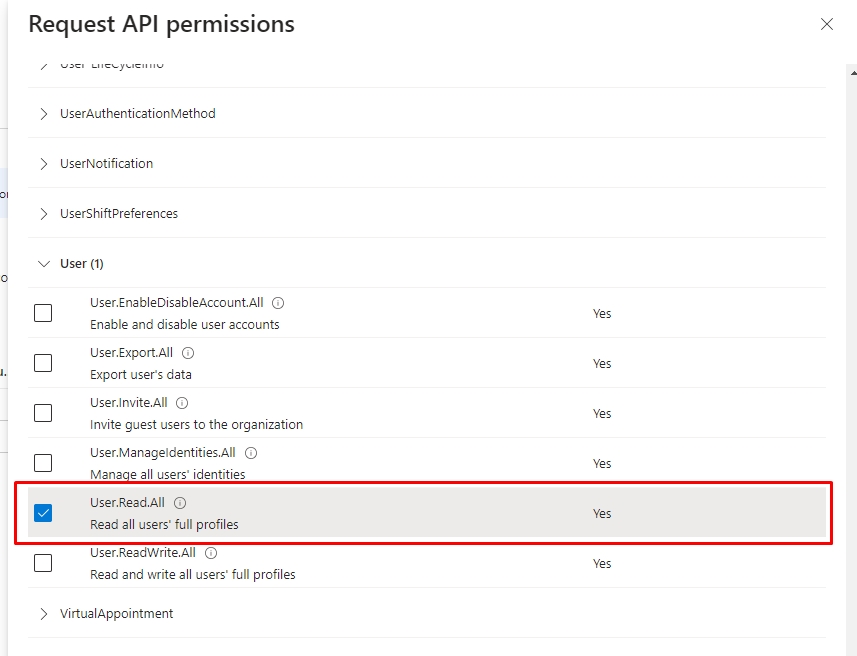
3.4. Please go to "API Permissions" on the left side and click on "Add a permission," select "Microsoft Graph," then "Application permissions."

3.5. Scroll down until you find the “User” category, click on it, then select the checkbox “User.Read.All”, and click on the button "Add permissions.".
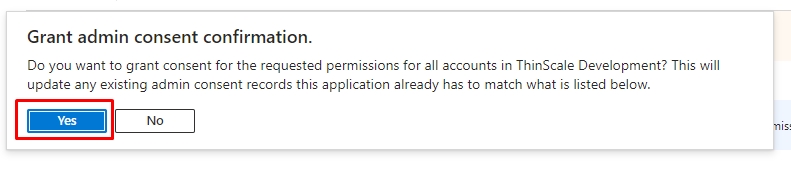
3.6. Make sure you have granted admin consent from your Azure tenant. The status should be in green "Granted for "tenant name," if you do not, please click on "Grant admin consent for "tenant name" " and click "Yes." If you don't have permission, please get in touch with your global admin Azure administrator.
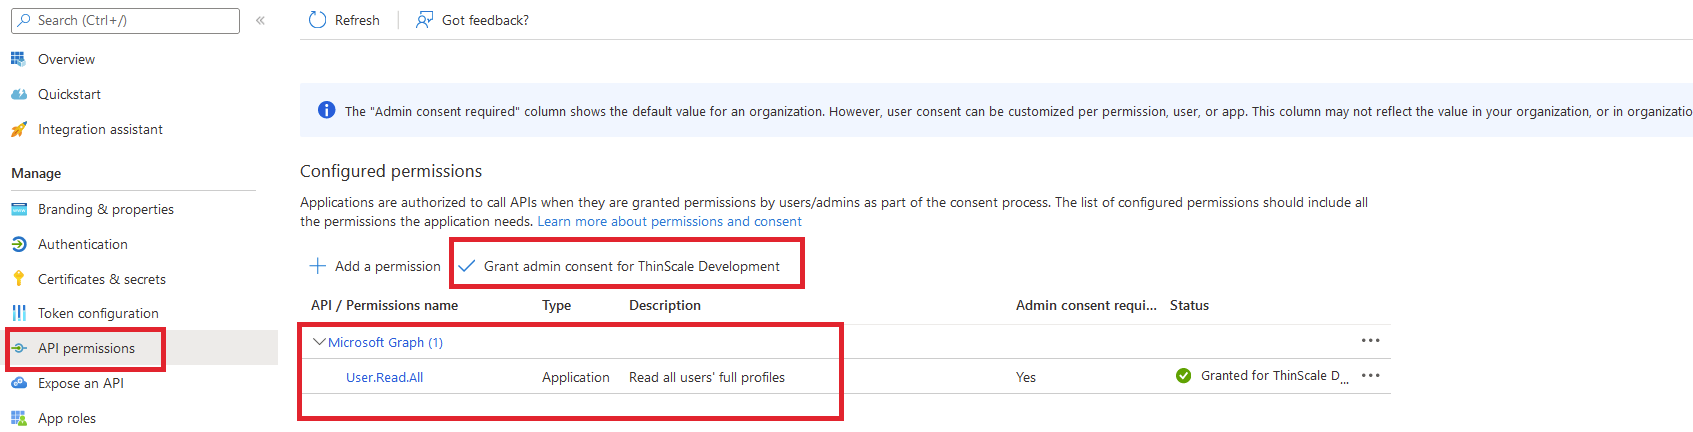
3.7. Please click on "Overview" on the left side and "Endpoints" and copy the "Microsoft Graph API endpoint."
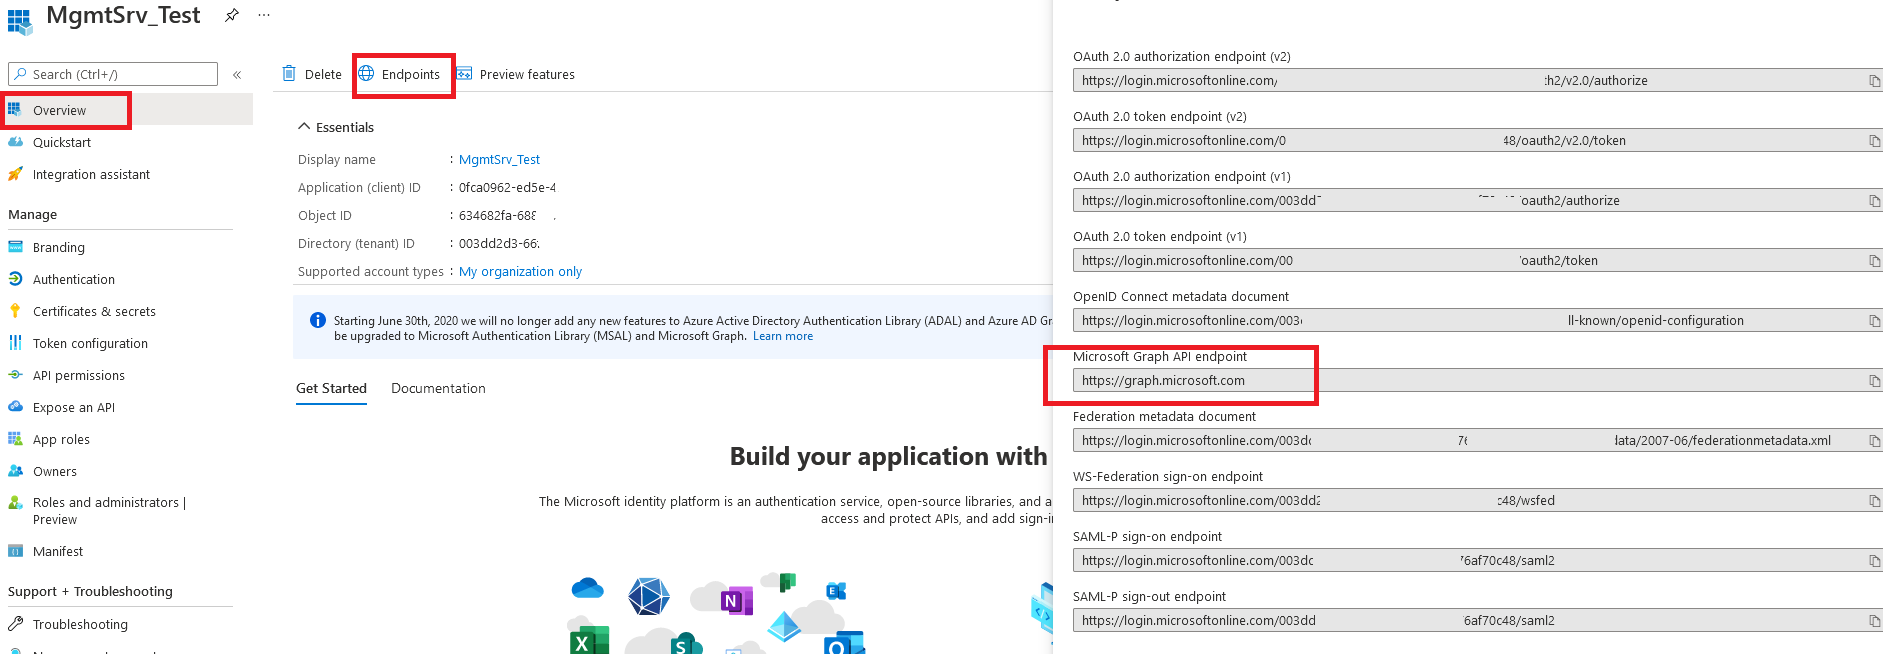
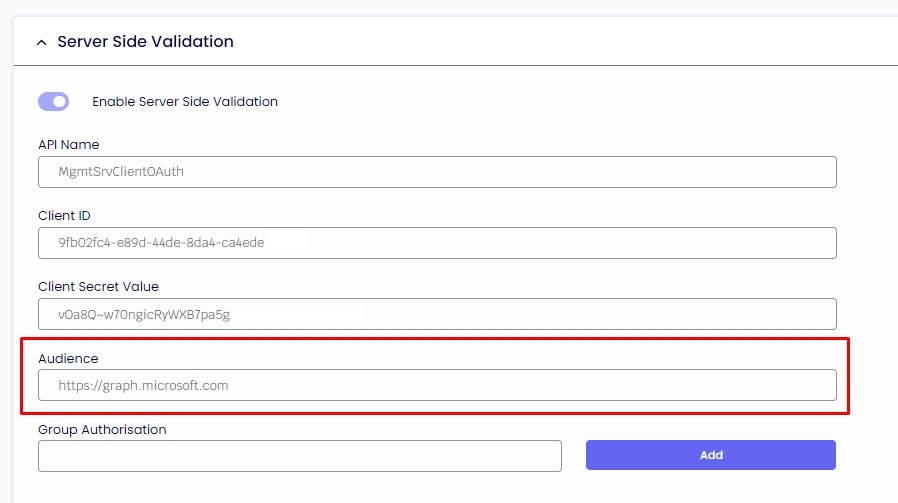
3.8. Please return to your management console and paste the Microsoft Graph API endpoint to the "Audience" field.
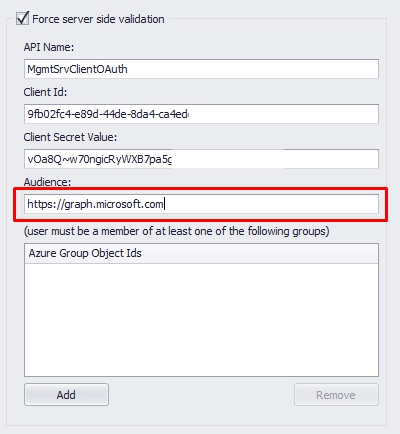
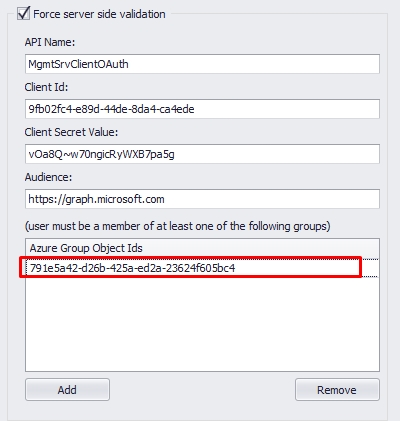
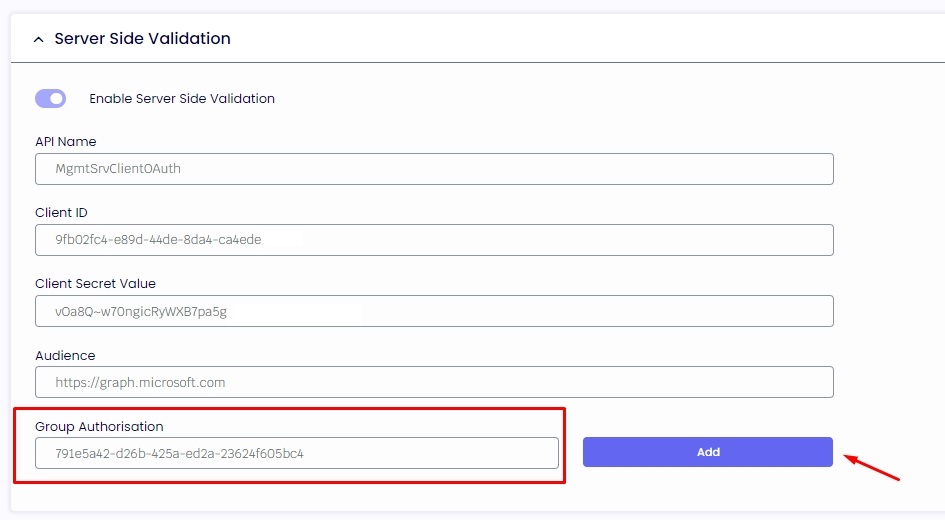
3.9. In the Azure Group Object Ids, you are allowing only agents members of at least one of the groups specified in the list to complete the authentication. The configuration on Azure has been completed at this stage. Please hit "Update" to save the settings when complete.
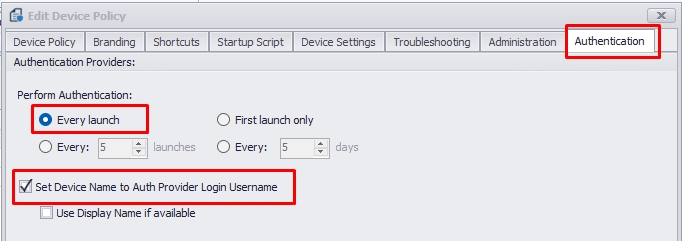
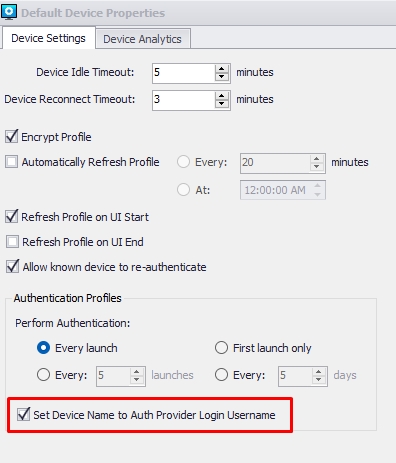
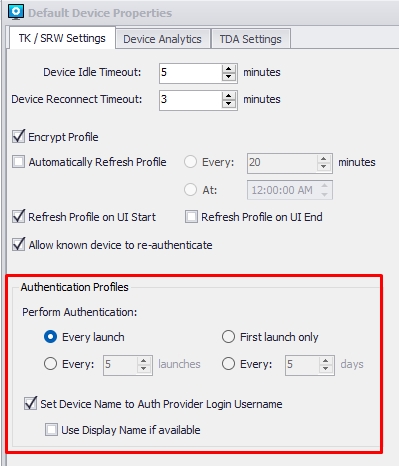
4.0. Please open the "Default Device Properties" in your management console and select when the agent should see the authenticator provider. We recommend using the option "Every Launch," which will require the agent to authenticate with your Azure.
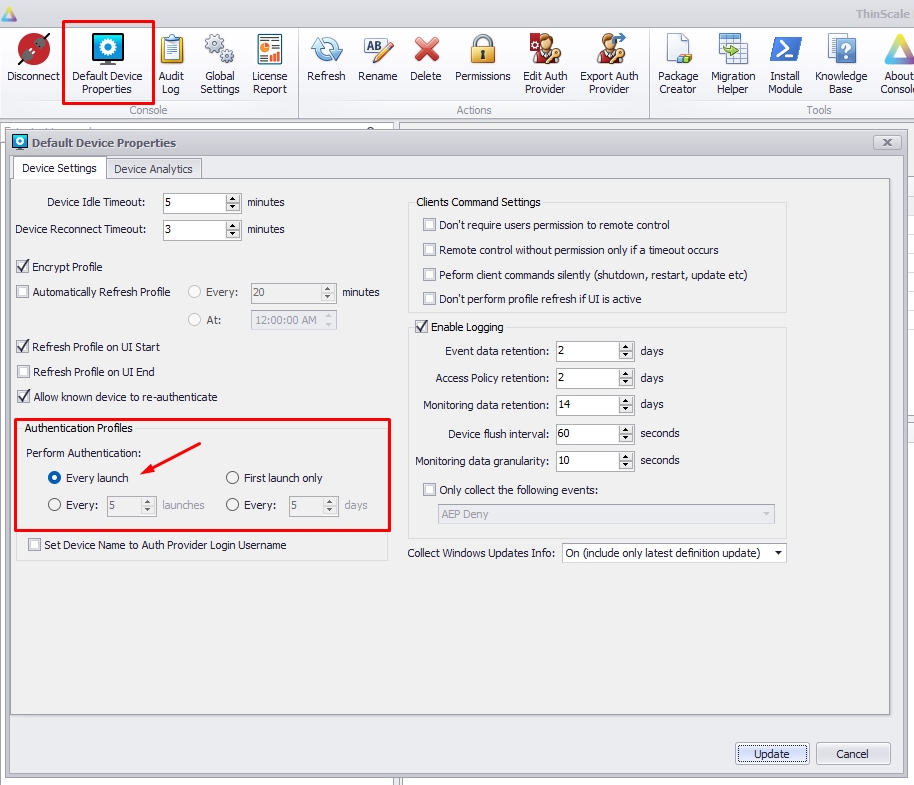
4.1. Additionally, you can opt to auto-rename the device on the console with the user credentials authenticated on Azure. For example, if the agent device is currently installed with the name "DESKTOP_8RE41ZF," enabling the "Set Device Name to Auth Provider Login Username" option will automatically rename the device to username@mycompany.com after the agent successfully authenticates with Azure.

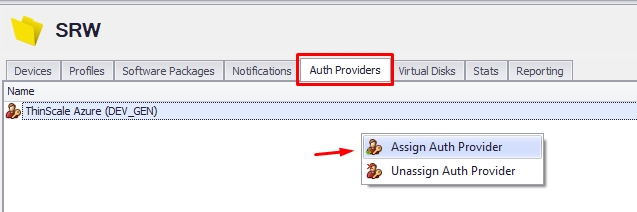
4.2. The last step is to go to the folder and assign the auth provider you created.
Success
Finish line! You completed the Azure Auth provider setup.
v8 On-premises
STEP 1: SETUP AZURE
Warning
You must be an Azure Administrator or have enough permissions to create app registrations and grant API permissions.
1.1. Sign in on your Azure instance and click on App Registrations.
Info
If you can't see "App Registrations" under your Azure Services, click "More services."
1.2. Create a new registration.
1.3. Set a Name for your registration application, and under "Redirect URI (optional)," select the option "Public client/native (mobile & desktop)." Please add this URL: https://login.microsoftonline.com/common/oauth2/nativeclient and click on the button "Register."
1.4. Copy your “Directory (tenant) ID.”
1.5. Create a new "Auth Provider" in your management console and select “Azure AD.”
1.6. Type the "Name" and "Display Name," and copy the "Directory (tenant) ID" to the "Tenant ID" field.
1.7. Now, return to your Azure and click "Authentication" on the left side to get the Redirect URIs. The management console will default prompt that URL https://login.microsoftonline.com/common/oauth2/nativeclient in the "Redirect Uri" field.
1.8. Please select the prompt user interaction according to your company's needs. The standard setup uses "Force Login."
ForceLogin = The user will be prompted for credentials.
SelectAccount = The authorization server's authorized endpoint, which would present to the user a list of accounts from which one can be selected for authentication.
AskConsent = Consent is the process of a user granting authorization to an application to access protected resources on their behalf. An admin or user can be asked for consent to access their organization/individual data.
1.9. Now, return to your Azure and click "Expose an API" and "Add a scope." Click on the "Save and Continue" button.
2.0. Type a "Scope Name" and change the consent to "Admins and users." It's mandatory to enter an "Admin consent display name" and an "Admin consent description." Leave the State "Enabled" and click on the button "Add scope."
2.1. Copy the created Scope API and return it to your management console. On the "Client ID" field, you will paste the value without api:// and Scope Name.
2.2. Delete all the scopes on the auth provider's field and paste your Scope API created with api://.
2.3. The audience of Token Validation is your app's Application ID, assigned to your app in the Azure portal, or simply the Scope API without the Scope Name.
2.4. Please click on "Overview" on the left side and "Endpoints" and copy the "OpenID Connect metadata document."
2.5. If you enable MFA and the validation from the user account is set up, the agent will be asked to re-authenticate after the specified number of hours.
2.6. The Force Server-Side validation will ensure that not only the client Token is validated against an app registration in Azure, but it also gives the ThinScale server the capability to authenticate that the client token is a trust Token coming from the app registration and not an impersonate one.
2.7. Create a new app registration on Azure for the server-side validation and select the Redirect URL.
2.8. Set a Name for your registration application, and under "Redirect URI (optional)," select the option "Public client/native (mobile & desktop)." Please add this URL: https://login.microsoftonline.com/common/oauth2/nativeclient and click on the button "Register."
2.9. The display name you set for the registration will be the "API Name" on the management console.
3.0. Copy the "Application (client) ID" and paste it to your "Client ID" on the management console.
3.1. Back to your Azure, click "Certificates & Secrets" on the left side and "New client secret" on the new screen.
3.2. Set a description name for the client's secret and expiration date and click on the button "Add."
Attention
The administrator needs to maintain the key in good standing, which means they can't let it expire; otherwise, it will cause issues for the agent to authenticate. If you let the key expire, Azure will require you to create a new one, so please update your Auth Provider on the console as well.
3.3. Please copy the "Value" key created. It will be your "Client Secret Value" on the management console.
Warning
Ensure you copy your value key; leaving that screen, you will not be able to see the key anymore and will be required to create a new one.
3.4. Please go to "API Permissions" on the left side and click on "Add a permission," select "Microsoft Graph," then "Application permissions."
3.5. Scroll down until you find the “User” category, click on it, then select the checkbox “User.Read.All”, and click on the button "Add permissions.".
3.6. Make sure you have granted admin consent from your Azure tenant. The status should be in green "Granted for "tenant name," if you do not, please click on "Grant admin consent for "tenant name" " and click "Yes." If you don't have permission, please get in touch with your global admin Azure administrator.
3.7. Please click on "Overview" on the left side and "Endpoints" and copy the "Microsoft Graph API endpoint."
3.8. Please return to your management console and paste the Microsoft Graph API endpoint to the "Audience" field.
3.9. In the Azure Group Object Ids, you are allowing only agents members of at least one of the groups specified in the list to complete the authentication. The configuration on Azure has been completed at this stage. Please hit "Update" to save the settings when complete.
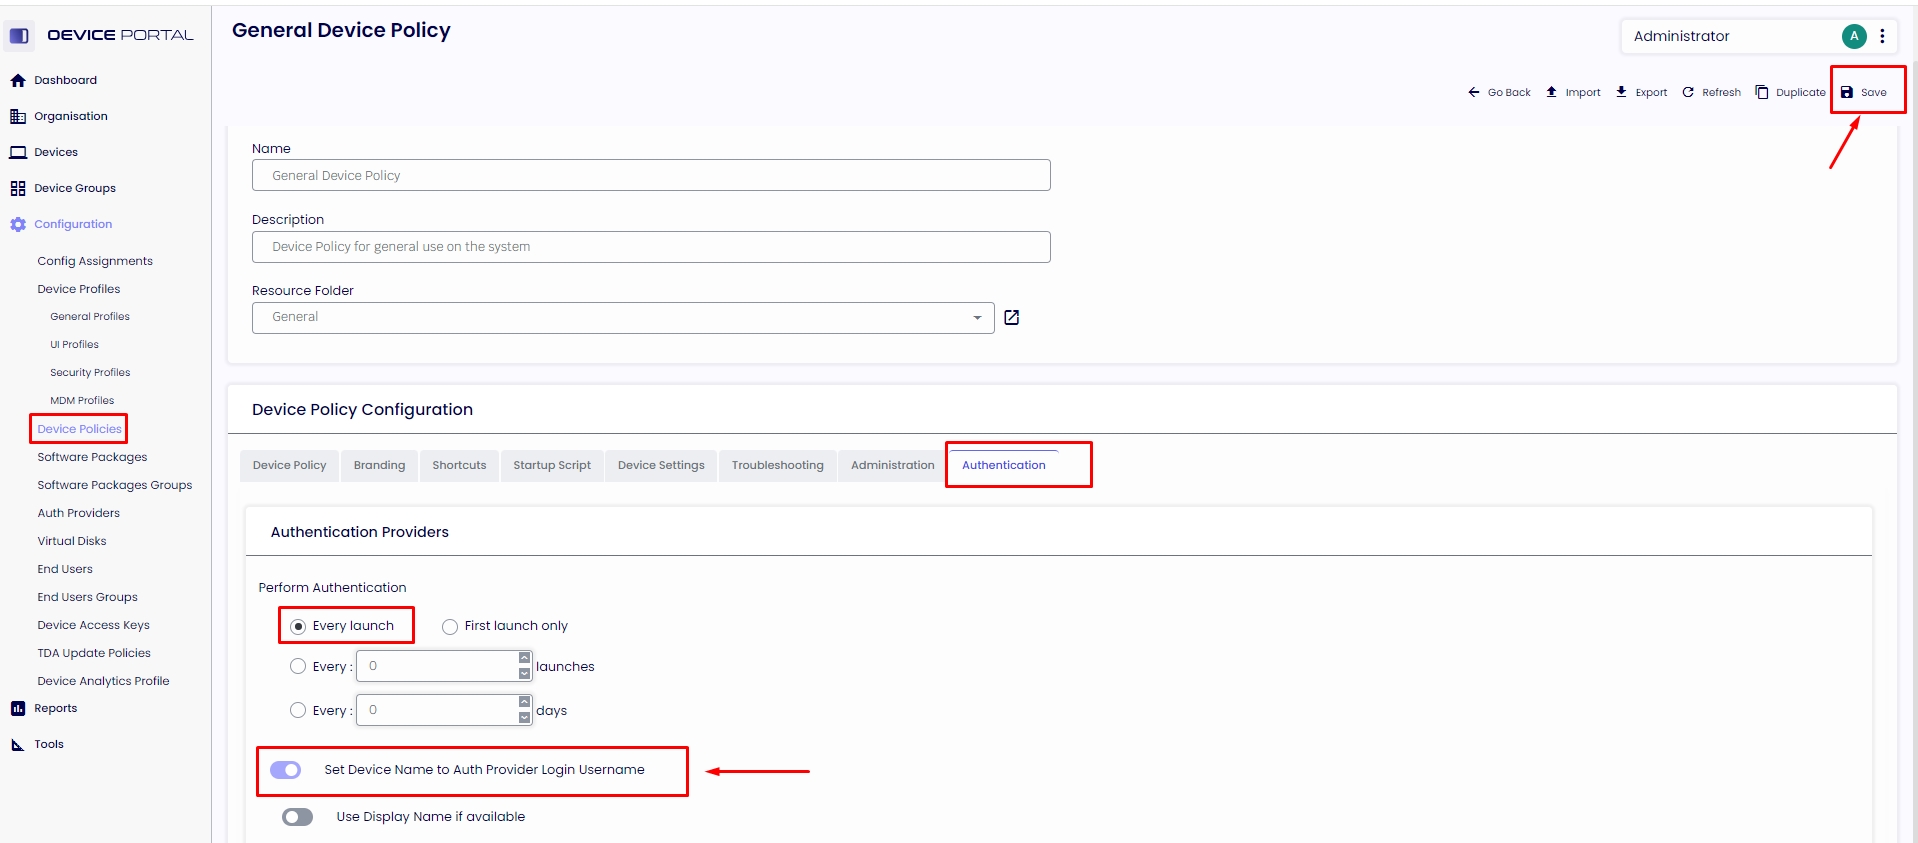
4.0. Please open the "Device Policies" in your management console, navigate to the “Authentication” tab, and select when the agent should see the authenticator provider. We recommend using the "Every Launch" option, which will require the agent to authenticate with your Azure whenever the session opens.

4.1. Additionally, you can opt to auto-rename the device on the console with the user credentials authenticated on Azure. For example, if the agent device is currently installed with the name "DESKTOP_8RE41ZF," enabling the "Set Device Name to Auth Provider Login Username" option will automatically rename the device to username@mycompany.com after the agent successfully authenticates with Azure.
4.2. The last step is to go to the folder and assign the auth provider you created.
Success
Finish line! You completed the Azure Auth provider setup.
v8 Cloud
STEP 1: SETUP AZURE
Warning
You must be an Azure Administrator or have enough permissions to create app registrations and grant API permissions.
1.1. Sign in on your Azure instance and click on App Registrations.
Info
If you can't see "App Registrations" under your Azure Services, click "More services."
1.2. Create a new registration.
1.3. Set a Name for your registration application, and under "Redirect URI (optional)," select the option "Public client/native (mobile & desktop)." Please add this URL: https://login.microsoftonline.com/common/oauth2/nativeclient and click on the button "Register."
1.4. Copy your "Directory (tenant) ID."
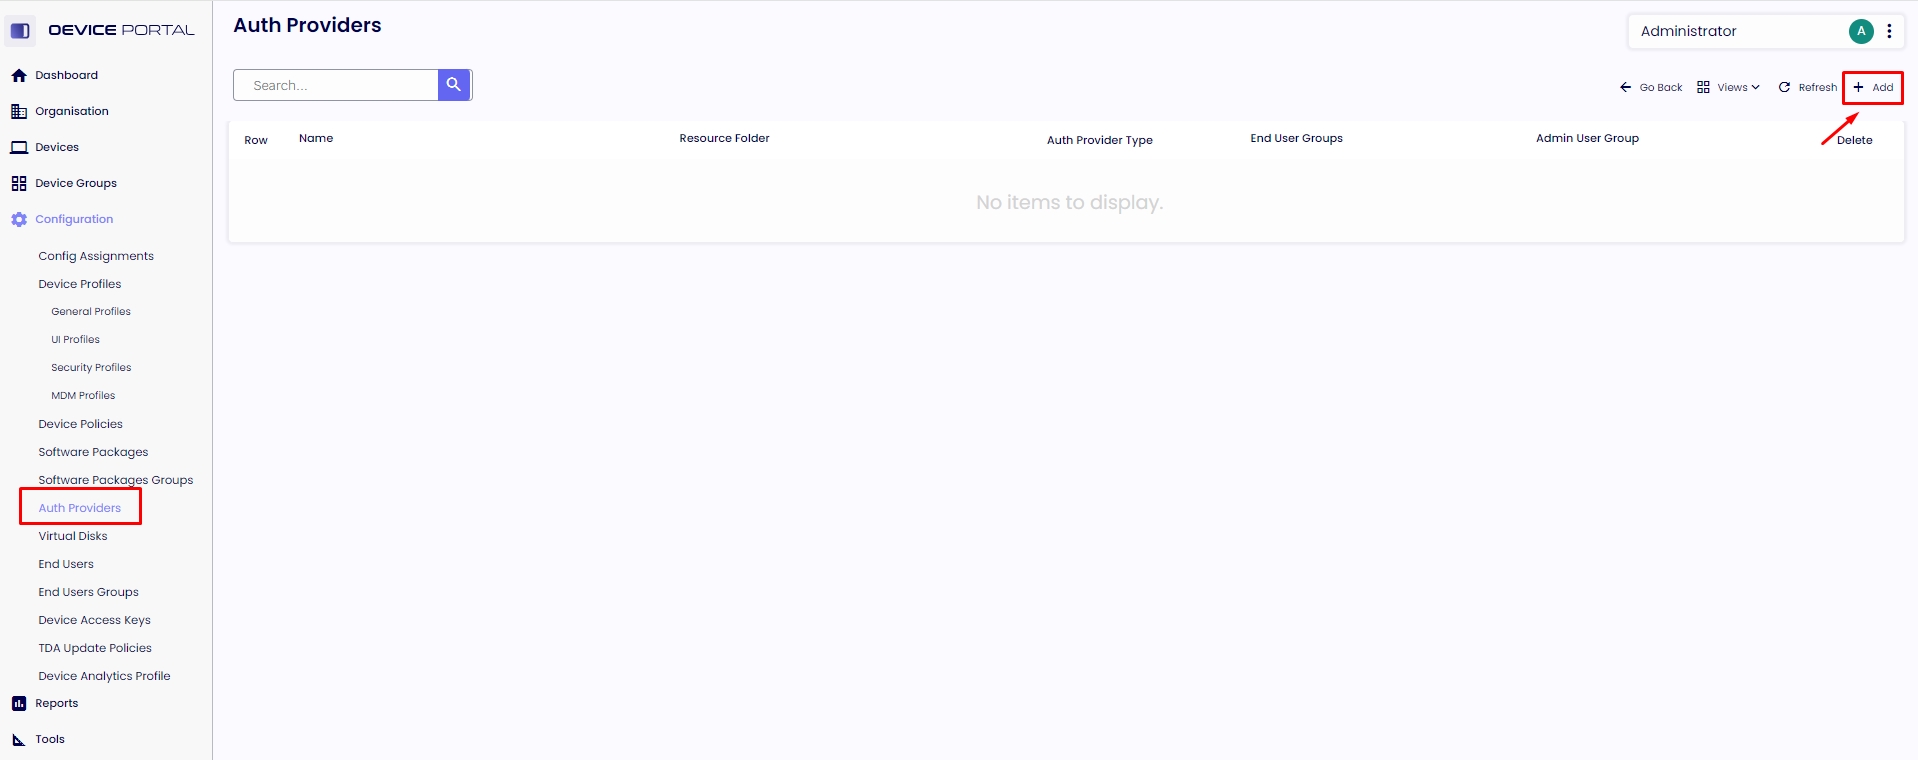
1.5. Create a new "Auth Provider" in your cloud management console. Navigate to “Configuration” - “Auth Providers” and click on the top left side “ + ” sign.
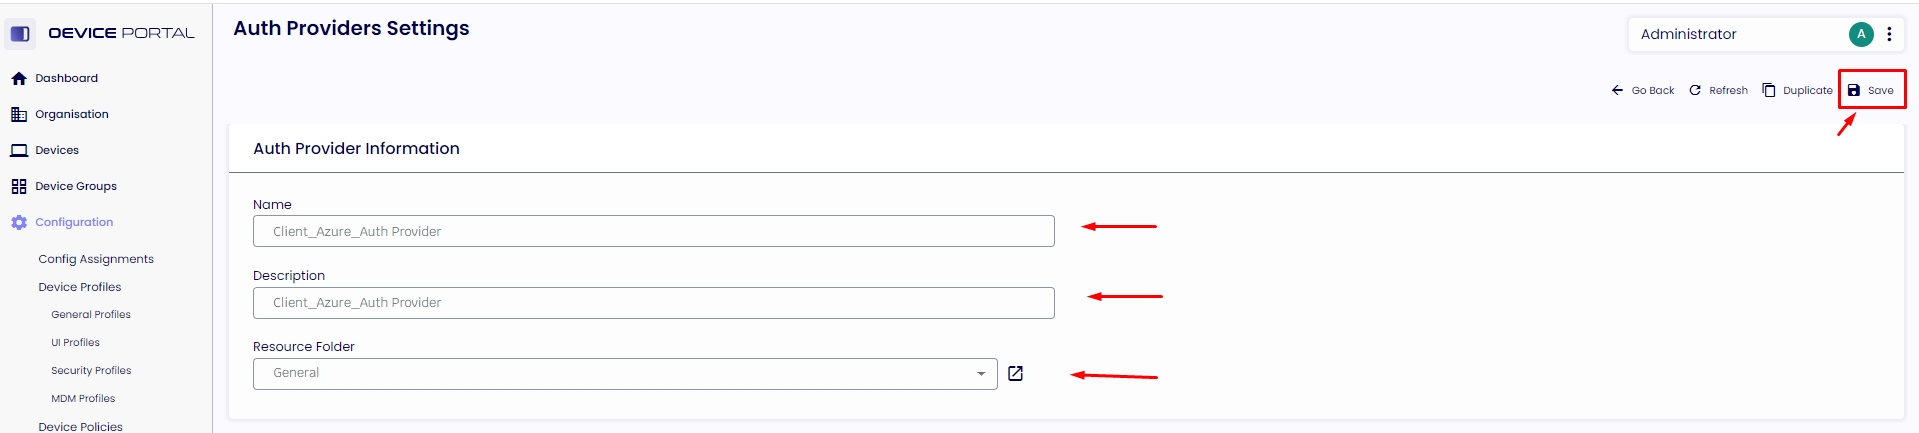
1.6. Type the "Name" and "Description" and select the “Resource Folder” to which this Auth Provider will be assigned.
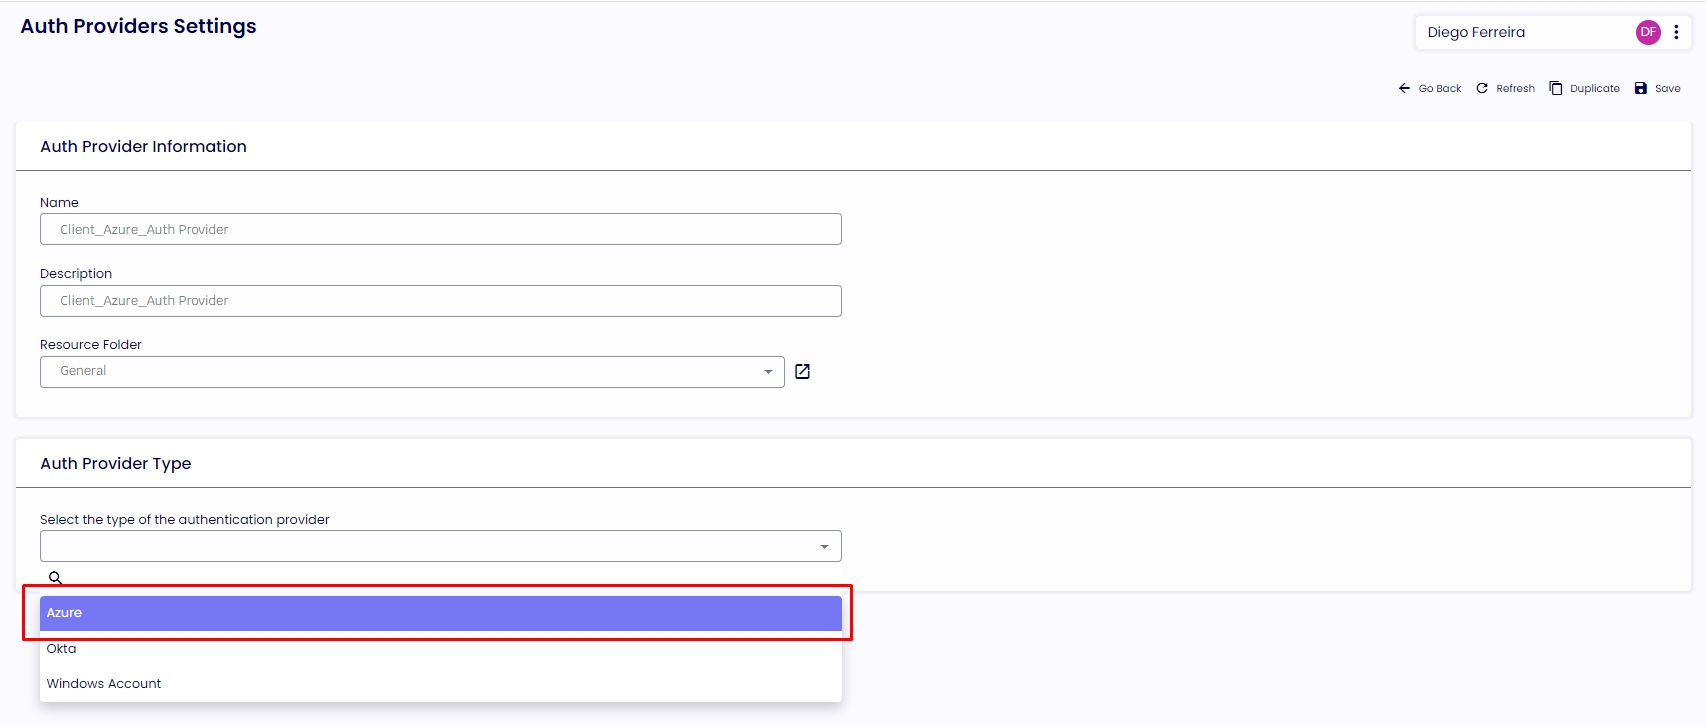
1.6.1. Select “Azure” under the Auth Provider Type.
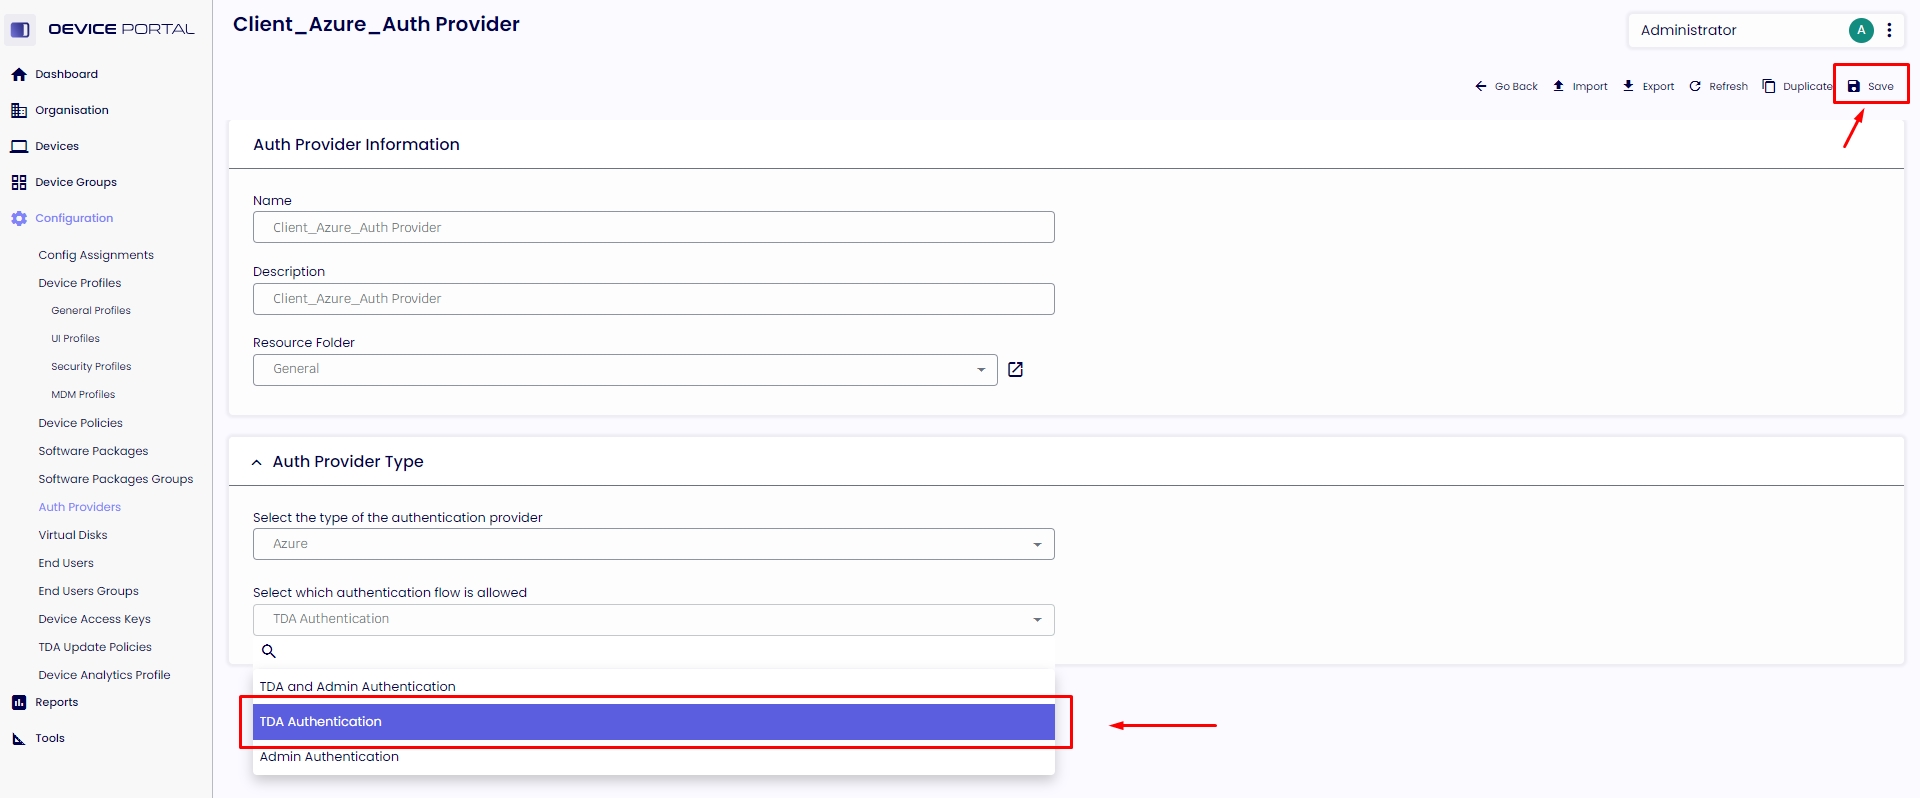
1.6.2. Under “Select which authentication flow is allowed,” select the option “TDA Authentication.” If you want to authenticate your management console, you should create a separate Auth Provider. Click on "Save" in the top right corner.
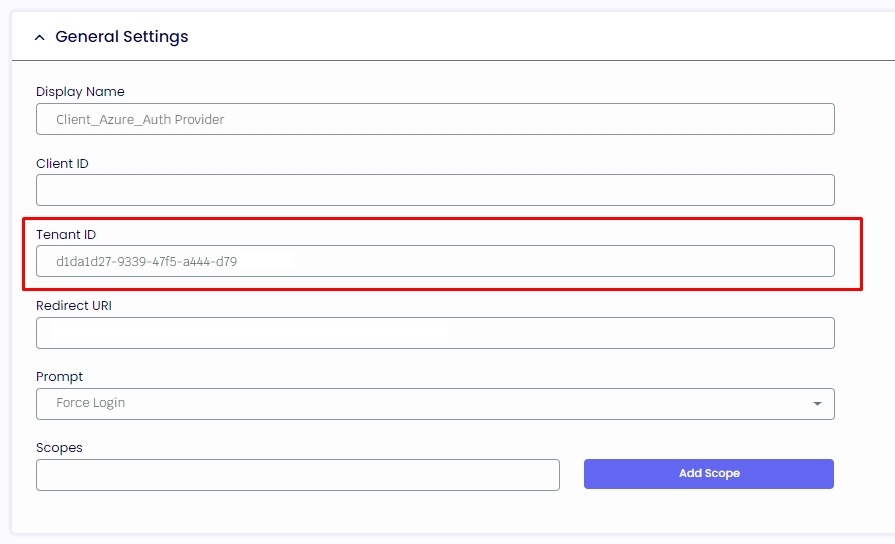
1.6.3. Expand the General Settings, type your "Display Name," and copy the "Directory (tenant) ID" to the "Tenant ID" field.
1.7. Now, return to your Azure and click "Authentication" on the left side to get the Redirect URIs. The management console will default prompt that URL https://login.microsoftonline.com/common/oauth2/nativeclient in the "Redirect Uri" field.
When selecting the “Admin authentication” the steps below are the same but additionally, inside the Authentication page select Add a Platform and select Web

Type your ThinScale Cloud Tenant URL
1.8. Please select the prompt user interaction according to your company's needs. The standard setup uses "Force Login."
ForceLogin = The user will be prompted for credentials.
SelectAccount = The authorization server's authorized endpoint, which would present to the user a list of accounts from which one can be selected for authentication.
AskConsent = Consent is the process of a user granting authorization to an application to access protected resources on their behalf. An admin or user can be asked for consent to access their organization/individual data.
1.9. Now, return to your Azure and click "Expose an API" and "Add a scope." Click on the "Save and Continue" button.
2.0. Type a "Scope Name" and change the consent to "Admins and users." It's mandatory to enter an "Admin consent display name" and an "Admin consent description." Leave the State "Enabled" and click on the button "Add scope."
2.1. Copy the created Scope API and return it to your management console. On the "Client ID" field, you will paste the value without api:// and Scope Name.
2.2. In the Scopes field, add your Scope API with api:// and click on the button “Add Scope”
2.3. The audience of Token Validation is your app's Application ID, assigned to your app in the Azure portal, or simply the Scope API without the Scope Name.
2.4. Please click on "Overview" on the left side and "Endpoints" and copy the "OpenID Connect metadata document."

2.5. If you enable MFA and the validation from the user account is set up, the agent will be asked to re-authenticate after the specified number of hours.
2.6. The Force Server-Side validation will ensure that not only the client Token is validated against an app registration in Azure, but it also gives the ThinScale server the capability to authenticate that the client token is a trust Token coming from the app registration and not an impersonate one.
2.7. Create a new app registration on Azure for the server-side validation and select the Redirect URL.
2.8. Set a Name for your registration application, and under "Redirect URI (optional)," select the option "Public client/native (mobile & desktop)." Please add this URL: https://login.microsoftonline.com/common/oauth2/nativeclient and click on the button "Register."
2.9. The display name you set for the registration will be the "API Name" on the management console.
3.0. Copy the "Application (client) ID" and paste it to your "Client ID" on the management console.
3.1. Back to your Azure, click "Certificates & Secrets" on the left side and "New client secret" on the new screen.
3.2. Set a description name for the client's secret and expiration date and click on the button "Add."
Attention
The administrator needs to maintain the key in good standing, which means they can't let it expire; otherwise, it will cause issues for the agent to authenticate. If you let the key expire, Azure will require you to create a new one, so please update your Auth Provider on the console as well.
3.3. Please copy the "Value" key created. It will be your "Client Secret Value" on the management console.
Warning
Ensure you copy your value key; leaving that screen, you will not be able to see the key anymore and will be required to create a new one.
3.4. Please go to "API Permissions" on the left side and click on "Add a permission," select "Microsoft Graph," then "Application permissions."
3.5. Scroll down until you find the “User” category, click on it, then select the checkbox “User.Read.All”, and click on the button "Add permissions.".
3.6. Make sure you have granted admin consent from your Azure tenant. The status should be in green "Granted for "tenant name," if you do not, please click on "Grant admin consent for "tenant name" " and click "Yes." If you don't have permission, please get in touch with your global admin Azure administrator.
3.7. Please click on "Overview" on the left side and "Endpoints" and copy the "Microsoft Graph API endpoint."
3.8. Please return to your management console and paste the Microsoft Graph API endpoint to the "Audience" field.
3.9. In the Azure Group Object Ids, you are allowing only agents members of at least one of the groups specified in the list to complete the authentication. At this stage, the configuration on Azure has been completed. Please click on “Save” at the top right corner of the page.
4.0. Please navigate to the “Device Policies” option from the menu, select your policy, go to the “Authentication” tab, and select when the agent should see the authenticator provider. We recommend using the "Every Launch" option, which will require the agent to authenticate with your Azure whenever the session opens.
4.1. Additionally, you can opt to auto-rename the device on the console with the user credentials authenticated on Azure. For example, if the agent device is currently installed with the name "DESKTOP_8RE41ZF," enabling the "Set Device Name to Auth Provider Login Username" option will automatically rename the device to username@mycompany.com after the agent successfully authenticates with Azure then click on the top right corner “Save.” 
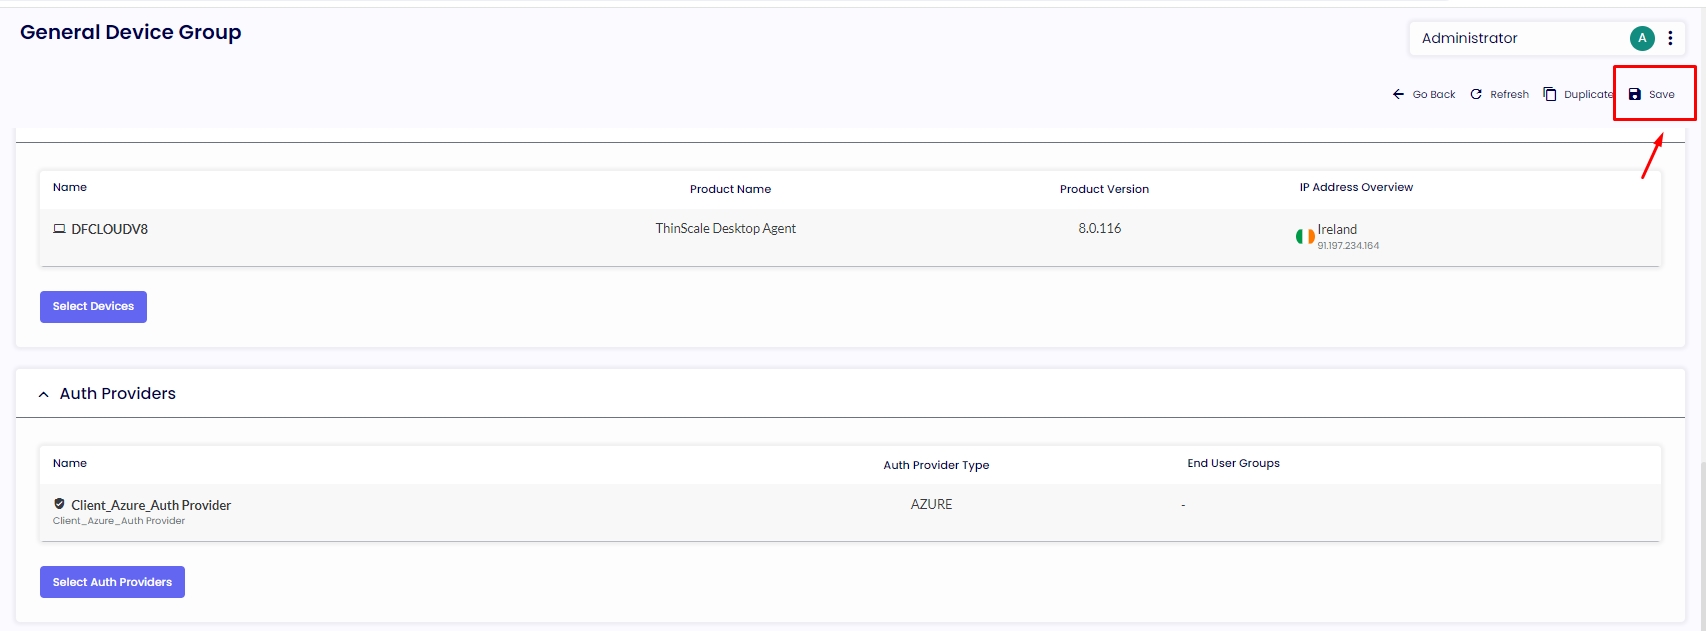
4.2. The last step is to go to the “Device Group,” select your device group, navigate to the “Auth Providers" tab, and click on the button “Select Auth Providers," select the Auth Provider you created and click in “Save” on the top right corner. Click on “Save” on the following page.


Success
Finish line! You completed the Azure Auth provider setup.
Prior v7.x (SRW/TK) and v8 (TDA) on-premises on the same ThinScale Console
The Azure setup is the same as described in the accordions above for v7.x and v8 on-premises. The only difference is that the Secure Remote Worker (SRW) and ThinKiosk (TK) use the “Default Device Properties” to set the authentication for every launch and rename the device on the console. The TDA (v8) settings are in “Device Policies” under the “Authentication” tab. If you use a hybrid environment, you need to enable those options for the TDA client to use the Azure Auth provider and get renamed on the console.
Prior v7.x

v8 On-premises