Creating & Editing SP
How to work with Software Packages + Example of creating an .msi package. #MC-KB15

Written by
Last published at: December 23rd, 2024Introduction
Before we start, we have a secondary article on editing your current software and a section with template scripts you can use. Both articles are complementary to each other. Take a minute and read both of them. |
Software packages are deployed from the server to the client. They go through the Download process and then automatically onto the Installation process. If the package is configured to reboot upon installation, it will also perform the reboot.
|
Location of packages
Server:
Typically when a package is created in the console, it is stored in the server's repository in this path:
C:\Program Files (x86)\ThinScale Management Server\PackageRepository
The package will carry the name of it's Package GUID:

To identify the package, you can locate it quickly in the console:

Client:
On the client, the package will be downloaded to a temporary location for installation:
C:\Program Files (x86)\SRW\Update6396\Packages
C:\Program Files (x86)\ThinKiosk\Update6396\Packages
Once installed, the package is removed.
Getting Started
Application details
The most important step is understanding the application you're creating the package for.
- Where is the installation directory? %ProgramFiles%, %LocalAppData% , etc. This will determine the detection method (if the application is already installed on the client) and the installation process (per user or typical computer installation). "Per user" the installation is endemic to software like MS Teams, softphones, etc.
- Is the installer in EXE or MSI format?MSI is a Windows installer package file format, and it typically uses a uniform set of arguments/parameters for installation for all applications in this format. To see which those are, call the Command Prompt and type:
msiexec ?

EXEs are installation bundles containing one or more .msi files, along with other configuration items, images, etc. In order to discover the arguments for installation (for example /silent), you should search the developer's site, as they usually provide these for system administrators.
- Are there any configuration files required additionally to make the application work on the client? For example, A VPN client may need a configuration file that points the VPN client to the VPN server so that the end-user does not have to add the server information or ports himself.
Creating a new package [VBScript] (example)
In this example, we will be using the Skype.msi installer.
If you have an application for which a developer offers a .msi installer, and if you do not require any specific additional configuration, it is the best way to go because of the nature of the .msi file format - all arguments are the same.
In this example, we're creating the latest Skype package via the .msi installer.
- Download the .msi installer (the link will automatically download the latest version: https://www.skype.com/go/getskype-msi and place it somewhere on the server. The initial download folder is irrelevant; once the package is created, it will be in the server repository.
- Acquire the basic application details. Unless you know or have researched the basic application details, you can discover it by installing it in a test environment. Run the installation on a test VM and find the installation directory. With this, we've discovered the following:
- Installation directory is: C:\Program Files (x86)\Microsoft\Skype for Desktop or shorter: %ProgramFilesx86%\Microsoft\Skype for Desktop
- The installation is not Per User installed (due to it not being installed in the App Data folder
- Start creating the package in the Thinscale Management Console by clicking the "Package Creator" icon on the ribbon bar:

Package Creator
Clicking the New Package icon starts the creation of the package type.
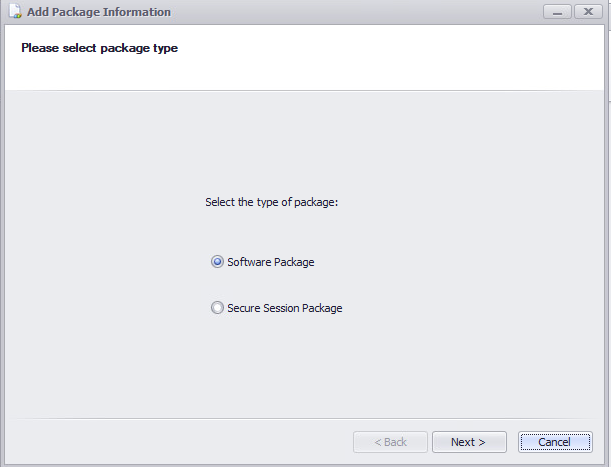
For this purpose, we are creating a regular software package, so we'll go with 'Software Package' and click Next.
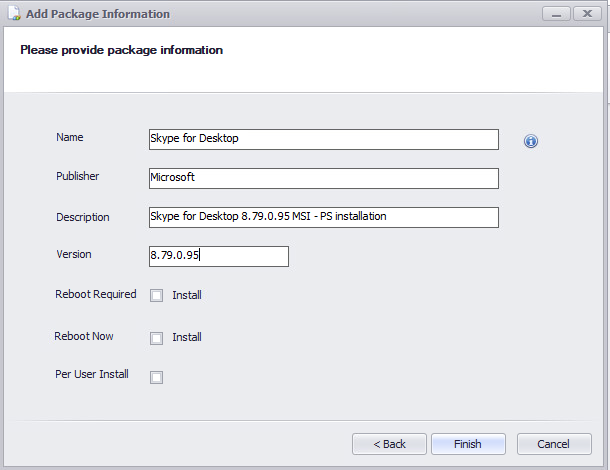
We are then required to fill in the basic details of the software. Click Finish when you've completed the form.
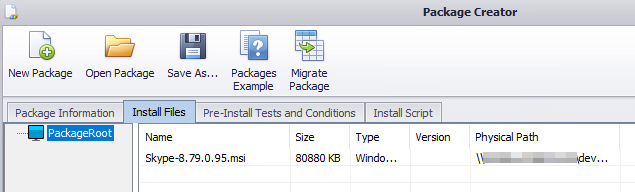
We are presented with several tabs now. The Install Files should contain the Skype *.msi installer, so we'll right-click on the white field and choose 'Add Files'.
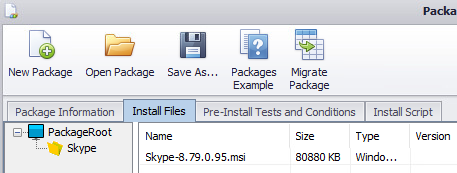
Browse to your MSI and attach it to the root folder.
|
NOTE: You can create folders within the package. Only make sure to call the file with the folder within the script. Example: Skype\Skype-8.79.0.95.msi instead of just Skype-8.79.0.95.msi 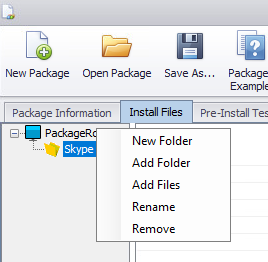
|
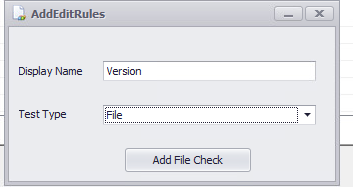
The Pre-Install Tests and Conditions represent the detection method and is not mandatory, but if you leave this empty then the package will install every time the Secure Remote Worker or Thinkiosk UI is launched. In this example, the Pre-Install Test will be the location of an existing Skype installation and it's version. This can be a registry key or a file. The simplest way is to go with a file. Right-click the field and choose Add.
- Display Name is the name of what we're looking for. We will not only be looking for the presence of Skype.exe file, but also its version. So we'll call this field "Version".
- Test Type will be "File". Click Add File Check.

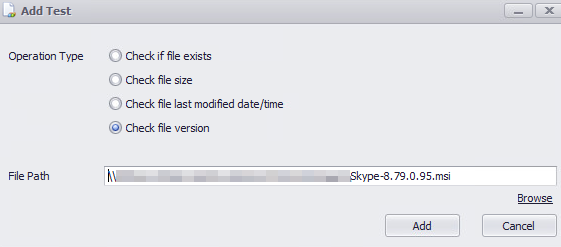
- Operation Type is our detection method. So we are looking to install Skype only when the currently installed version is lower than 8.79. So we'll go for "Check file version".
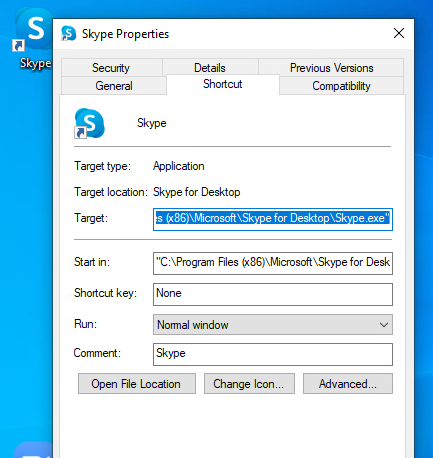
- File Path is the directory where the software package will look for Skype.exe. Typically this would be C:\Program Files (x86)\Microsoft\Skype for Desktop\Skype.exe, but in order to be absolutely sure, install the application somewhere manually, right click the exe and you will see the target path:

So now we're looking at this. Click Add to proceed.

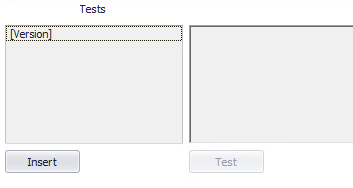
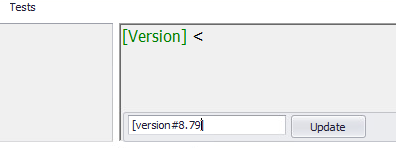
- The Tests section is where we set up the detection method itself. We've just told the software package to look for Skype.exe file and its file version. Now we need to tell it what to do with it. This field is semi-automated and it offers commands for convenience. So you will see the name of your Pre-install Test in the left box as [Version].
- If you click the Insert button, this will show the operators on the left side, and then it will offer you the rest of the command.
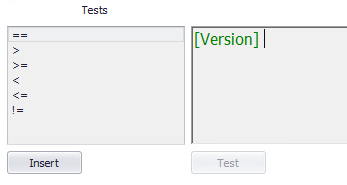
- The expressions are self-explanatory (is, is greater than, is greater than or equal,...). Logically, we want the package to install if the version is lower than the one currently installed on the client. So choose the fourth option from the left box.
- Another field will appear now, where we should write the version number of the software we're installing. Click Update to insert the value into the field.
- Our detection method is done even though the left field is offering you to continue the detection method expression. You would use this if you have multiple conditions only.

You also have the option to create script-based pre-install checks for greater customization.
Please refer to our pre-install script test KB for more detailed information and some examples.
For example, if you are installing a software and copying a file into a directory. You would use the && expression.
The install script tab is where the actual installation commands will be written. For .msi, the simplest one that works is the following:
|
On Error Resume Next Set objShell = CreateObject("WScript.Shell") objShell.Run "msiexec.exe /i *.msi", 0, True WScript.Quit() |
- Because we want this particular software package to be installed silently, or in other words we don't want our end-user to see or interact with the installation window, we will be adding the /qn argument after the .msi, which stands for "quiet" and "No UI".
We can save our package now by using the Save As.. button on the ribbon.
Exit the package creator and the sequence will ask you if you want to load the new package into your console. The purpose for this is historical backtracking. You can create multiple packages of the same software and delete the ones that don't work later.
Our package is now done and loaded into the console.
Creating a new package [PS Script] (example) - sofware v. 7.2 and above only
With the release of 7.2 version, packages can also be created utilizing a Powershell scripts instead of VB Script.
In this example we will be using Skype.msi installer.
If you have an application for which a developer offers an .msi installer, and if you do not require any specific additional configuration, it is the best way to go because of the nature of the .msi file format - all arguments are the same.
In this example we're creating the latest Skype package via .msi installer.
- Download the .msi installer (the link will automatically download the latest version: http://www.skype.com/go/getskype-msi and place it somewhere on the server. The initial download folder is irrelevant as once the package is created, it will be located in the server repository.
- Acquire the basic application details. Unless you already know or have researched the basic application details, you can discover it all by simply installing the application in a test environment. Run the installation on a test VM and find the installation directory. With this we've discovered the following:
- Installation directory is: C:\Program Files (x86)\Microsoft\Skype for Desktop or shorter: %ProgramFilesx86%\Microsoft\Skype for Desktop
- The installation is not Per User installed (due to it not being installed in the App Data folder)
- Start creating the package in the Thinscale Management Console by clicking the "Package Creator" icon on the ribbon bar:
Package Creator
Clicking the New Package icon starts the creation of the package type.

For this purpose we are creating a regular software package so we'll go with 'Software Package' and click Next.

We are then required to fill in the basic details of the software. Click Finish when you've completed the form.

We are presented with several tabs, now. The Install Files should contain the Skype msi installer, so we'll right-click on the white field and choose 'Add Files'.
Browse to your MSI and attach it to the root folder.
|
NOTE: You can create folders within the package. Only make sure to call the file with the folder within the script. Example: Skype\Skype-8.79.0.95.msi instead of just Skype-8.79.0.95.msi
|
The Pre-Install Tests and Conditions represents the detection method and is not mandatory, but if you leave this empty then the package will install every time the Secure Remote Worker or Thinkiosk UI is launched. In this example, the Pre-Install Test will be the location of an existing Skype installation and it's version. This can be a registry key or a file. The simplest way is to go with a file. Right-click the field and choose Add.
- Display Name is the name of what we're looking for. We will not only be looking for the presence of Skype.exe file, but also its version. So we'll call this field "Version".
- Test Type will be "File". Click Add File Check.
- Operation Type is our detection method. So we are looking to install Skype only when the currently installed version is lower than 8.79. So we'll go for "Check file version".
- File Path is the directory where the software package will look for Skype.exe. Typically this would be C:\Program Files (x86)\Microsoft\Skype for Desktop\Skype.exe, but in order to be absolutely sure, install the application somewhere manually, right click the exe and you will see the target path:
So now we're looking at this. Click Add to proceed.
- The Tests section is where we set up the detection method itself. We've just told the software package to look for Skype.exe file and its file version. Now we need to tell it what to do with it. This field is semi-automated and it offers commands for convenience. So you will see the name of your Pre-install Test in the left box as [Version].

- If you click the Insert button, this will show the operators on the left side, and then it will offer you the rest of the command.

- The expressions are self-explanatory (is, is greater than, is greater than or equal,...). Logically, we want the package to install if the version is lower than the one currently installed on the client. So choose the fourth option from the left box.
- Another field will appear now, where we should write the version number of the software we're installing. Click Update to insert the value into the field.

- Our detection method is done even though the left field is offering you to continue the detection method expression. You would use this if you have multiple conditions only.

For example, if you are installing a software and copying a file into a directory. You would use the && expression.
Utilizing && (AND) or || (OR) functions to Assess Multiple Pre-install Conditions
The general function of the Pre-Install Tests works by check the condition(s) listed, and if the overall result is “False”, then the need for installation is not present and the software does not needlessly install. If the overall result is “True”, it assesses that it’s true that the software is needed and will proceed to install.
Vs

When to utilize the && (AND) function:
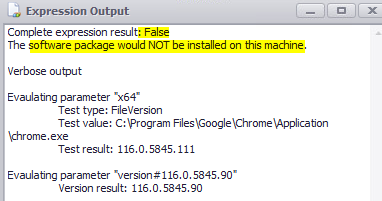
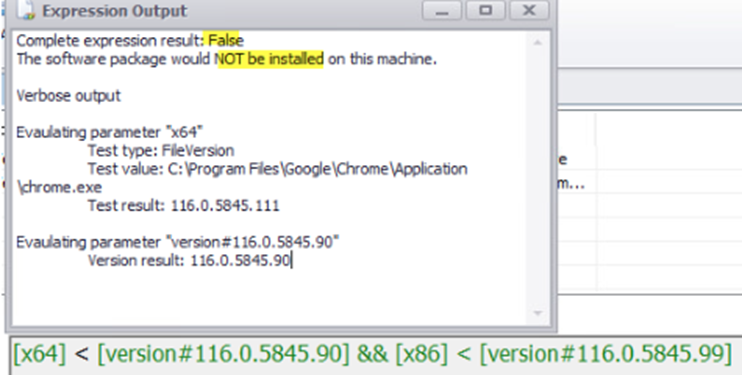
With the AND function in the Pre-Install Test, for the result to be that the software is not needed to be installed, one of the conditions of 'False' must be met.
For the Google Chrome example below, the check is inspecting first whether the 64-bit edition is in need of upgrading. On my PC here, it is judged that my Chrome version has no need for upgrade, so the one "false" result makes the AND statement false as a whole and thus the software does not install as it is not needed.
…………………………………………………………………………………………………………………………………………………………….......................................
When to utilize the || (OR) function:
The OR function will result in software being installed if all of the condition checks get a result of “True”. The logic works as in “if Condition 1 returns True OR Condition 2 returns True, then the final result is True and software will be installed”
The test looks at the final result of each condition and will always proceed to install the software unless a “False” result is reported from each.
For the VMWare Horizon example below, we are requiring that both the registry key is present AND that the application version is up-to-date. If either condition is giving an end result of “True”, the software package knows it needs to proceed to install so that each conditional requirement is met:
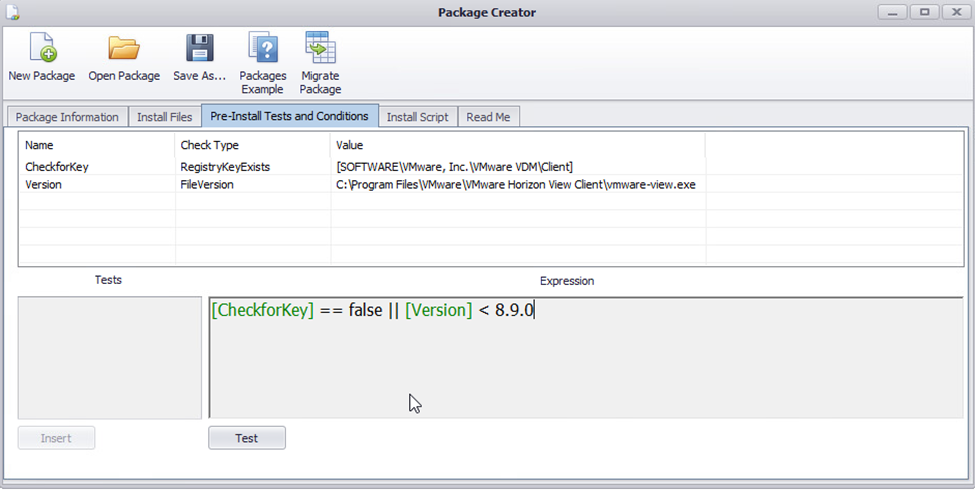
Let’s say my machine lacks the required registry key, yet its vmware-view.exe is already up-to-date. We launch ThinKiosk or SecureRemoteWorker and the process is as follows:
- When the check begins running as it’s set to upon launch of ThinKiosk/SecureRemoteWorker, the condition of [CheckforKey] will indeed output “false”. So the test of the expression “[CheckforKey] == false” will have a end result of “True” since it’s true that it’s absent. Our first condition will have the “True” end result, so the software knows that it’s True that the software must be installed.
- The software package is installed. Then upon the next launch of ThinKiosk/SecureRemoteWorker, now it will re-assess and it will judge the expression“[CheckforKey] == false” as a False condition since now the key is present and good to go. Then it judges our [Version] is up-to-date (let’s say our software is 8.9.10 version which is greater than 8.9.0 that we were checking for). So the [Version] end result also comes out to “False”. Both/all tests result in “False”, thus the software package knows there is no need to install needlessly.
The install script tab is where the actual installation commands will be written. For .msi, the simplest one that works is the following:
|
$MSI = "Skype-8.79.0.95.msi" $arguments = "/I $MSI /quiet" ### Run installation Start-Process msiexec.exe -Wait -ArgumentList $arguments |
- Because we want this particular software package to be installed silently, or in other words we don't want our end-user to see or interact with the installation window, we will be adding the /quiet argument after the .msi.
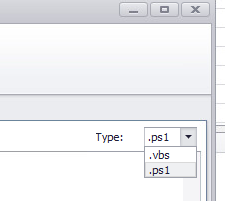
Make sure you change the script type as well:
6. We can save our package now by using the Save As.. button on the ribbon.
Exit the package creator and the sequence will ask you if you want to load the new package into your console. The purpose for this is historical backtracking. You can create multiple packages of the same software and delete the ones that don't work later.
Our package is now done and loaded into the console.
Testing the software package
The Console
Just creating the software package is not enough, because even if the software installs successfully, it will still not appear in the Application dashboard unless you make it available in the profile under the Local Applications.
Remember the detection method? We used the Skype.exe file to detect if it's installed or not in the client. Use the same path for adding the Local Application. So you should have something like this:

Last step is to assign the Software Package to the Device Folder of the devices which need to have Skype deployed. Click the Device Folder, on the right-side pane choose Software Packages tab and click the Assign button to add our new package.
The Client
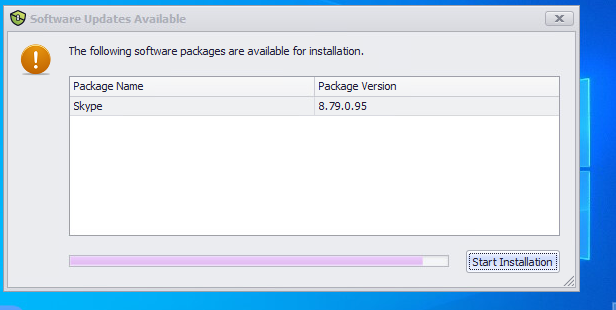
Launch your SRW or ThinKiosk test machine/VM. In this example I will be using one with SRW. If the package is created correctly, you will be able to see the installation popup window (depending on your software installation settings in the profile) as soon as the machine service of SRW detects new Software Packages assigned to the Device Folder.
If we hit Start installation, we will see the Download and Install progress of the package.
Once SRW starts, since we added the shortcut to Skype.exe under Local Applications, we can now see it under the Application Dashboard:
Always make sure the application is running afterwards: