
SECURE BROWSER
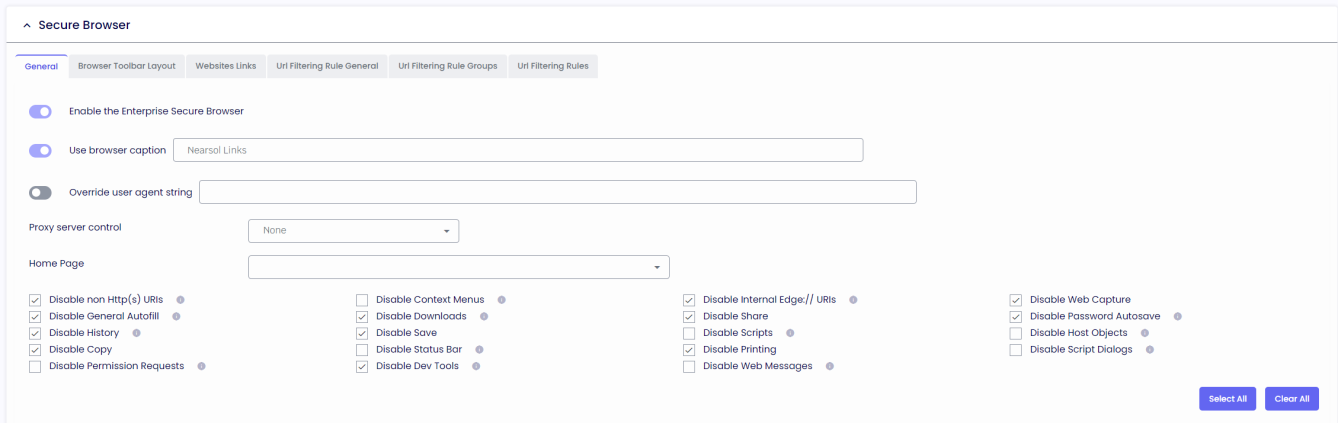
Enable the Enterprise Secure Browser
If enabled, the browser will be opened inside the TDA UI.
Use browser icon caption
Provides a caption to use for the browser tab icon.
Override user agent string
A custom user agent string can be sent in the User-Agent HTTP header whenever it requests any site.
i.e.: Mozilla/5.0 (Windows NT 10.0; Win64; x64) AppleWebKit/537.36 (KHTML, like Gecko) Chrome/117.0.0.0 Safari/537.36
Proxy server control
If enabled, the browser will detect whether the proxy option is enabled on the user's desktop.
VDI Control
Log out of Citrix Web Interface / StoreFront when a session is launched
If enabled, TDA will automatically log out of the ThinScale Connector and the Citrix StoreFront / Web Interface website after launching a resource.
Clear browsing data after Citrix Web Interface/ Storefront logoff
If enabled, TDA will automatically clear the browser session after a Storefront is manually or automatically logged off.
Browser Toolbar layout 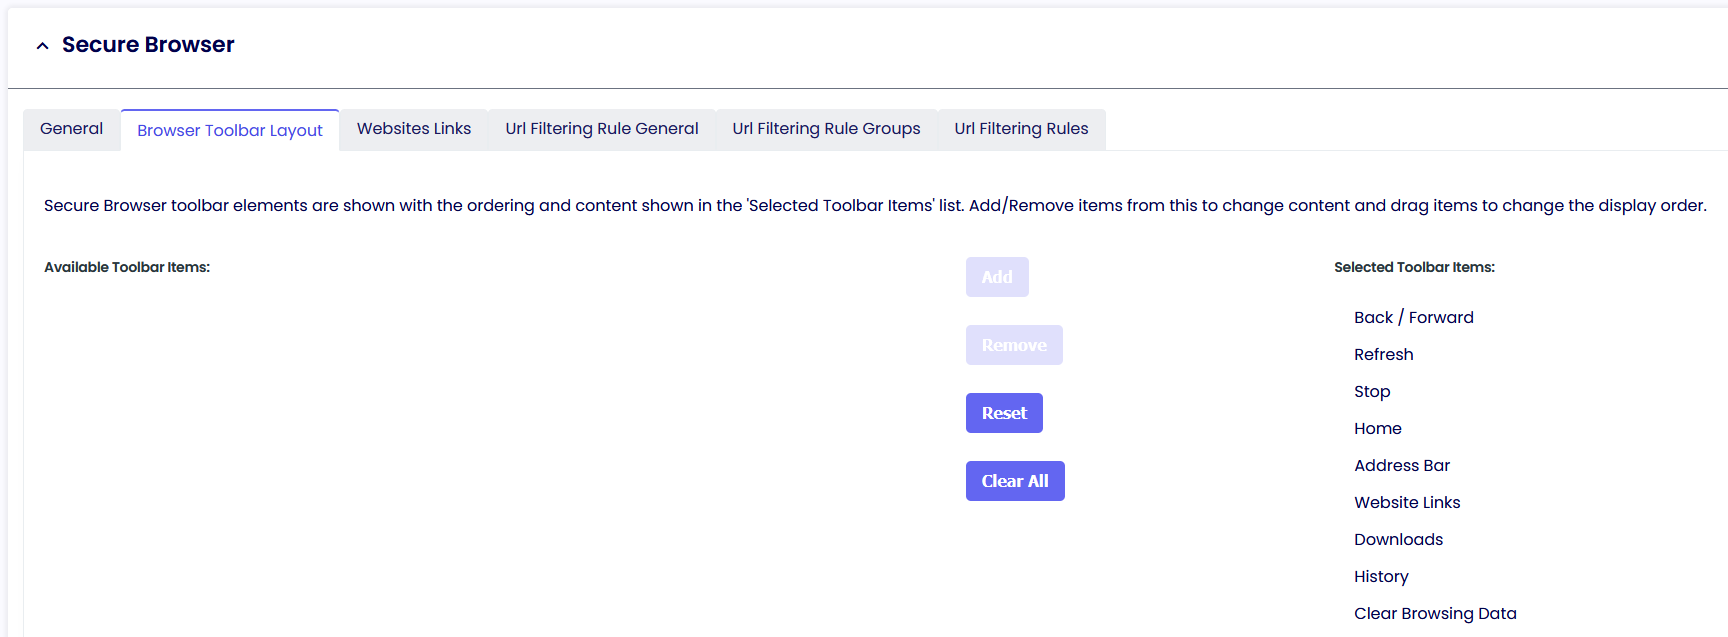
Secure Browser toolbar elements are shown with the ordering and content in the 'Selected Toolbar Items' list. Add/Remove items from this to change content and drag items to change the display order.
Website Links 
URL Filtering Rule General 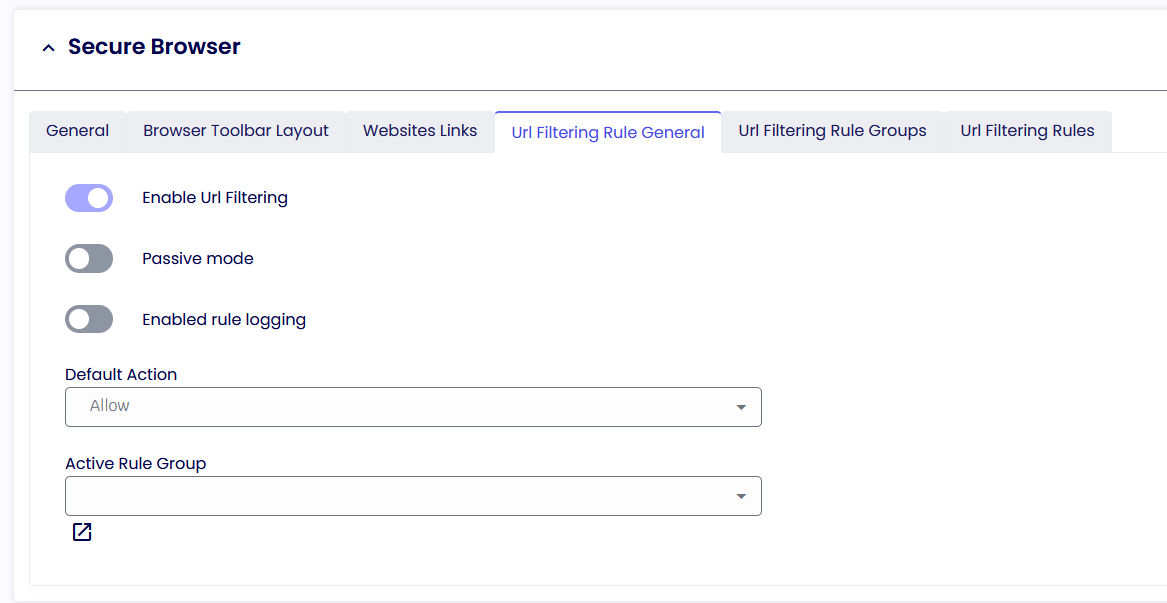
Default Action
The Default action is used to either whitelist (Allow) or Blacklist (Block) if any website browsed by the user is not found in the Url Filtering Rules.
If you would like to Block ALL websites and only allow some of them, your default action should be set to Block, and the Url Filtering Rules will be set to Allow.
If, on the other hand, you want to Allow ALL and only block certain websites considered “dangerous,” your default action should be set to Allow, and the Url Filtering Rules will be set to Block.
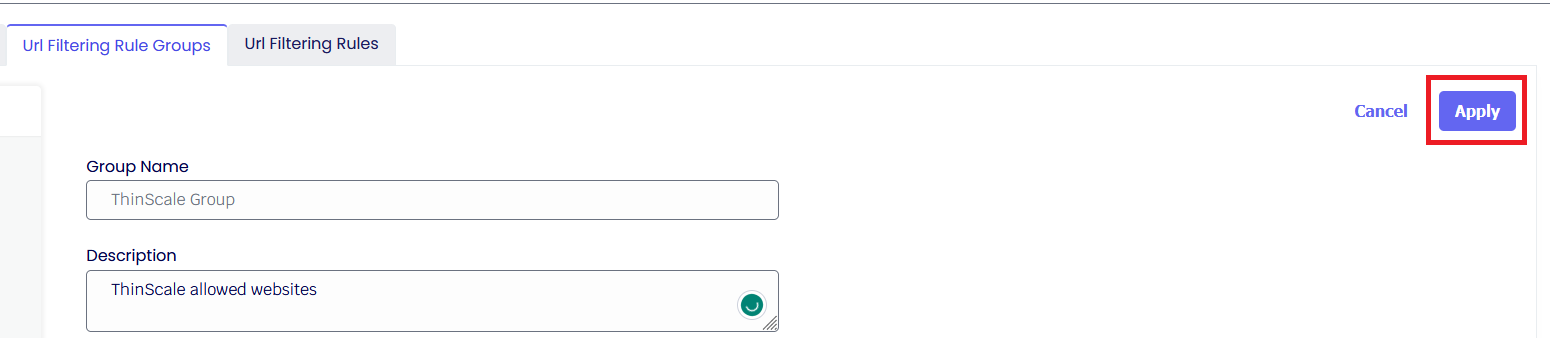
Active Rules Groups
For example, the active rule group is used to group URLs of the same category.
i.e., the Google group may have all G-Suite URLs, the Finance group may have access to Workday URLs, and so on.
To Create a Rule Group, give it a name and a description and click Apply.
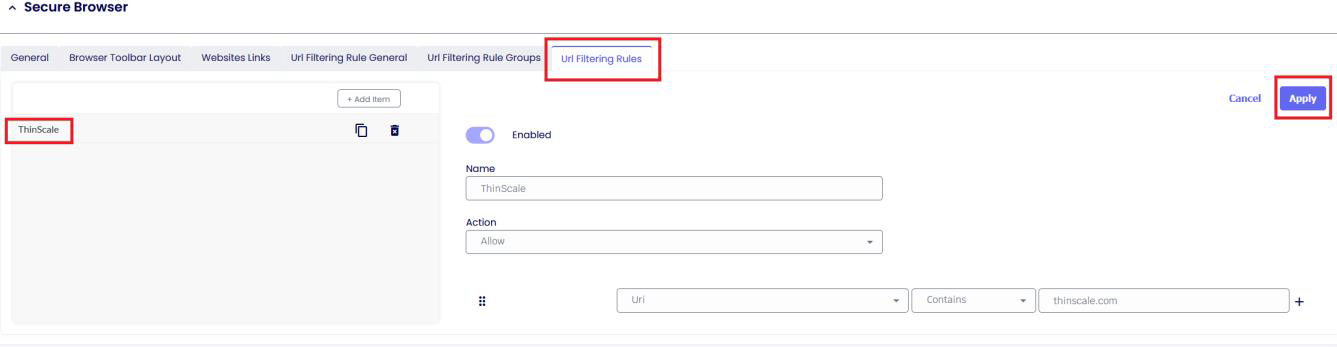
Browse the Url Filtering Rules now. Switch the Enabled button, add a website with the preferred rule, and click Apply.

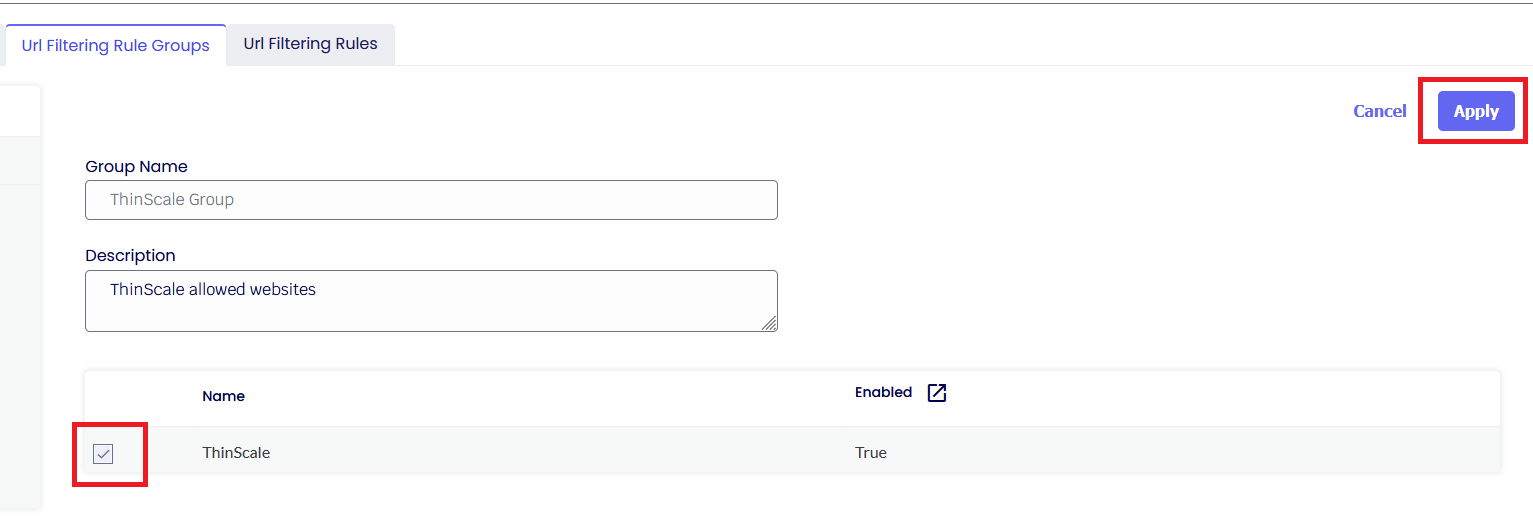
Once done, return to your Rule Group, select the newly created Rule, and click Apply.
Original string - e.g., the original string of the URL http://www.contoso.com:80//thick%20and%20thin.htm is http://www.contoso.com//thick and thin.htm
Scheme - e.g., https
Host - e.g., the host part of the URL https://thinscale.com/contact is thinscale.com
Absolute Path - e.g., the absolute path of the URL https://thinscale.com/contacts is /contacts
Query - e.g., the query of the URL http://www.contoso.com/catalog/shownew.htm?date=today is ?date=today
Port - e.g., the port of the URL https://thinscale.com/contact is 443
SECURITY PROFILES
Below, you will find an explanation of all the options within the Security Profiles options.
Dual Persona
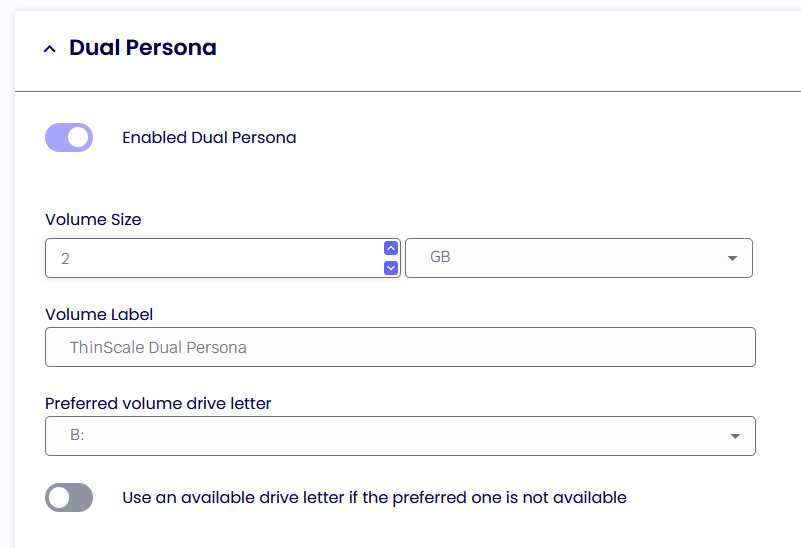
Enable Dual Persona
Dual Persona lets you move the TDA local Windows user profile away from the local hard drive of the personal device (C:\Users) to an encrypted virtual volume.
TDA manages the encrypted virtual volume and is only made available when the TDA is active.
When enabled, users can only save data to this encrypted volume. All other locations, including all local hard drive volumes, are marked read-only when accessed from within the TDA session. Only applications running inside the TDA session have access to the virtual volume.
Volume Size
Select the maximum size of the virtual volume. The Dual Persona volume is dynamically sized, so it will only consume actual hard disk space when data is saved.
Volume Label
Specify the formatted volume label of the Dual Persona volume.
Preferred Volume Drive Letter
Select the drive letter that will be assigned to the Dual Persona volume.
Use an available drive letter if the preferred one is not available
If enabled and the preferred driver letter is in use on the local device, SRW will use the first available drive letter on the device.
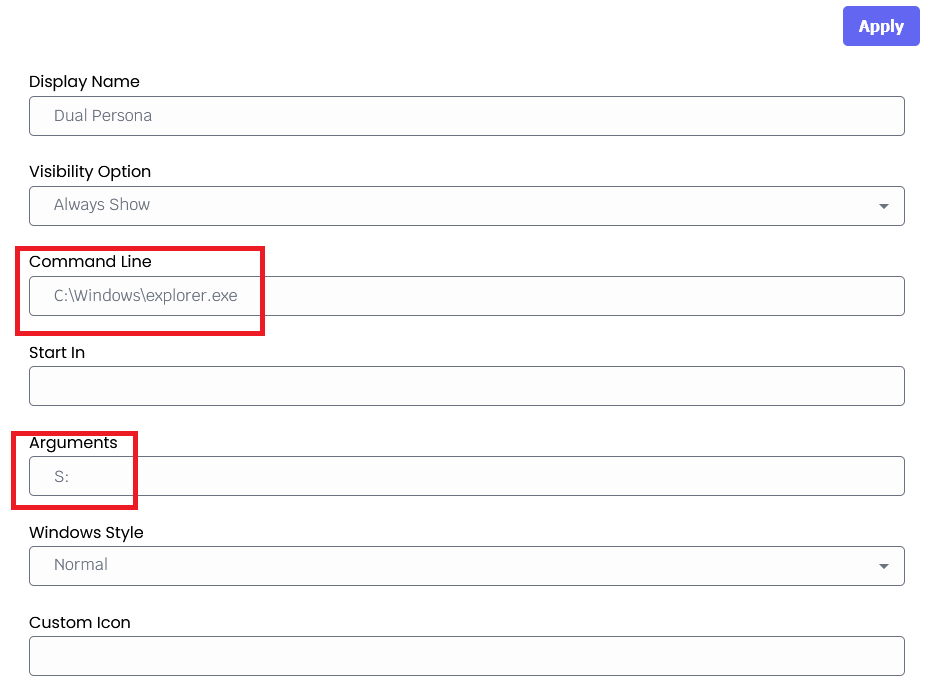
To have the DP and TS drives available within the TDA session, a local path needs to be created within the UI Profiles > Application tab like so:
Local device restrictions also need to apply General Profiles > Local Device Restrictions like so:

Temporary Storage
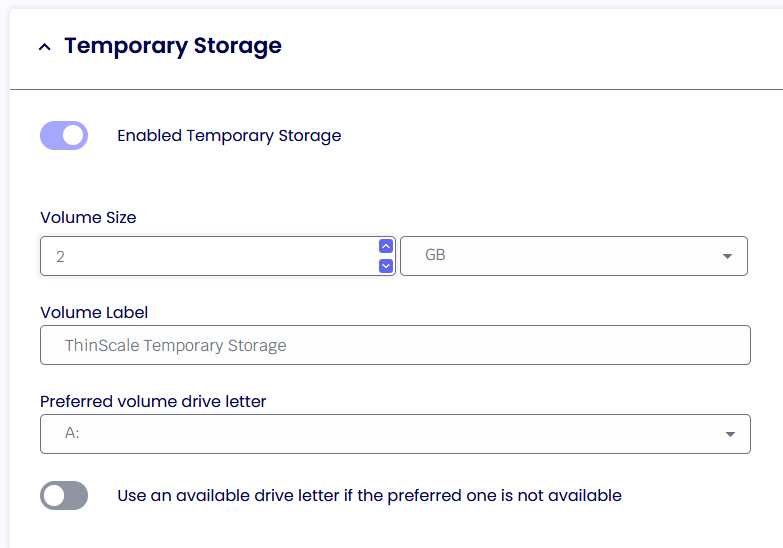
Enable Temporary Storage
Temporary Storage lets you create a temporary encrypted virtual volume on the personal device that users can use to save data from within the TDA session.
TDA manages the encrypted virtual volume and is only made available when the TDA is active.
Volume Size
Select the maximum size of the virtual volume. The Temporary Storage volume is dynamically sized, so it will only consume actual hard disk space when data is saved.
Volume Label
Specify the formatted volume label of the Temporary Storage volume.
Preferred Volume Drive Letter
Select the drive letter that will be assigned to the Temporary Storage volume.
Use an available drive letter if the preferred one is not available
If enabled and the preferred driver letter is in use on the local device, SRW will use the first available drive letter on the device.
To have the DP and TS drives available within the TDA session, a local path needs to be created within the UI Profiles > Application tab like so:
Local device restrictions also need to apply General Profiles > Local Device Restrictions like so:
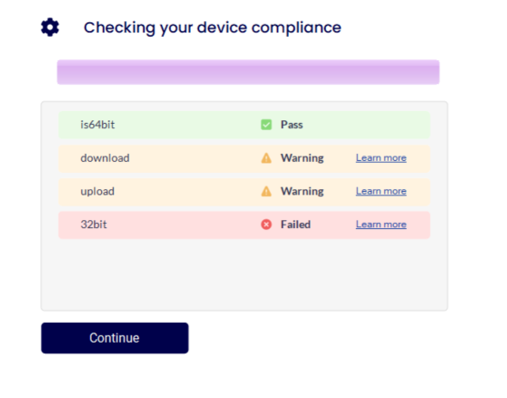
Access Policies
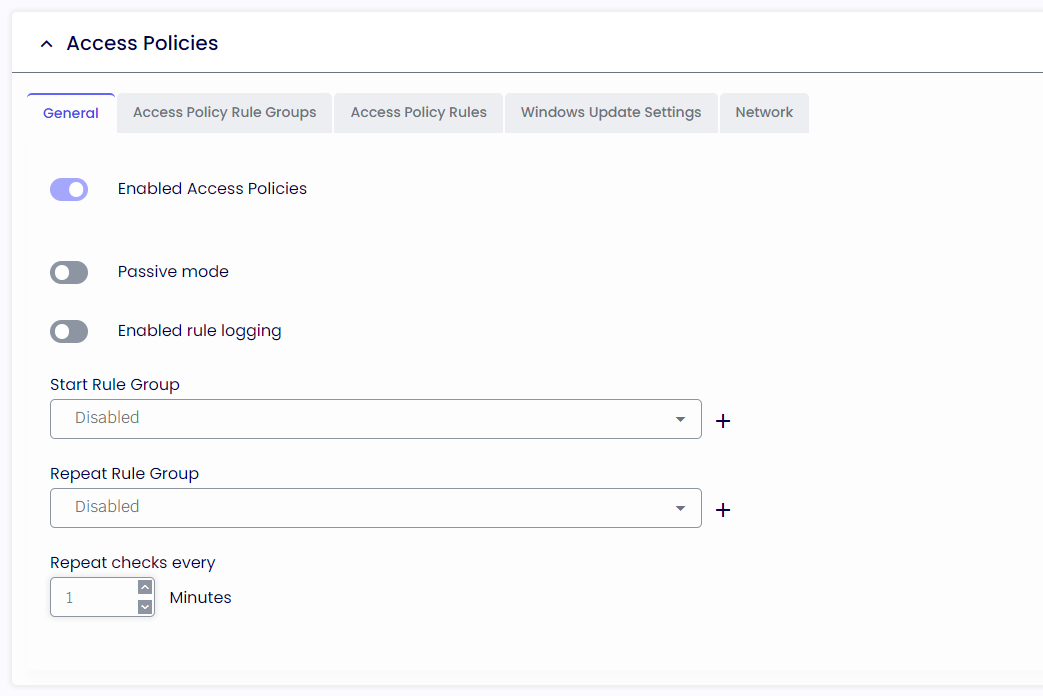
Enable Access Policies
If enabled, the Administrator can create a list of requirements a candidate must Pass to launch the TDA client fully.
Note: a “Continue” rule can also be created to let the user in the session even if they don’t meet the requirements.
Passive mode
If enabled, any Access Policies that failed execution will be ignored.
Enable rule logging
The administrator can retrieve more information about the Access Policies from the TDA log file if enabled.
Start Rule Group
If enabled, the Access Policies in this group will only be executed during TDA startup.
Repeat Rule Group
If enabled, the Access Policies in this group will also be executed while in the TDA session.
Repeat check every
The Access Policies in the repeat group will be reevaluated every x minutes if enabled.
All these groups can be enabled at the same time.
Windows Update Settings
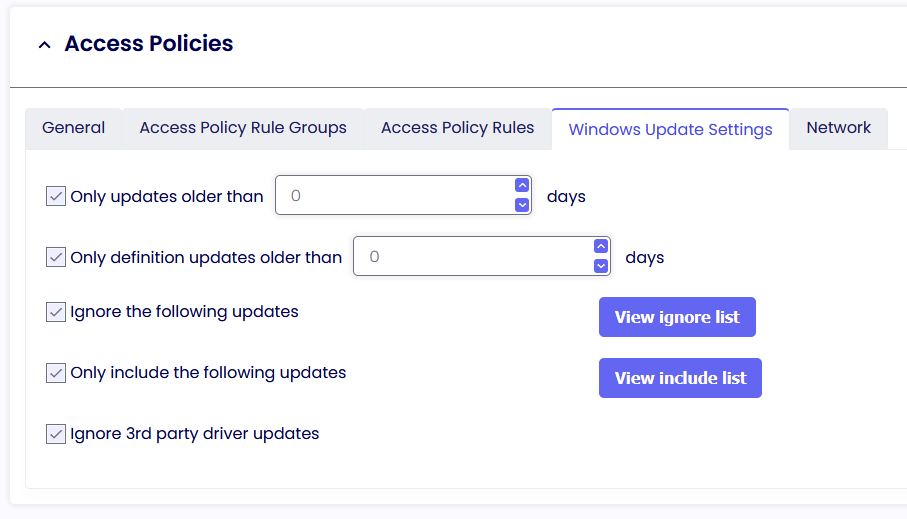
Only updates older than
If enabled and “Close TDA” is selected, users must install only available updates older than the specified days, or they will not be able to use TDA. If enabled and “Allow to Continue” is selected, the user can launch TDA.
Only definition updates older than
If enabled and “Close TDA” is selected, users must install only available definition updates older than the specified days, or they won’t be able to use TDA. If enabled, and “Allow to Continue” is selected, the user can launch TDA.
Ignore the following updates
If enabled, all the updates specified in the list will be ignored.
A manual check will be necessary if an update is added to the list after the update window check.
Only include the following updates
If enabled, only specific updates in the list will need to be installed.
Ignore 3rd party driver updates
If enabled, all the 3rd party drivers’ updates will be ignored.
Network
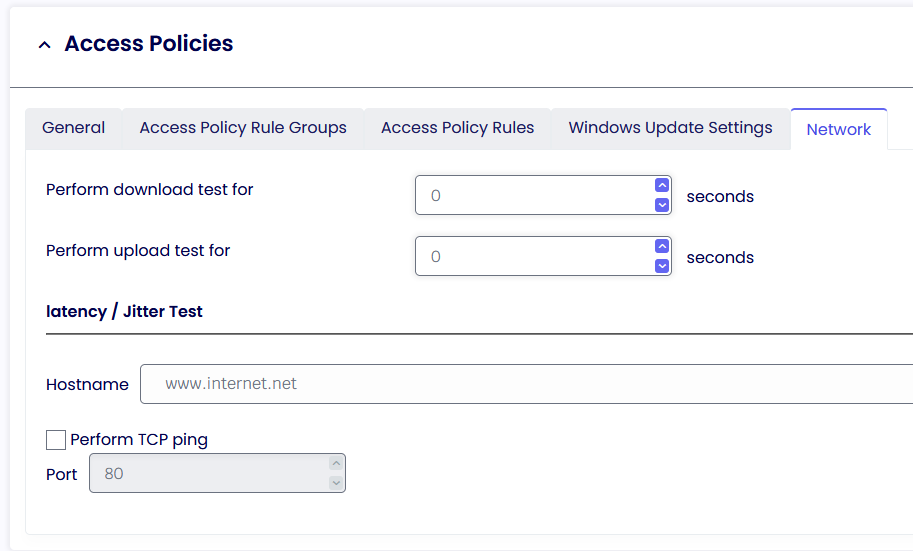
Hostname
Specify the hostname you would like to use to perform ma ping request.
Process Security
General
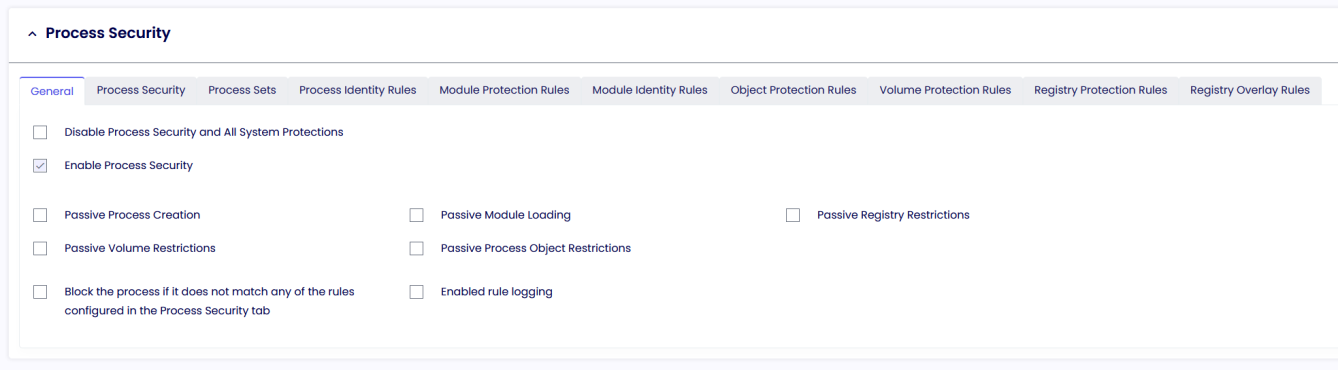
Disable Process Security and All System Protections
If enabled, all the default rules applied by the Process Security engine will be disabled.
This critical option should be used only for troubleshooting purposes and NEVER during production. A restart is needed when applied.
Enable Process Security
if enabled, the default rules and the rules created for your applications to run.
Passive Rules (All)
If enabled, any of the Process Security functions (Volume, Module, Registry, etc) will be ignored.
Enable rule logging
If enabled, the administrator can retrieve more information about the Process Security engine from the TDA log file.
Do not alter or remove SYSTEM rules. Modifying these rules may lead to instability in the TDA session.
From the beginning, the Cloud Device Portal will be populated with “Default System Rules.” It is recommended that users unfamiliar with the Process Security Engine don’t delete these rules. The deletion of these rules will impact the TDA's operation.
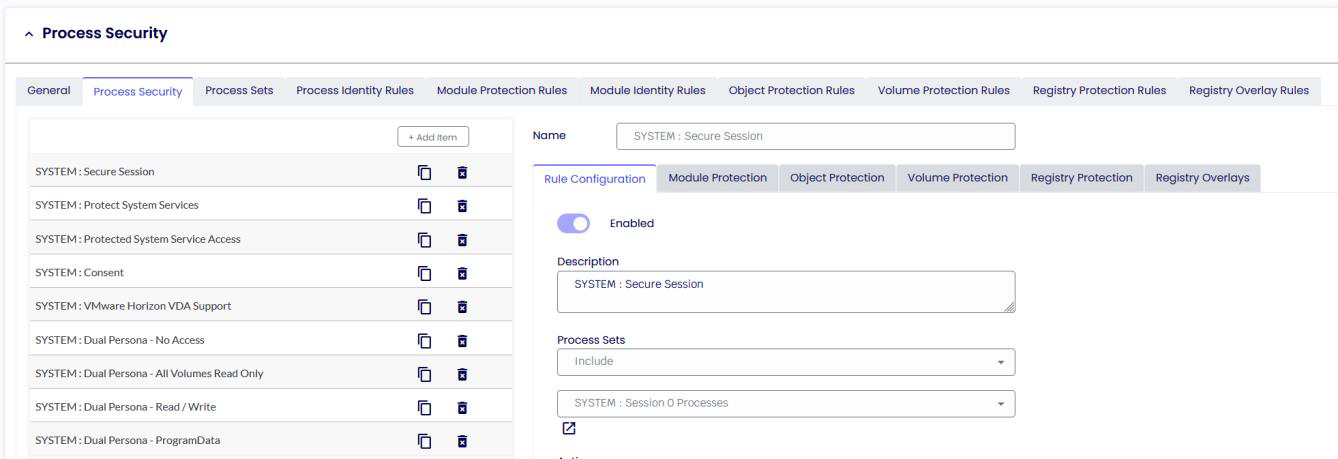
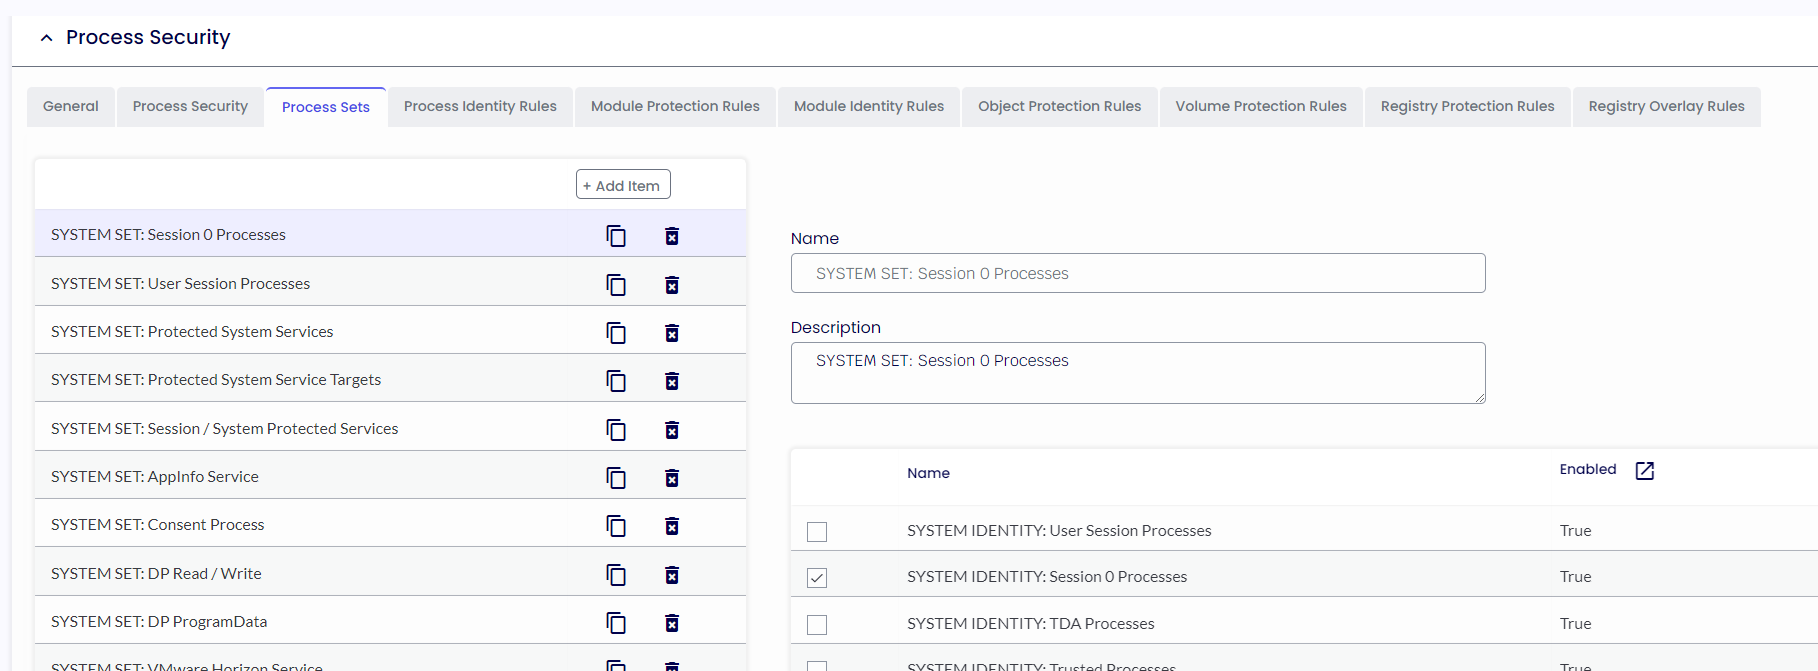
Process Security lists all the Rules, either System or Custom. Process Security Sets are the container where all the Process Security identities are created.
Process Security Identity Rules is the container where you set all the process identities (prior v7.x, known as AEP - Application Execution Prevention) for the specified process you want to Allow/Block.
When creating a rule, there are relationships and conditions you can use to match or not a specific file name, size of the file, last modified date and time, Certificate Thumbprints, and all the other options in the profile editor.
An example of the rule can be seen in the screenshot below. The rule will allow the locally installed VMware application.
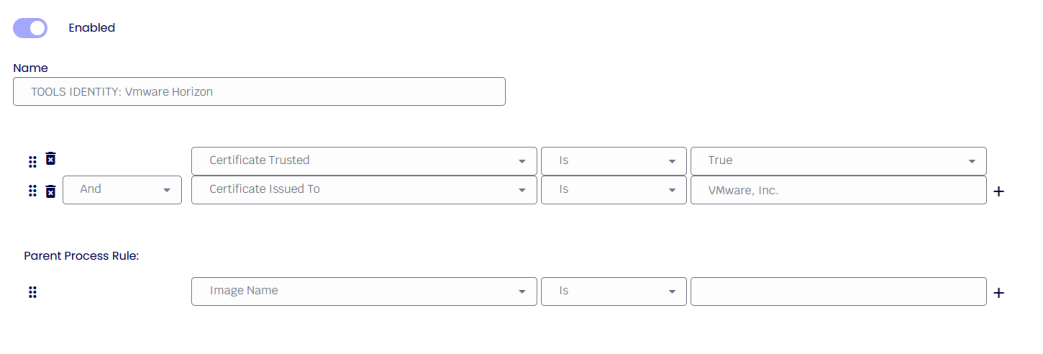
The relationship between each condition in the rule and the preceding condition sequences Process Security Identity rule processing. For ‘AND’ conditions, the conditional test must all pass for ‘OR’ conditions. They are examined as a “one of many” situation. The 1st condition in the rule will ignore the ‘relationship’ field as there are no preceding conditions.
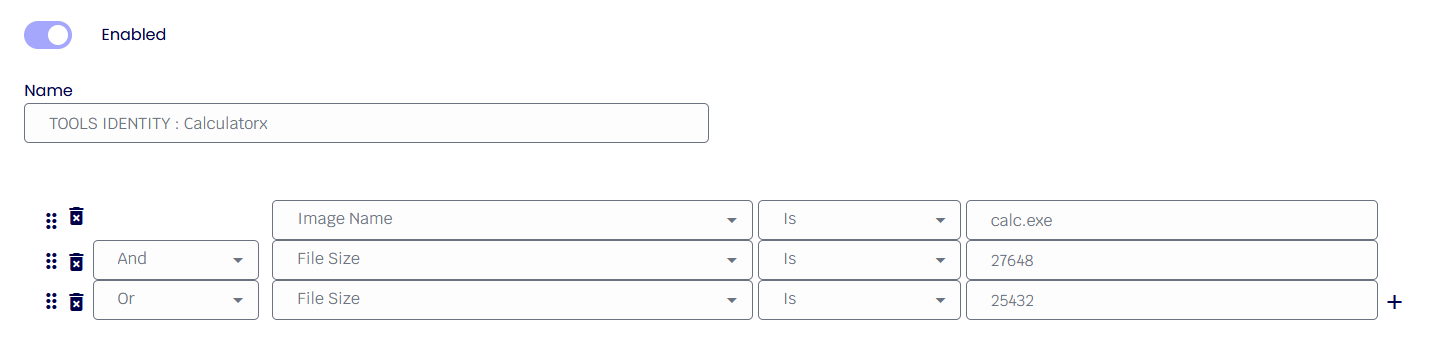
In the following example, we show a rule allowing only two particular " Calculator " versions given the filename and sizes.

First, we want to ensure the correct filename, so we add a condition to verify the filename. “Image Name” represents the full path and filename and is the only condition where the upper/lower case does not matter.
Secondly, we want to allow two possible file sizes, such as 2. To do this, we add another condition to test the file size, as shown below.
Finally, we need to add a second size to allow. The difference is we must select a relationship of ‘OR’ to indicate “the 1st size OR the 2nd size”. In the image below, we see all three conditions added. This can be read as “(image name) AND (1st size OR 2nd size)”.
Please refer to this KB article to learn more about the rules - AEP Application Execution Prevention Best Practices.
Parent Rule
The new Parent Process Rule will allow the creation of specific rule sets where it will be possible to allow/ block processes created from a parent only.
Enable Process Security
If enabled, any processes added to the list will be allowed/denied execution.
Passive modes
Any of the Process Security functions (Volume, Module, Registry, etc) will be ignored if enabled.
Enable rule logging
If enabled, the administrator can retrieve more information about the application being prevented from executing from the TDA logs file.
Block the executable if it does not match any of the configured rules below
If enabled and no other rules are created in the list, the console will auto-create a rule for you to prevent incorrect system operation.
Process Sets
A Process Sets is a repository where all your process identity (executable name, thumbprints, hashes and more) are stored.
Action
Specify the desired action (Allow/Block/No Action) to apply to the listed processes.
System Priority
When activated, System Priority takes precedence over a standard priority, even when the latter is configured to a value of 10.
A System Priority will mandate the application of a rule ahead of any other rule within the process Set.
Priority
If activated, administrators can assign elevated priority to processes, allowing the engine to prioritize this specific set of rules over others.
Systray Injection
If enabled, the process with the injection enabled can display its icons inside the left button system notification area.

Process Identity
A process Identity entails the configuration by an administrator of criteria determining whether an executable is permitted or denied from execution.
Module Protection Rules
Module Protection Rules control what application modules (DLLs) can be loaded by applications running when TDA is active. DLLs can be whitelisted or backlisted, giving complete control over what executable code runs within the secure environment.
Should an already allowed executable try to load a module that is not permitted, TDA will terminate the process and log the user out of the TDA session.

Object Protection Rules
Object Protection Rules provide control over what level of access rights processes and threads are allowed to have. More information can be found here or here.
In our example, the Consent Process will only assign specific rights to its executables.
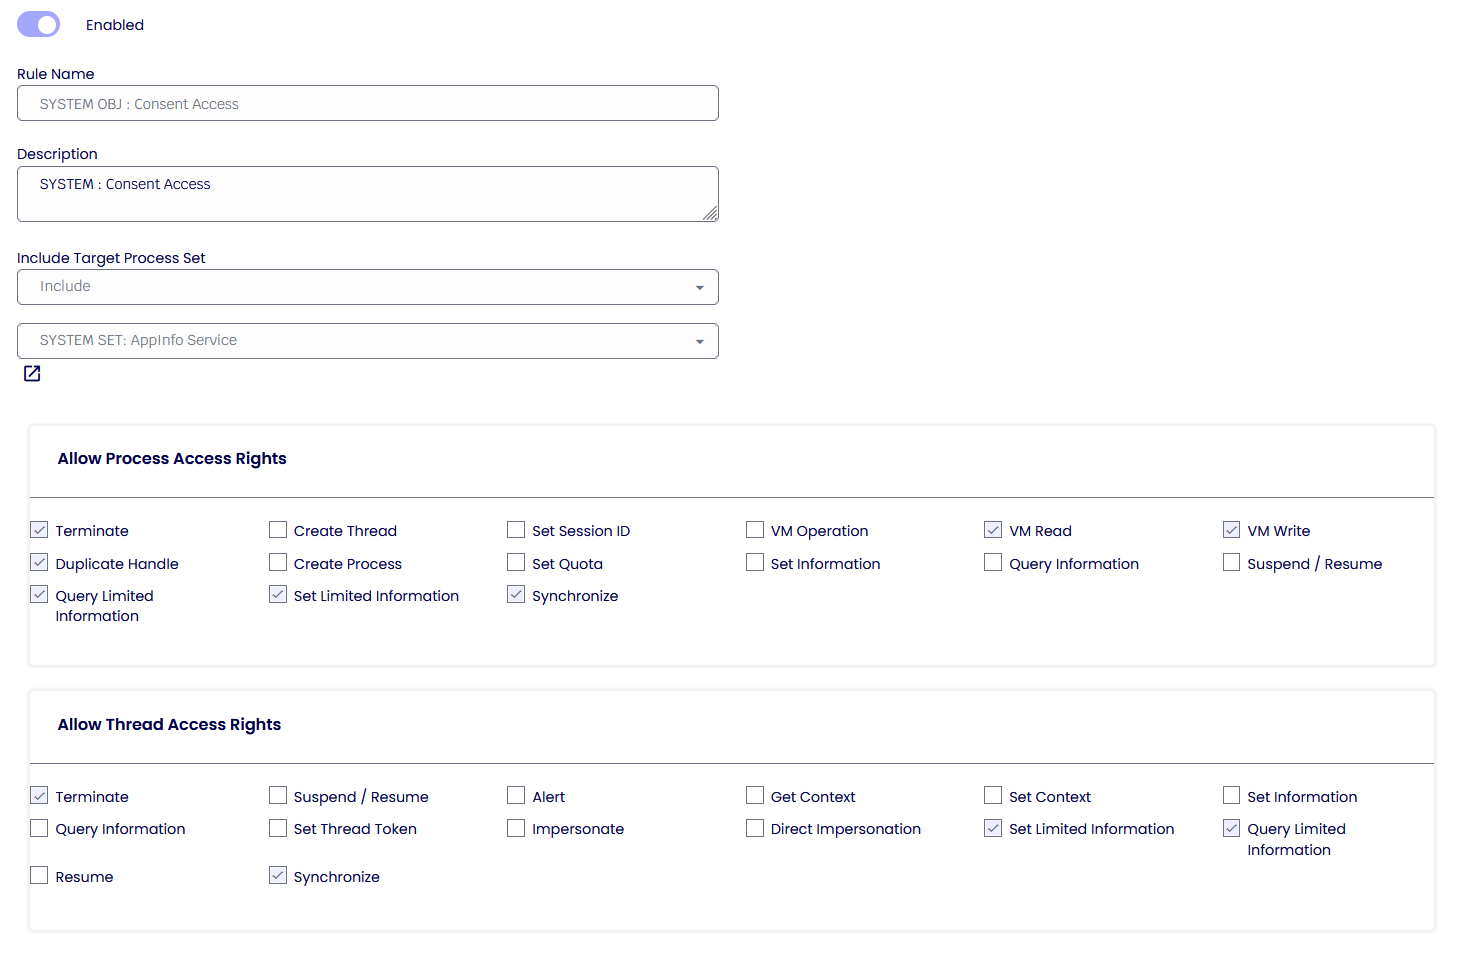
An Object Protection Rule will be usually coupled with a Process Sets and Identity rule and the “consent” is an example of. If we look at the Process Identity for the “Consent Processes,” only the processes that match these following rules will be allowed to have the Object Protection Rule.

If the process running on the machine doesn’t match these rules, then the Object protection rules will be denied.
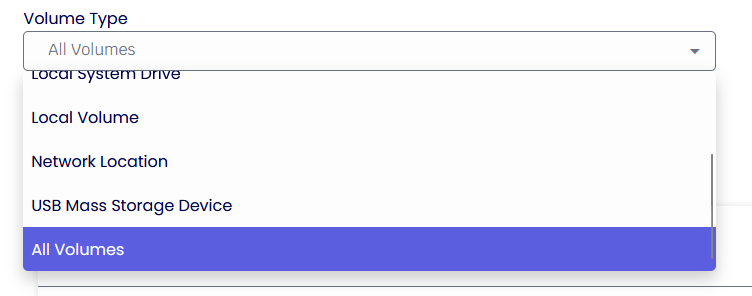
Volume Protection Rules
Volume Protection Rules control the level of access a process has against a particular volume.
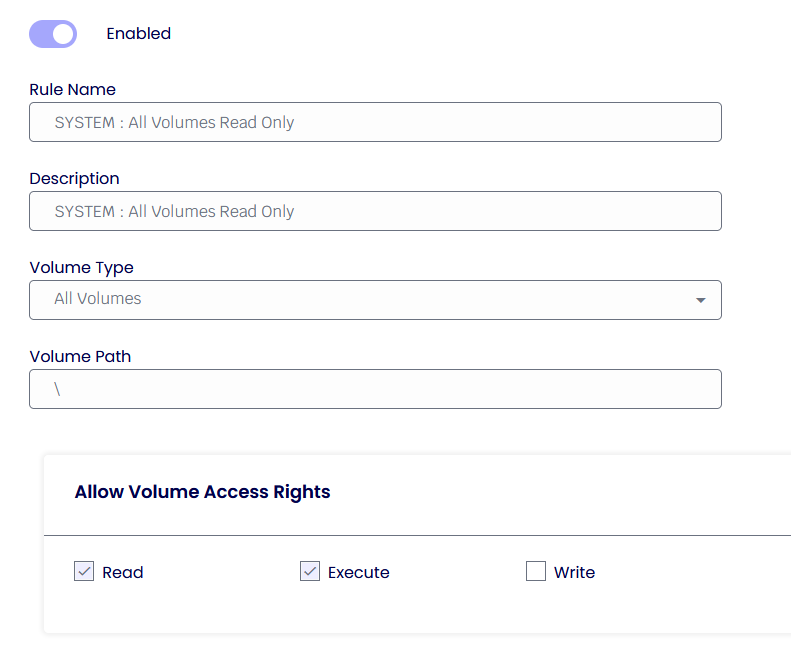
The above example shows the rule applying a “Read Only” access right rule to all the Volumes, which means that no process in the system can write on disk.
In the following example, however, you can see that the Dual Persona Volume has full access to writing and reading within the Dual Volume itself.

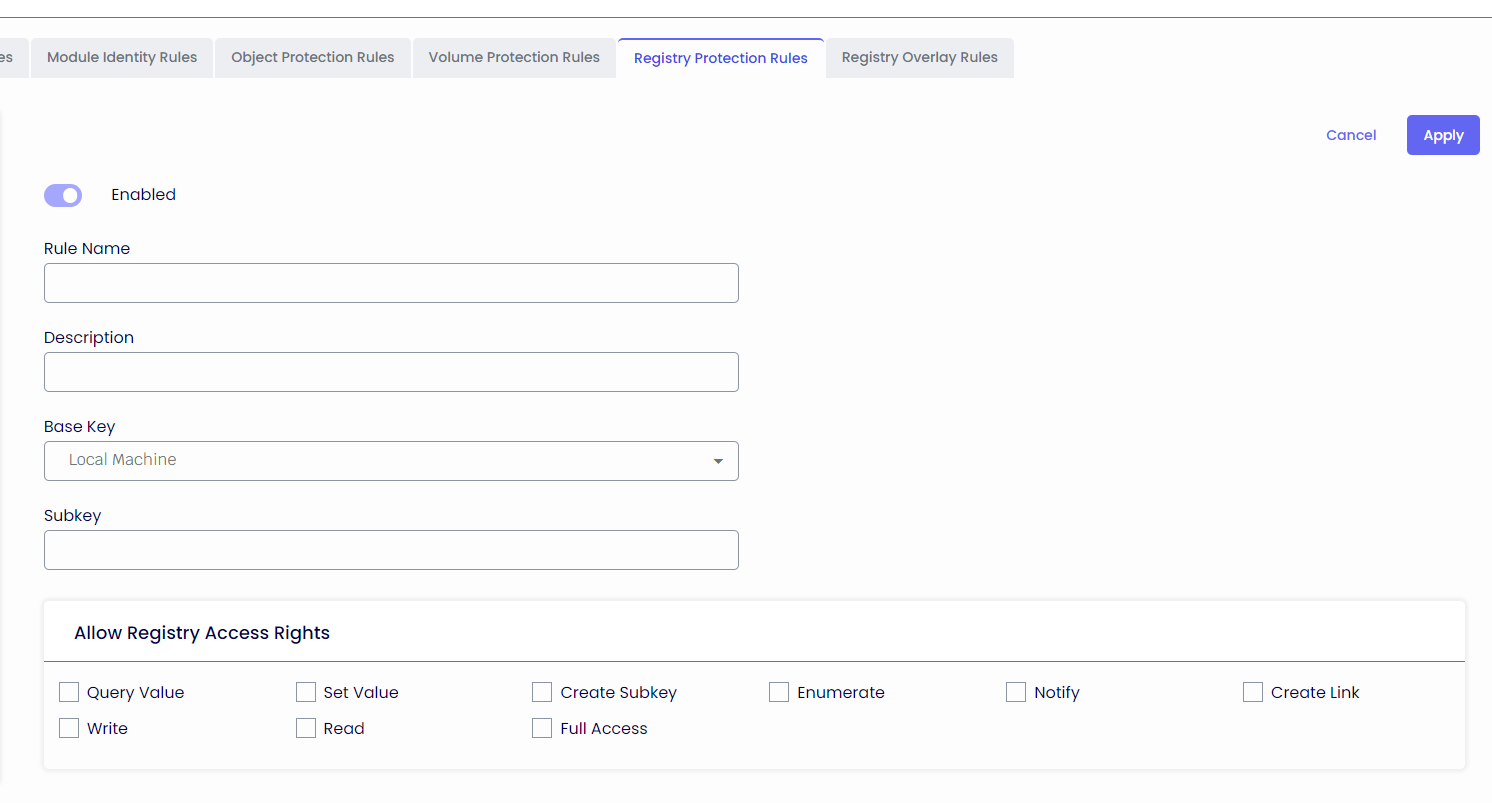
Registry Protection Rules
Registry Protection is a security layer exclusively for Registry Key hives. More information can be found here.
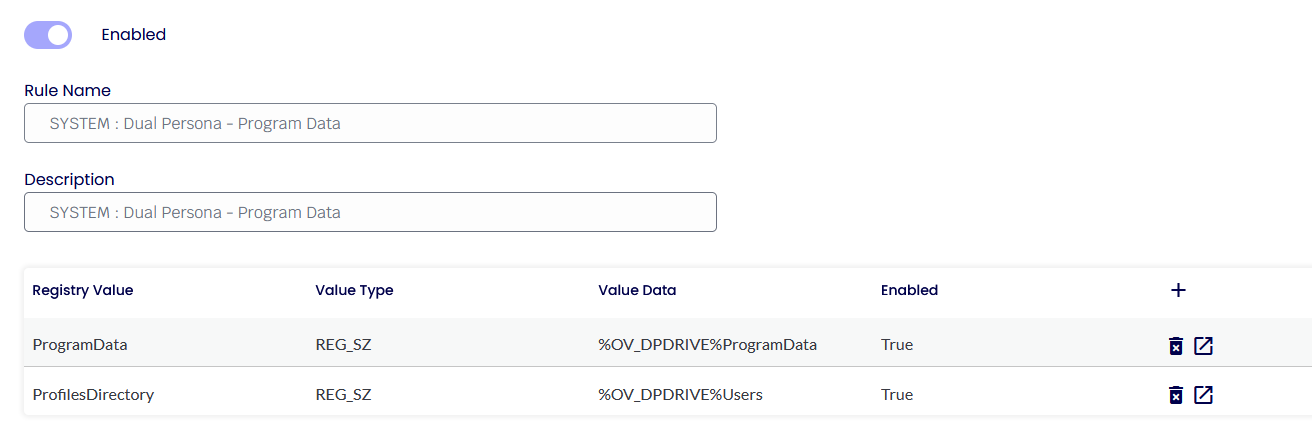
Registry Overlay Rules
Registry Overlay is used to apply a specific registry key only to a particular Process Set.
Unlike Additional Registry keys, which apply to every process in the system, Registry Overlays are only applicable and seen by the processes identified by the associated Process Security Rule.
Driver Protection
Driver Protection provides functionality to blacklist Windows drivers. If a Windows driver that matches a configured rule is installed and running on the system, TDA will not run.
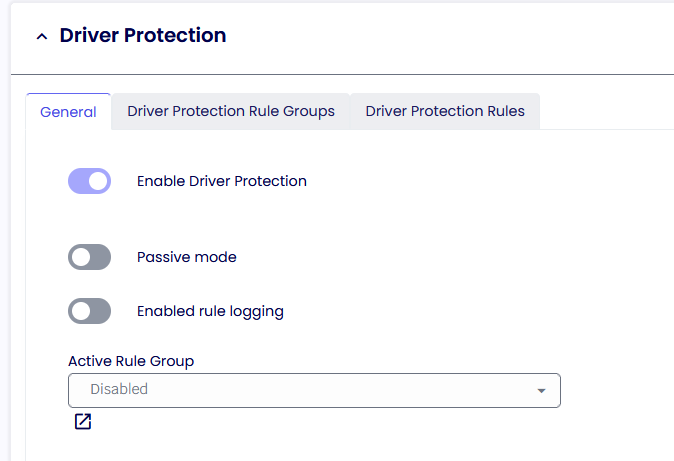
Passive Rules
If enabled, any of the Driver Protection Rules will be ignored.
Enable rule logging
The administrator can retrieve more information about the Driver Protection Rule from the TDA log file if enabled.

i.e., if the Citrix drives are not loaded on the system during TDA operation, the TDA will not run.
When a driver is loaded on the system, there is very little the TDA can do to unload it, so to prevent any “potential” bad drivers from performing any malicious activity, the TDA will stop its operation altogether.
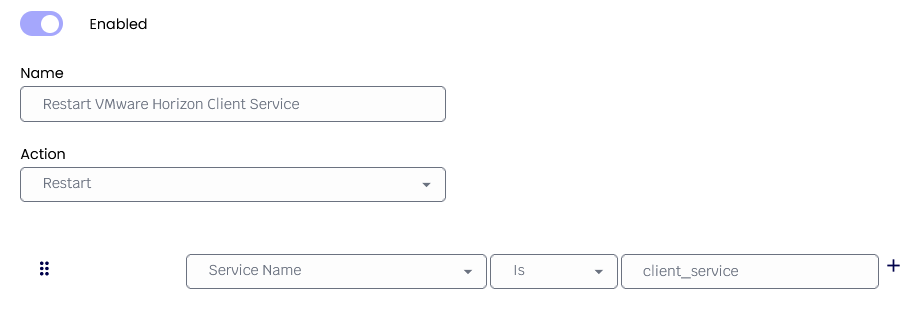
Service Protection
Service Protection builds on existing Process Security technology to provide Windows services execution control at the system level. An administrator can define rules for a profile to control what services can run or should be stopped. Control is asserted over overall service applications, including all Windows services.
Service Protection has four areas of operation:
at start-up: services are scanned for compliance before the TDA starts, and all the rules will be applied beforehand.
at session start-up: services are scanned for compliance while the TDA initializes the secure session, and all the rules will be applied during initialization.
repeat: services are scanned for compliance in real-time while TDA policies are in place, and all the rules will be applied while the TDA session runs every x.
logout: services are scanned for compliance while the TDA logs off, and all the rules will be applied at logout.
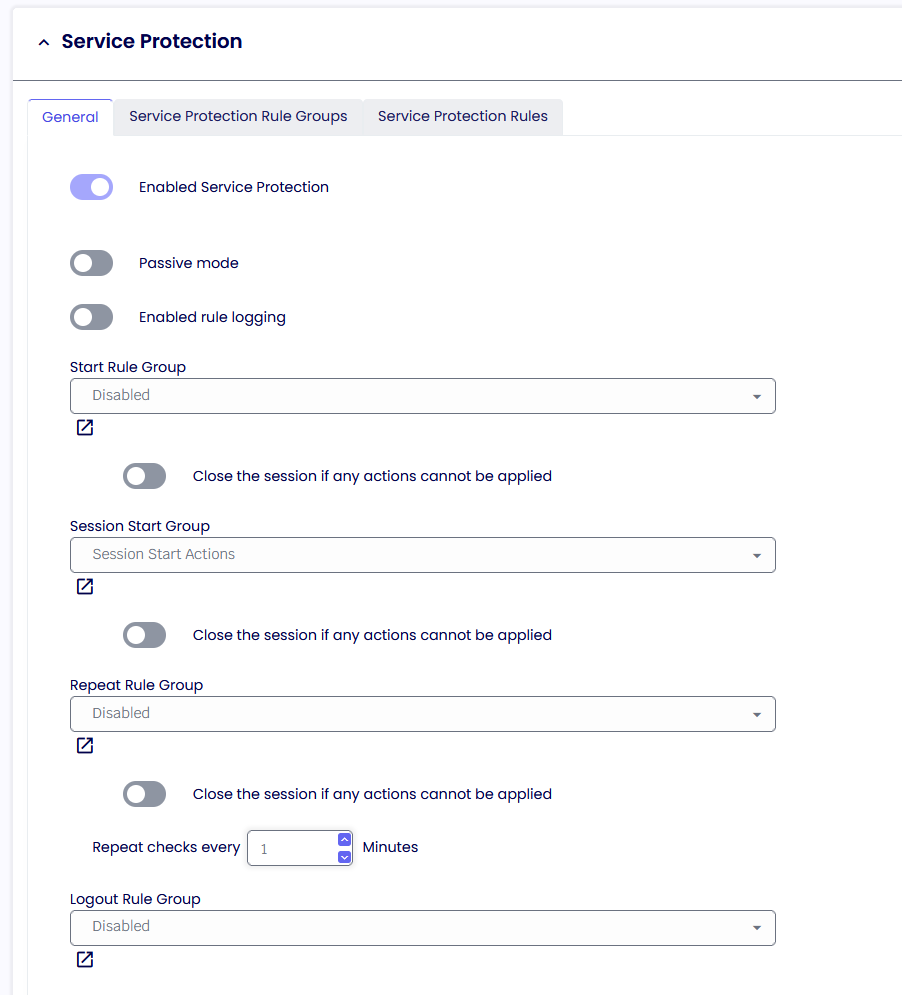
Passive Rules
If enabled, any of the Service Protection Rules will be ignored.
Enable rule logging
The administrator can retrieve more information about the Service Protection Rule from the TDA log file if enabled.
Close the session if any actions cannot be applied
If enabled, the TDA will close the session if actions created in the Service Protection Rules list cannot be applied.
Service Protection builds on existing Process Security technology to provide Windows services execution control at the system level. Using familiar concepts from Process Security Identity, an administrator can define rules for a profile to control what services can run or should be stopped. As with Process Security Identity, control is asserted over overall service applications, including all Windows services.
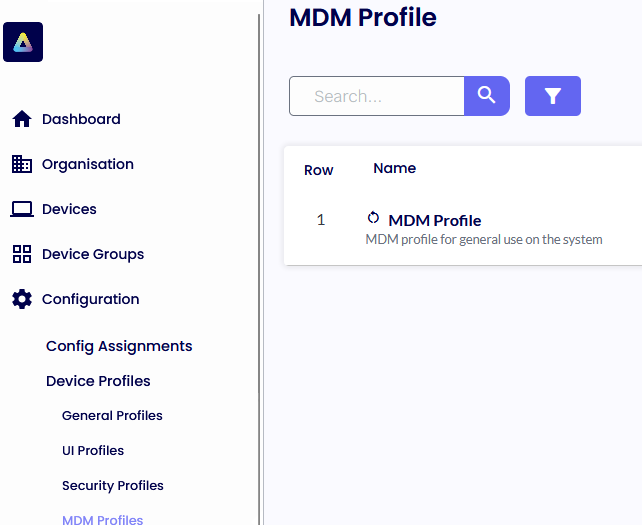
MDM Profiles
Below, you will find the explanation of all the options within the MDM Profiles options.
Windows Firewall Control

Enable Windows Firewall Control
If enabled, you will be able to control the Windows Firewall policy.
Firewall state
Turn the Windows Firewall on or off.
Inbound connections
Configures the action that applies when no rules match the inbound network connection attempt.
Outbound connections
Configures the action that applies when no rules match the outbound network connection attempt.
Disable all existing rules
If enabled, TDA will disable all current Windows firewall rules. TDA will back up all the existing rulesets and then disable them. When TDA logs off, unlocked, or all policies are removed, all original Firewall rules are restored.
Hide notifications when a program is blocked from receiving inbound connections
If enabled, notifications from a program blocked by the firewall will be suppressed.
Reapply firewall setting while running
If enabled, the TDA firewall rules will be reapplied based on the specified amount.
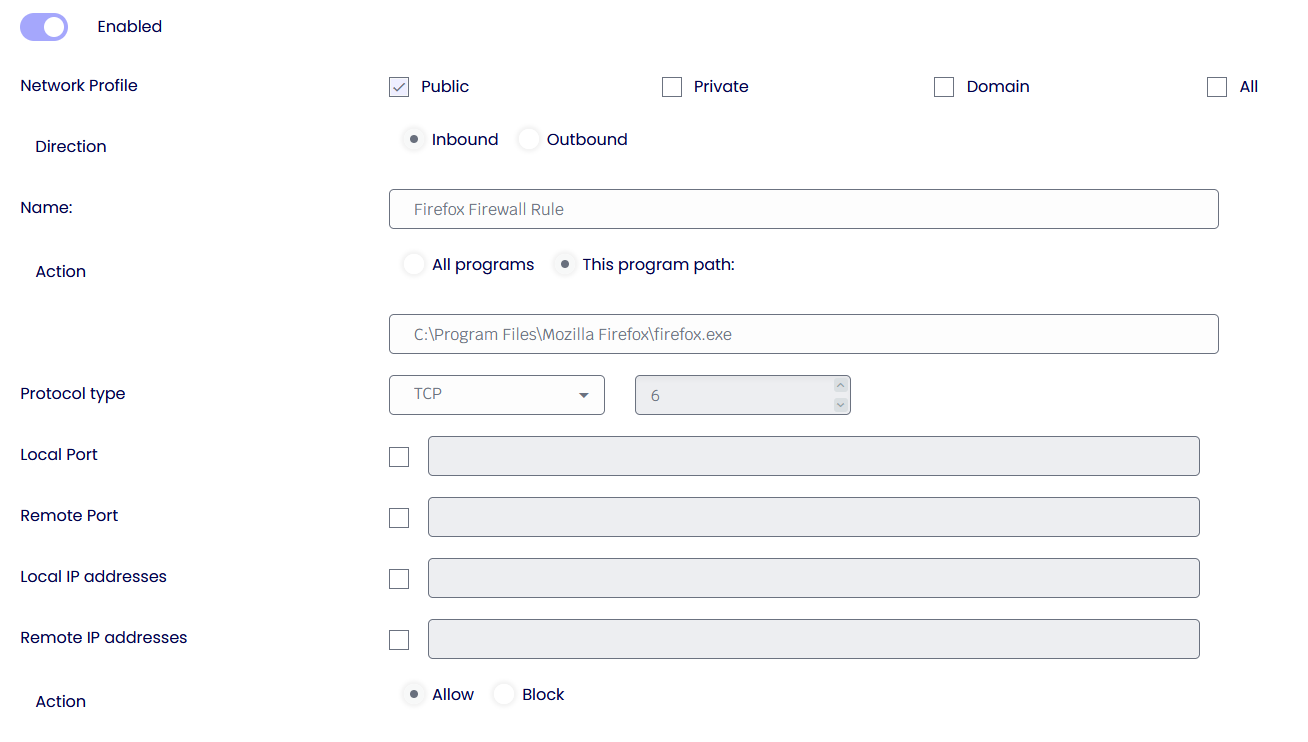
Apply Custom firewall rules
Create custom rules for inbound and outbound traffic.
Device Policies
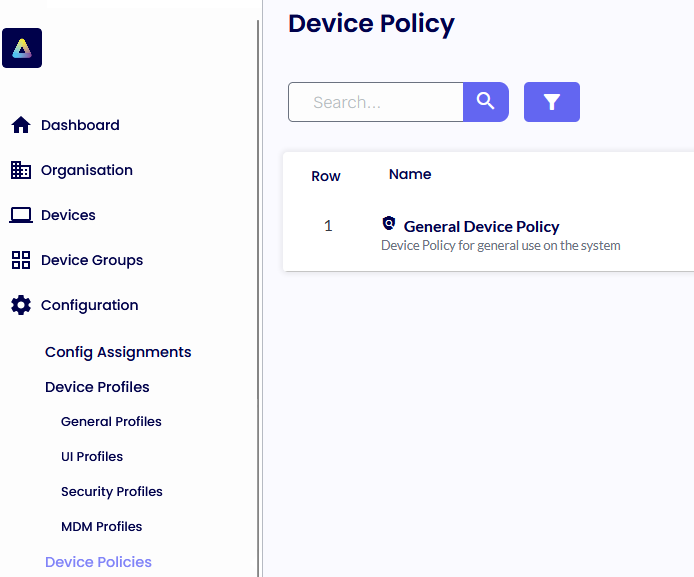
Device Policies contains the comprehensive configuration settings required for our latest TDA client.
You can define configurations such as Modes, Device Login Preferences, Branding, troubleshooting, and more within these device policies.
OPERATING MODE
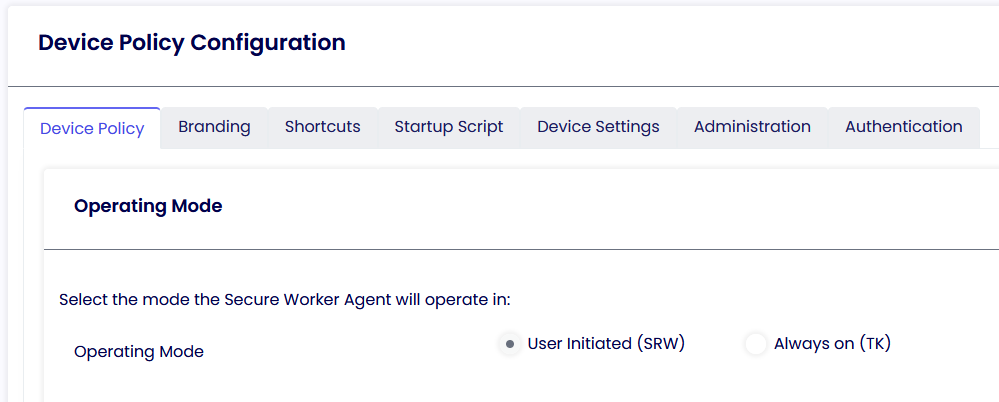
With the new TDA, it becomes feasible to seamlessly switch between SRW and TK modes without reinstalling the client. You can effortlessly modify the mode and then restart the client.
User-Initiated (SRW)
This mode is helpful for BYODs that are not company-owned. The user must manually click the TDA icon before commencing its operation.
Always on (TK)
This mode is helpful for corporate devices connected to the corporate network or joined to the company domain. The TDA UI will automatically launch after the machine boots up, and access to the underlying OS will be restricted.
The UI will not launch automatically if operating using Windows Shell, but all the security restrictions will still be applied in the background.
Device Login Options
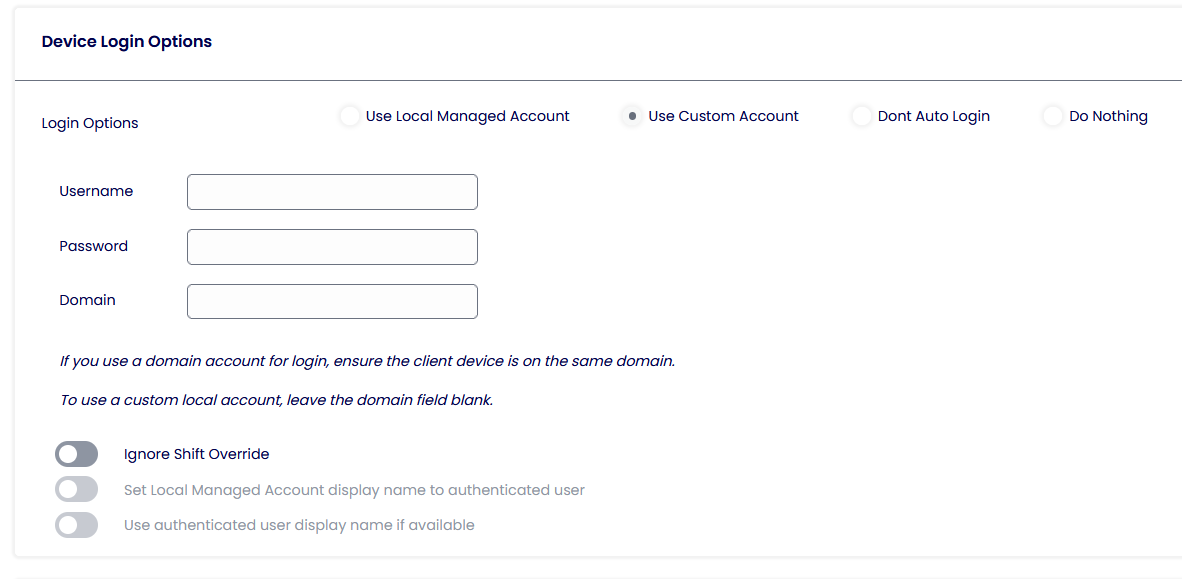
Device Login Preferences are relevant only when operating in TK Mode.
Use Local Managed Account
The device will auto-login using a local account, ‘TDA,’ created by the TDA. This user is a low-privileged user account.
Use Custom Account
The device will auto-login using the credentials supplied in the Username / Password and Domain fields. This can be an alternate local or domain account if the device is domain-joined.
Don’t Auto Login
Disables any configured auto-login settings.
Do Nothing
TDA will not apply or remove any auto-login configuration. If the device already has auto-login configuration applied or this configuration is delivered by other means, it will remain in place.
Ignore Shift Override
Prevents the left shift key from overriding the auto-login configuration.
Set Local Managed Account display name to an authenticated user
If enabled, the display name while login to the machine will be set using the username typed in the Authentication Provider screen.
General
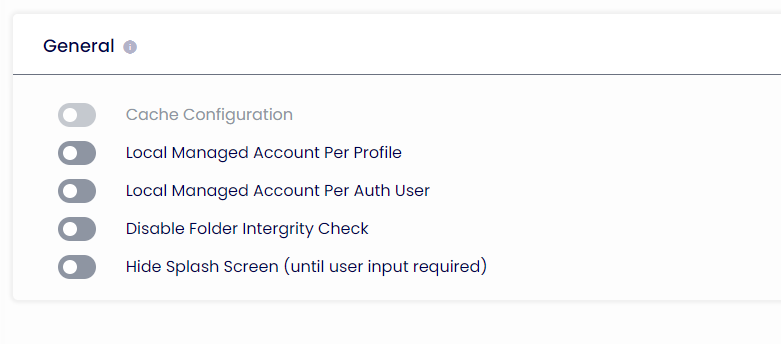
Cache Configuration
If enabled, profiles assigned to the Device folder will be saved and encrypted locally. Please note there are two locations:
1. Programdata\tda\devicedata\devicedata.cache
2. HKEY_LOCAL_MACHINE\SOFTWARE\ThinScale\TDA\DeviceGroupConfiguration
Local Managed Account Per Profile
If enabled, TDA will create a separate Windows User Profile per profile assigned to the device folder.
Local Managed Account Per Authentication User
If enabled, TDA will create a separate Windows User Profile for every logged-in user using the Authentication Provider.
Disable Folder Integrity Check
If enabled, the TDA will not check for the integrity of its Core Modules folders. Not recommended when in SRW Mode.
Hide Splash Screen
If enabled, the TDA will hide its initial UI screen loading unless user input is required.
Branding and Shortcut
With the introduction of the TDA, you can effortlessly configure custom splash screen images and personalized desktop icons directly through the Device Portal. Upload your desired image within the device policy, use a .ico file for the desktop shortcut, and your customization is complete.
Startup Script
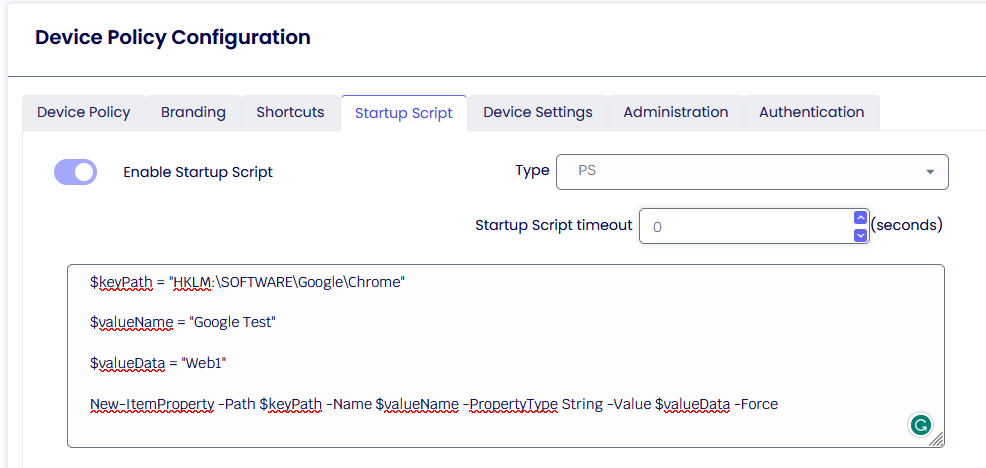
Enable Startup Script
Enables the supplied.VBS or. BAT or PS1 startup script. The script is configured as a local group policy start-up script and will apply during the Windows boot process.
Startup Script Timeout
Determines how long the scripts will run before stopping their execution.
Device Policy Configuration
Inside the device settings tab, you can configure all the options pertaining to Device Logs. This includes the ability to choose the events of most tremendous significance selectively, gather results from Access Policies, exclude frequently recurring processes and services, and predominantly enable "Troubleshooting Mode."
Device Events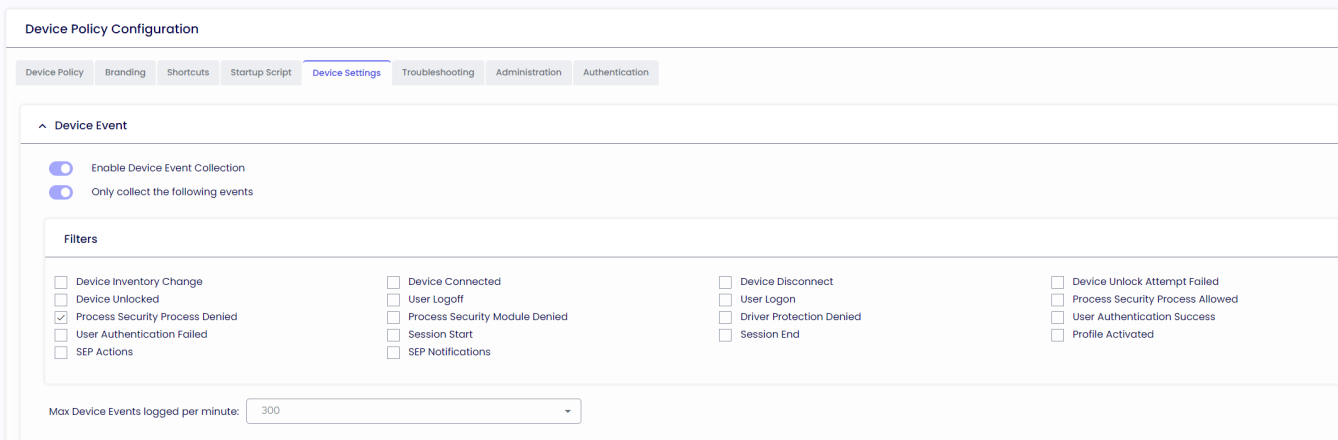
Enable Device Event Collection
Events will be stored in the DB and displayed in the Device Portal if enabled.
Only collect the following events
Only specific events will be stored in the DB and displayed in the Device Portal if enabled.
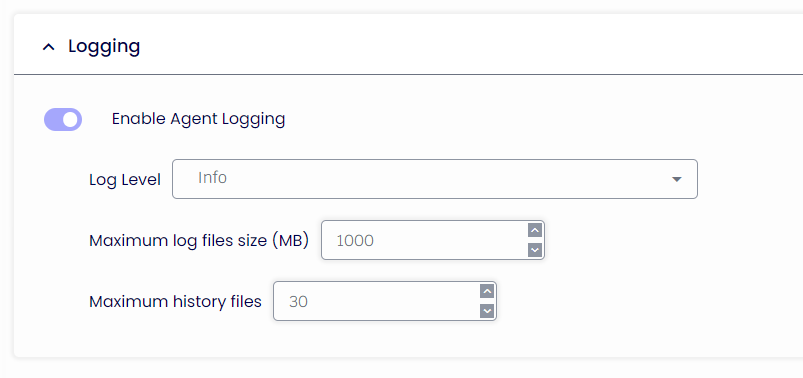
Logging
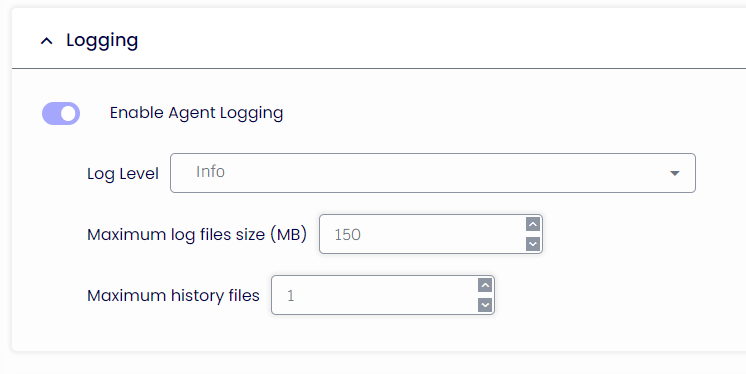
Enable Agent Logging
If enabled, the TDA will store the events in a TDA.txt file inside the ProgramData folder.
Maximum log files size (MB)
If enabled, the TDA.txt will store only data worth X MB. It will then start overriding its content.
Maximum history files
If enabled, the TDA will store only X amount of the TDA.txt upon service restart.
Admin Actions

Only allow device action when in secure session
If enabled, Restart and Profile Refresh actions will only be performed when the TDA session is active.
Perform device actions silently
Actions like Restart and Profile Refresh will be performed silently without user consent if enabled.
Perform device actions if no user response is received
If enabled, actions like Restart and Profile Refresh will be performed only when the user fails to accept or deny the request.
Device Settings
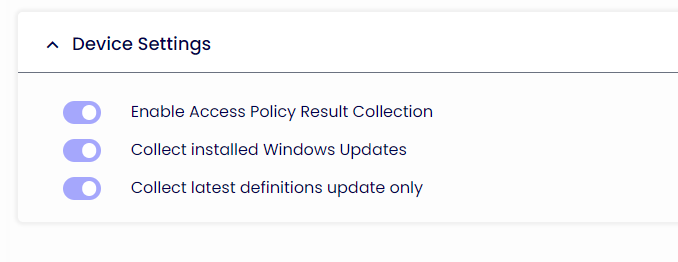
Enable Access Policy Result Collection
If enabled, events about the Access Policy will be stored in the DB and displayed in the Device Portal.
Collect installed Windows Updates
If enabled, events about Windows Updates will be stored in the DB and displayed in the Device Portal.
Collect latest definitions update only
Only the latest Windows updates will be stored in the DB and displayed in the Device Portal if enabled.
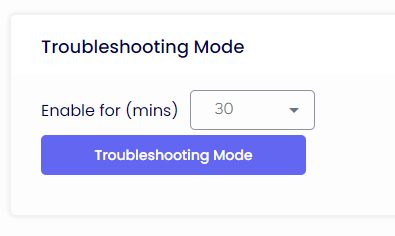
Troubleshooting
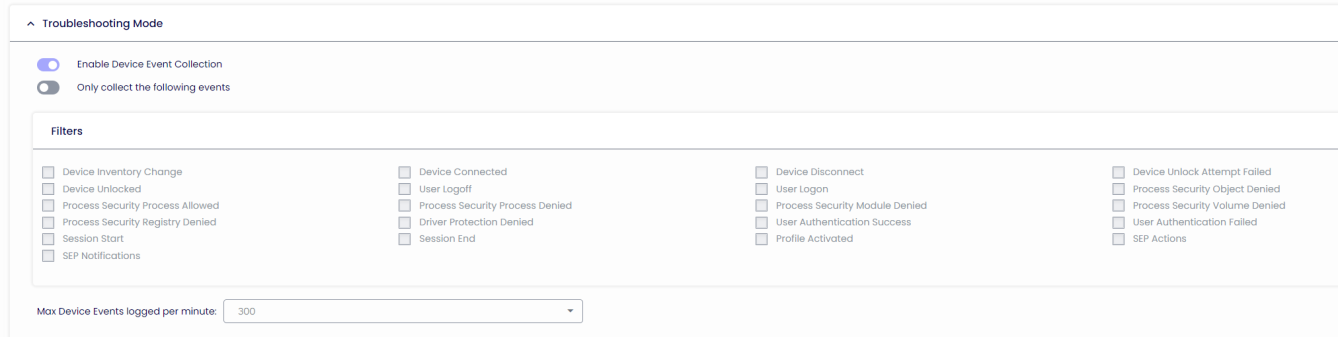
Troubleshooting Mode will collect a lot more events than normal Device Events collection. It is recommended to use this mode only when resolving an agent issue.
Troubleshooting Mode is an “on-demand” operation that can be switched on and off via the Device Actions in the Devices Tab.
Object / Volume / Registry event filtering
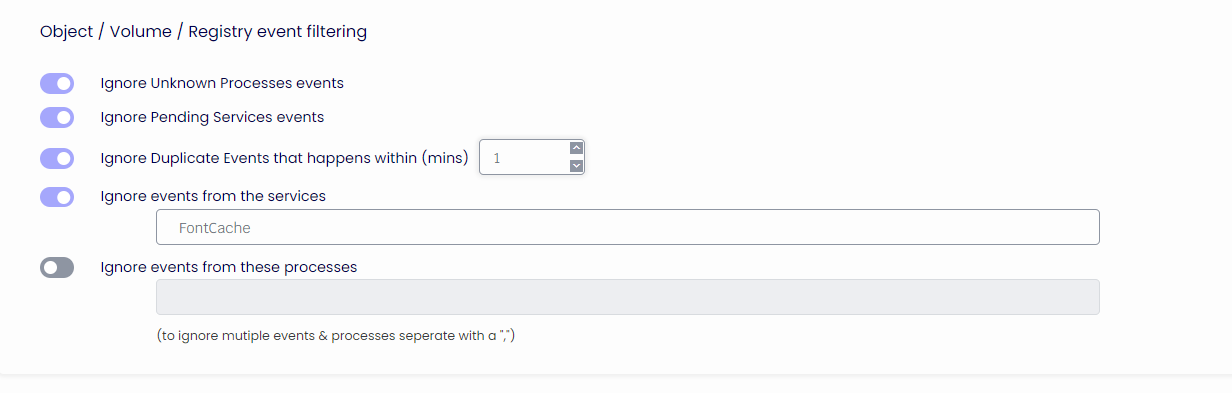
Ignore Unknown Processes events
Unknown process events will not be displayed in the Device Portal if enabled.
Ignore Pending Services events
Pending service events will not be displayed in the Device Portal if enabled.
Ignore Duplicate Events that happens within (mins)
If enabled, duplicate process events in X minutes will not be displayed in the Device Portal.
Ignore events from these services
If enabled, events logged from a specific service will not be displayed in the Device Portal.
Ignore events from these processes
If enabled, events logged from a specific process will not be displayed in the Device Portal.
Logging
Enable Agent Logging
If enabled, the TDA will store the events in a TDA.txt file inside the ProgramData folder.
Maximum log files size (MB)
If enabled, the TDA.txt will store only data worth X MB. It will then start overriding its content.
Maximum history files
If enabled, the TDA will store only X amount of the TDA.txt upon service restart.
Administration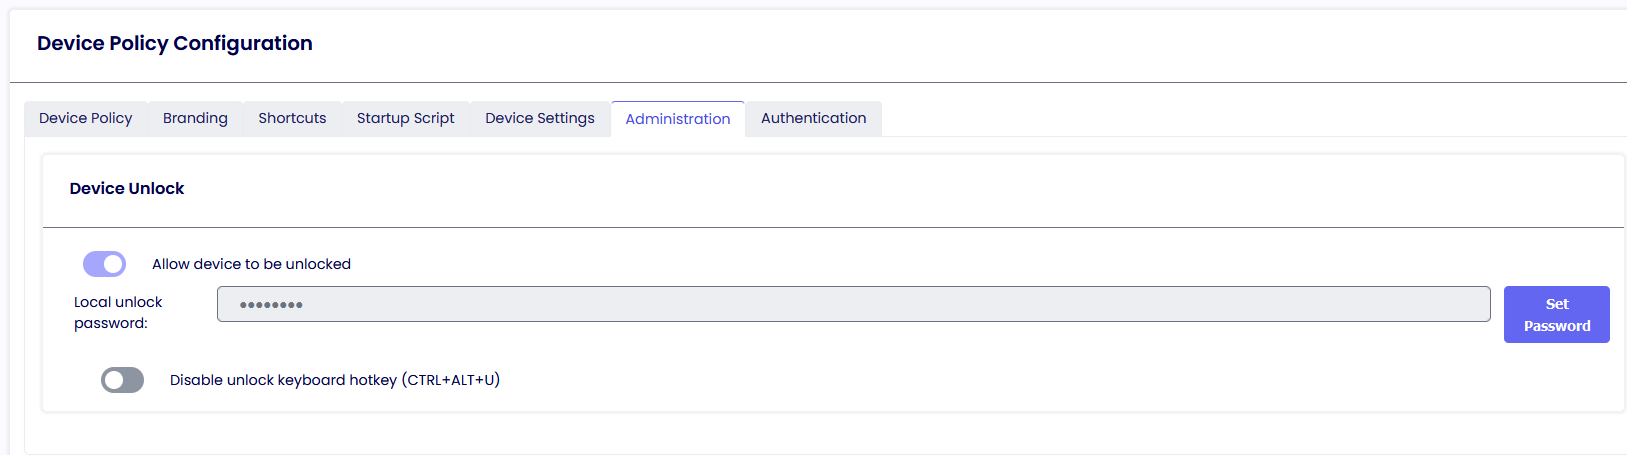
Here is where you can set the unlock password for the TDA client. Additionally, you can deactivate the unlock key hotkey (Ctrl-Alt-U) to require an unlock through the Management Console exclusively.
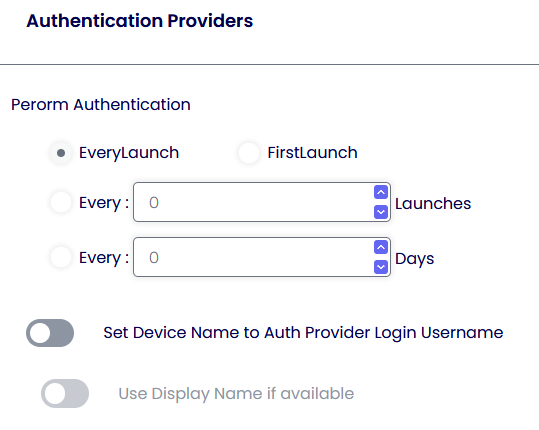
Authentication
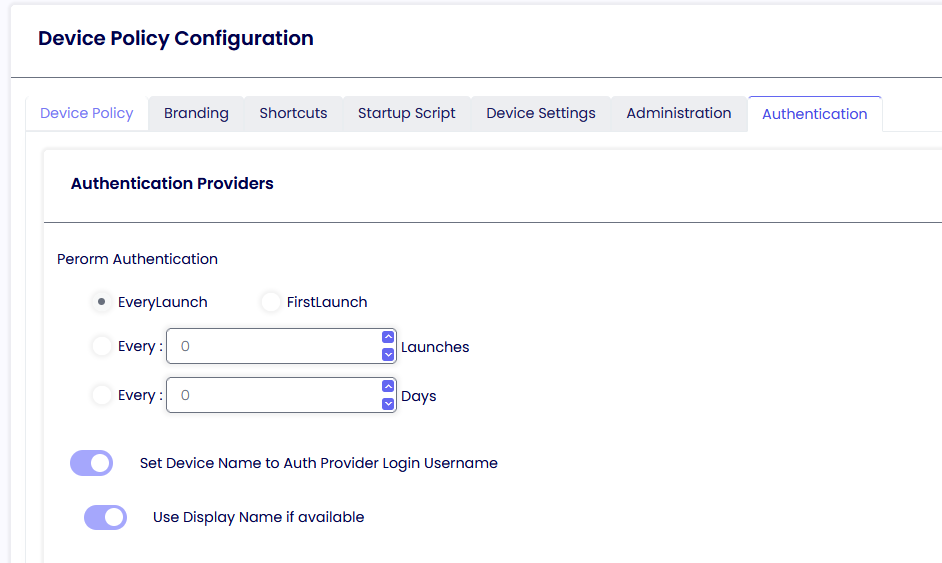
Here is where you have the option to control the behavior of the Authentication Provider screen. You can also set the option to rename the device connected to the server with the username typed in the Auth Provider screen.
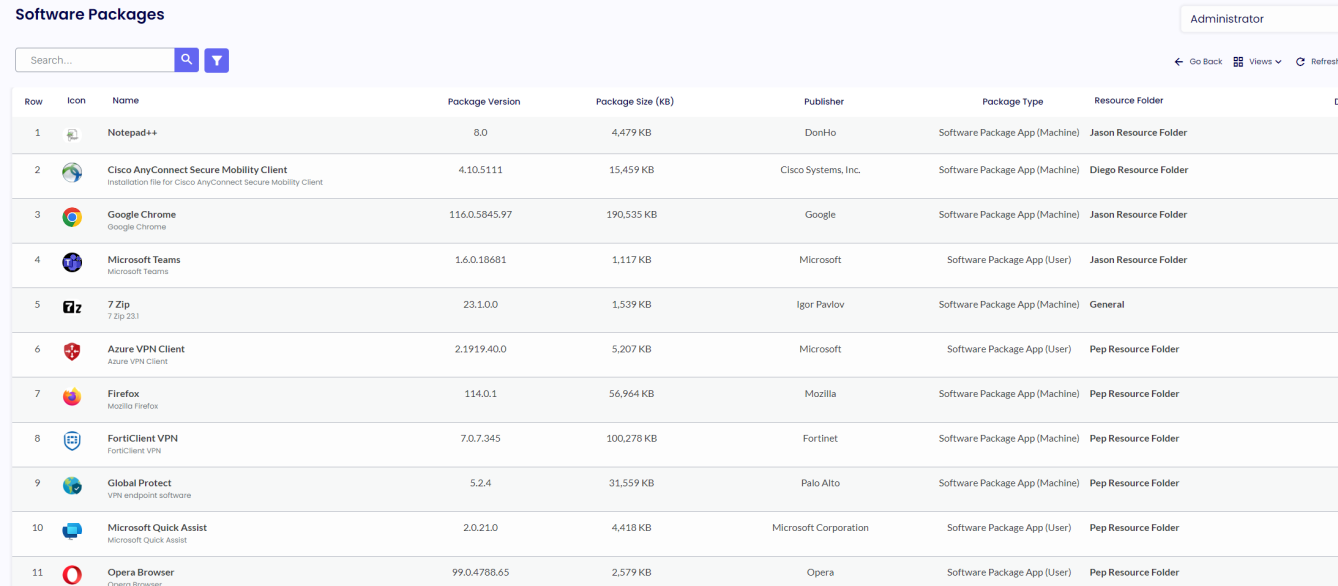
SOFTWARE PACKAGES
Software Packages can be deployed and installed on your TDA devices. You will need to use the Package Creator tool to create a software package. Download is available here.
Adding a new software package
Go to the Software Package Tab and click Add to add a new Software Package.

Browse the .pkg file created from the Software Package Tool and Add it to the Device Portal.

Once the upload is finished, you will see all the information related to the package. Click ‘Save.’
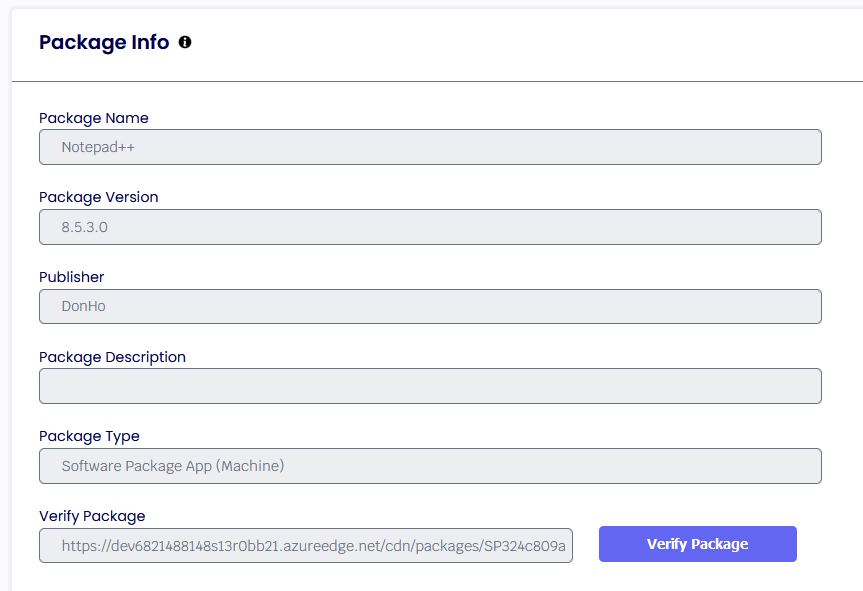
Once the package has been added to the portal, you will see it in the list.

Please check our library of already-made packages from the ThinScale Portal.
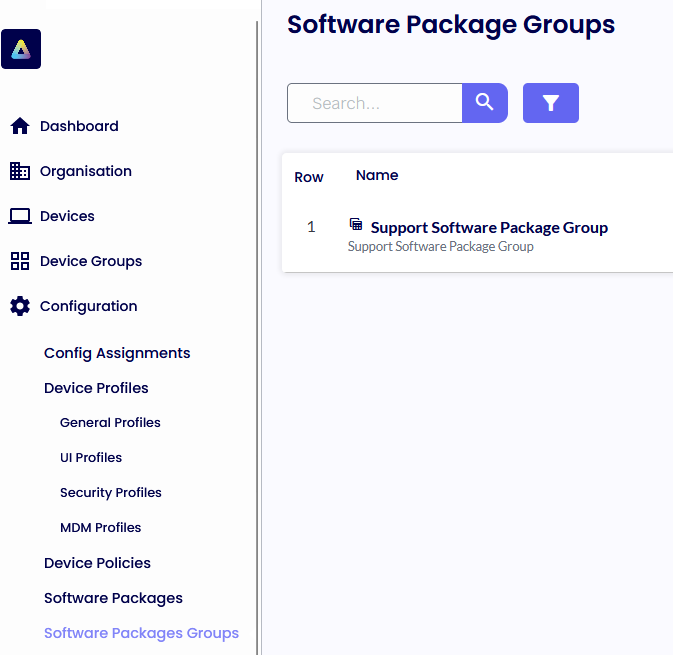
SOFTWARE PACKAGES GROUPS
Software package groups are containers where an administrator can store all the packages.
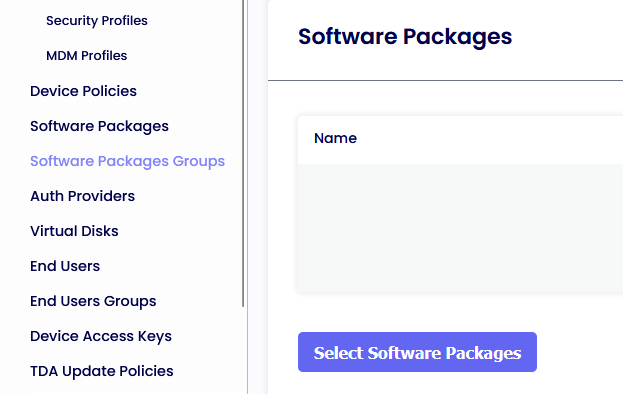
To Add the newly created Package to the Software Packages Group, please click the “Select Software Package” button, add Notepad++, and Click Save.

AUTHENTICATION PROVIDERS
The new Authentication Providers will give the administrator the option to authenticate the Device Portal or the TDA agents machines an Azure or Okta identity before launching the application. That way, the ThinScale Team has added another layer of security, whereas a user must fully authenticate against an Azure AD, OKTA, to fully launch the TDA client.
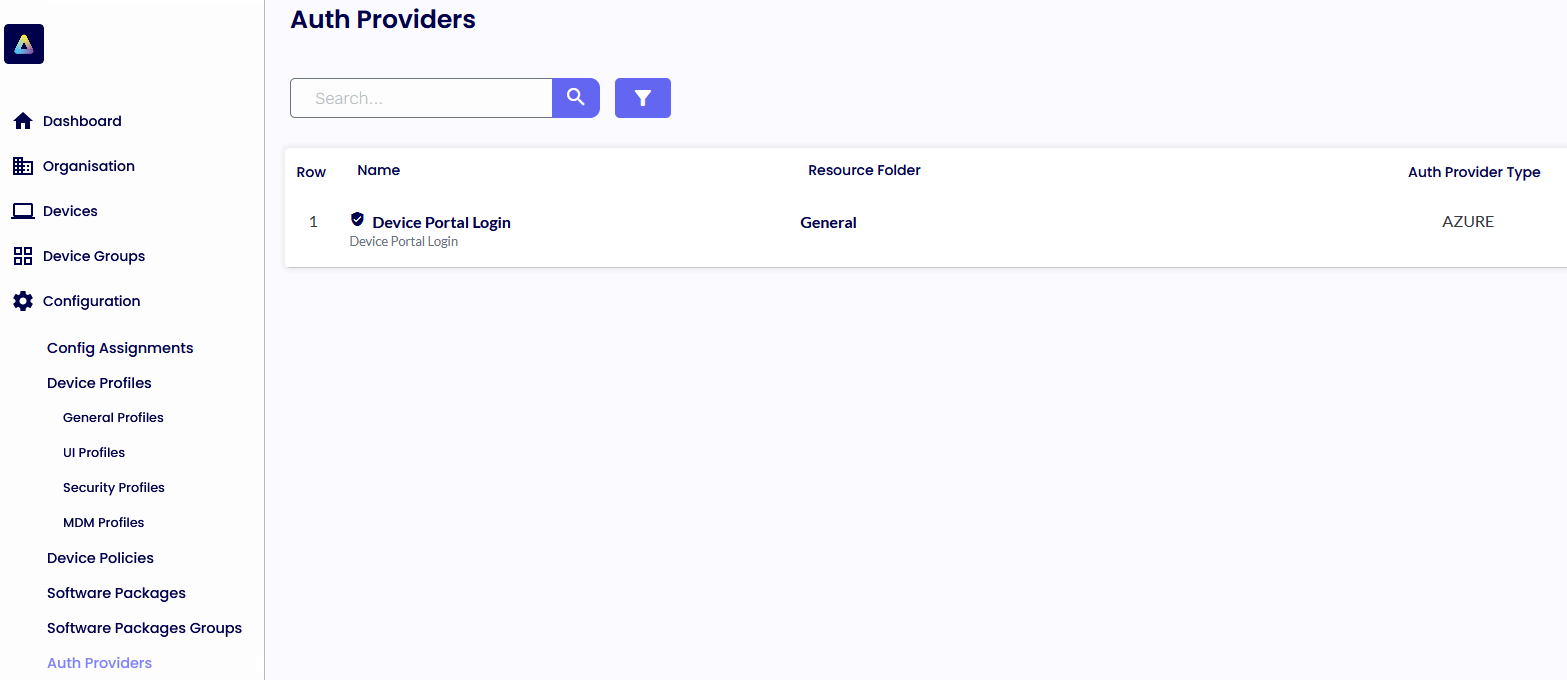
Additionally, the admin can use the below option to rename the device, which authenticates with one of the below Providers inside the Device Portal.
Note: ThinScale does not control any of the settings in either Azure or Okta. Reach out to your Sys Admin for more info. For the Azure or Okta Auth Provider, please look at the KB articles with detailed step-by-step instructions on configuring them.
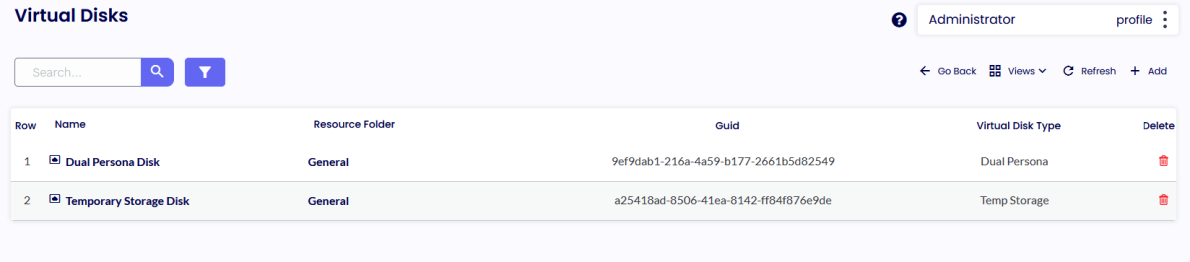
VIRTUAL DISKS
Virtual Disks are required by Home Edition Operating Systems when the Dual Persona or Temporary Storage features are enabled in your TDA Security profiles.
The same virtual disk can be assigned to Resource Folder, but a separate disk is required for Dual Persona and Temporary Storage if both technologies are enabled.
Launch the ThinScale Package Creator and click Create Virtual Disks. Give it a name, size, volume label, and, optionally, an encryption password. Click “Create Virtual Disk.” Save the “. vd” file locally and then Add it to the Device Portal.
Repeat for a Temporary Storage one.
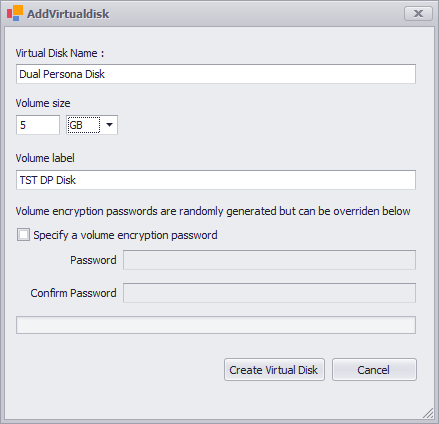
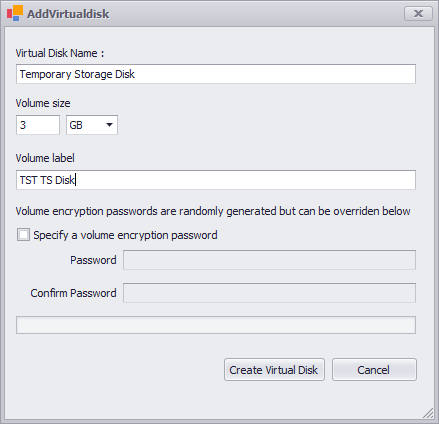
Note: Volume Label must be less or equal to 32 characters.

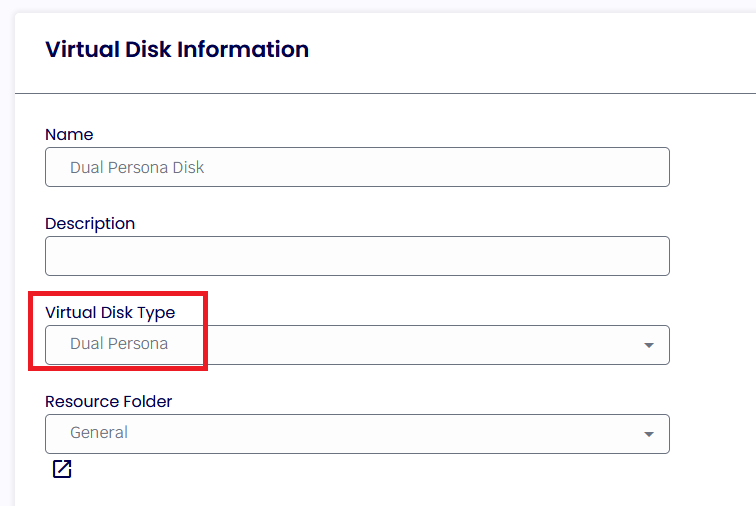
Give it a name and browse the file you just created with the Package Creator Tool.
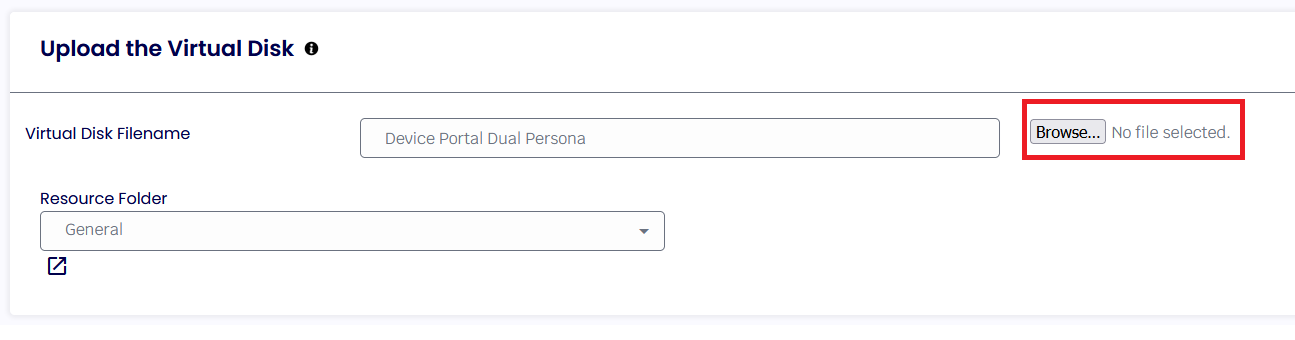
Select the Disk type and click Save when the upload is finished.
Repeat for the Temporary Storage Disk.
END USERS
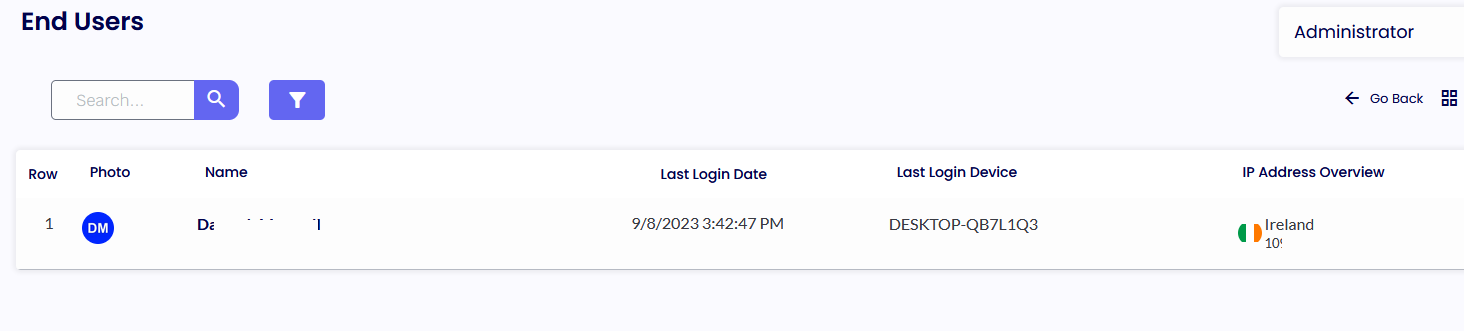
The End Users Tab will display all users logged in to the Device Portal via the Authentication Provider.
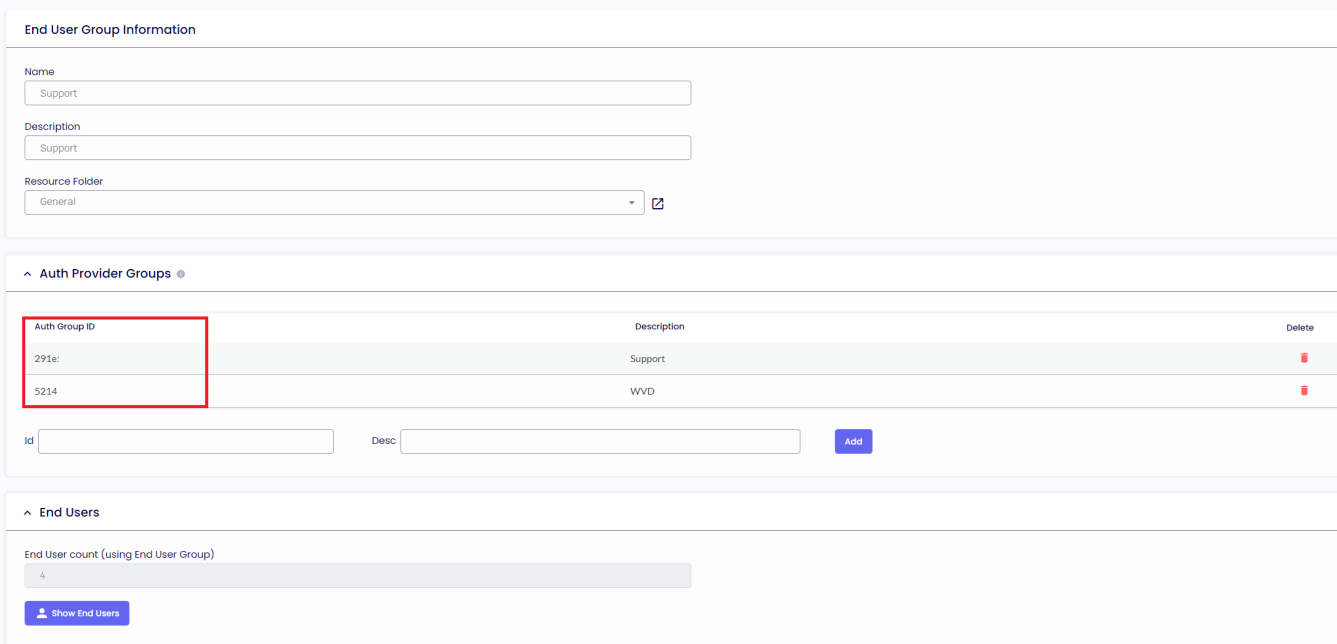
END USERS GROUPS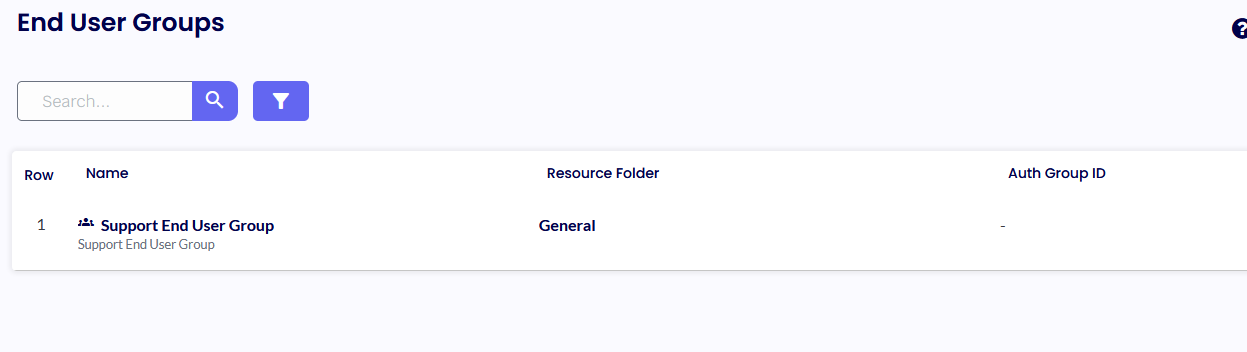
The End User Groups Tab is where the administrator will set the Auth Group ID from the Azure Microsoft Entra ID. All the users who are part of those groups will be added to the end users section.
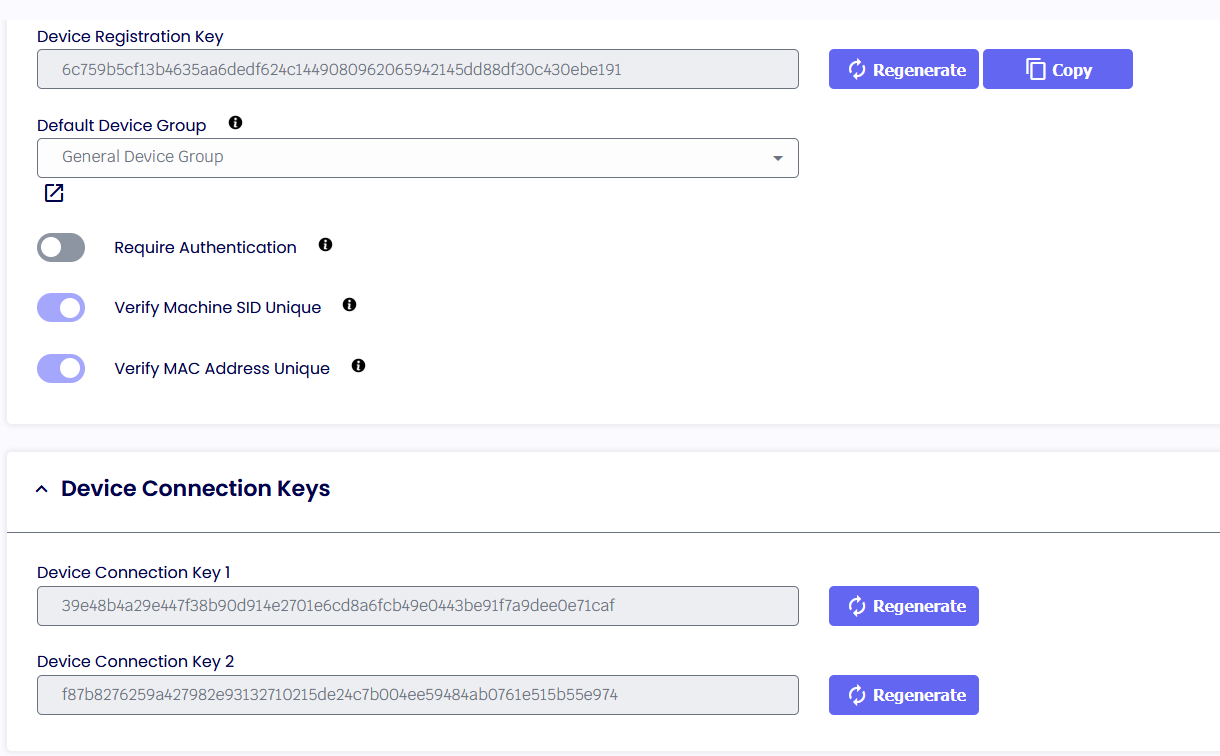
DEVICE ACCESS KEYS
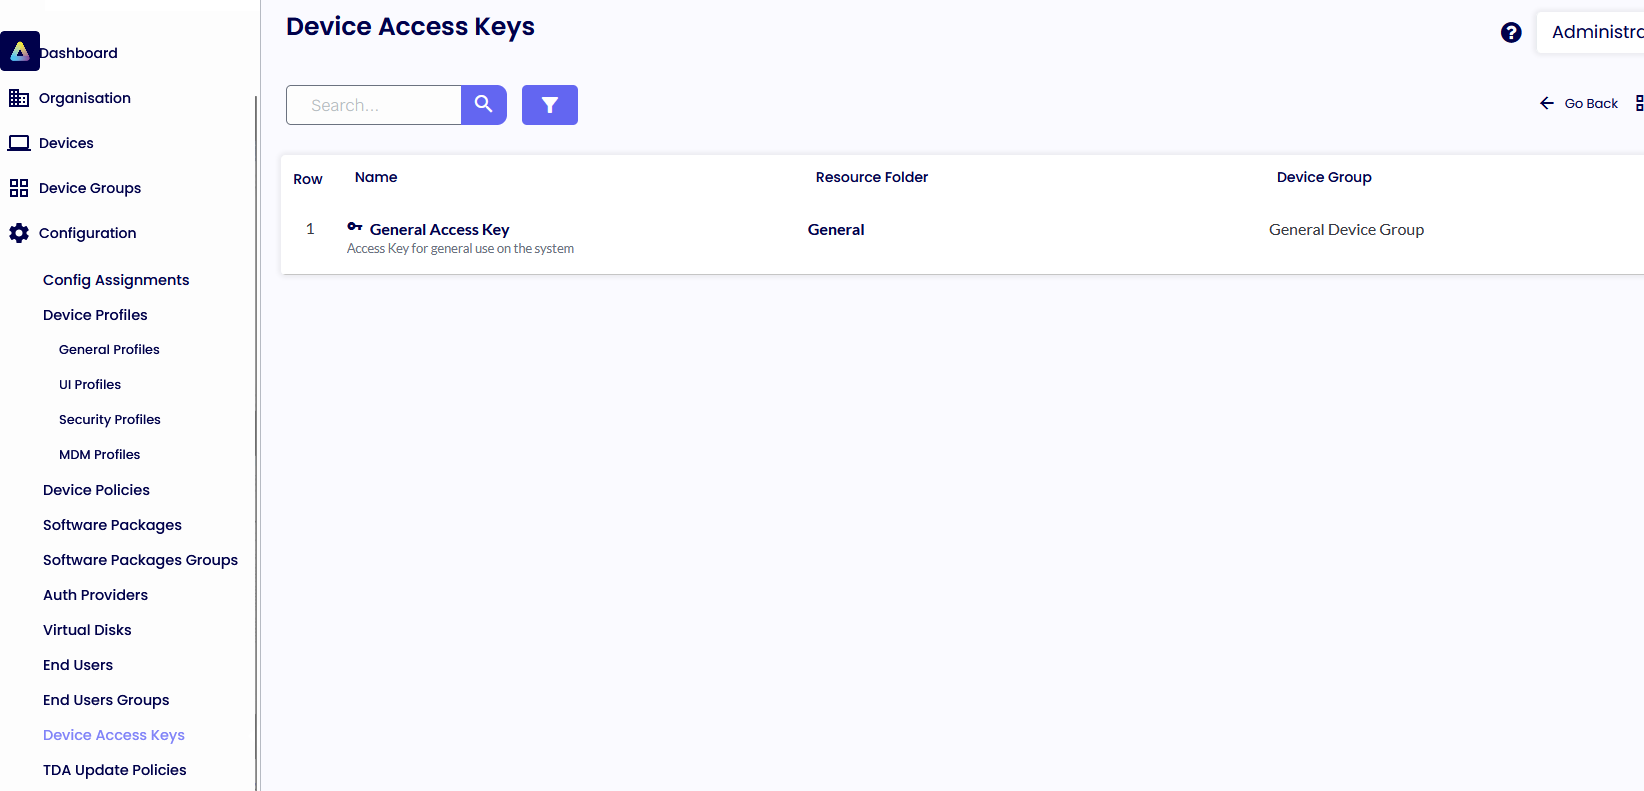
Device Access Keys are the entry point for all devices into the Device Portal.
You can create any number of Access Keys that different devices can connect. For example, you can create two Device Access Keys with different registration keys and resource folders.
This will allow different devices connecting via the different Access Keys to require different credentials and can be registered into different resource folders in the device portal, assigning different profiles and/or packages if desired.
• Enter a Name and Description for your new Access Key
• Access Keys have three keys associated with them
- Device Registration Key – Used by devices during initial installation
- Connection Key1 and Connection Key2 – Used by devices to connect after installation
• Changing the Device Registration Key will not impact existing devices, but new installations will need to provide the updated key during installation
• Require Authentication – if enabled during installation, the machine will be forced to authenticate against an Authentication Provider (i.e., Azure, Okta)
• Devices can use Key1 or Key2 to authenticate to the Device Portal. As long as one key is correct, the device will authenticate.
• Using 2 keys allows the keys to be rotated without having to reinstall or reconfigure the devices using them.
• Verify Machine SID is Unique - During the device registration process, this option verifies that the device's Machine SID is unique before registering the device as a new device.
• Verify MAC Address is Unique - During the device registration process, this option verifies that the device's MAC Address is unique before registering the device as a new device.
TDA UPDATE POLICIES
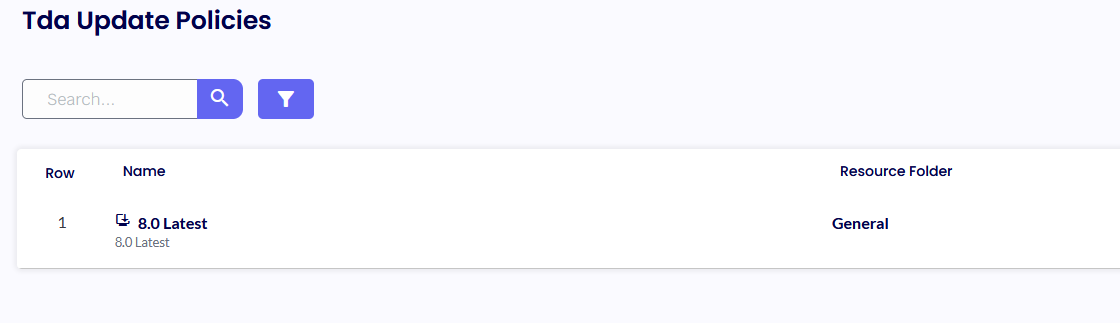
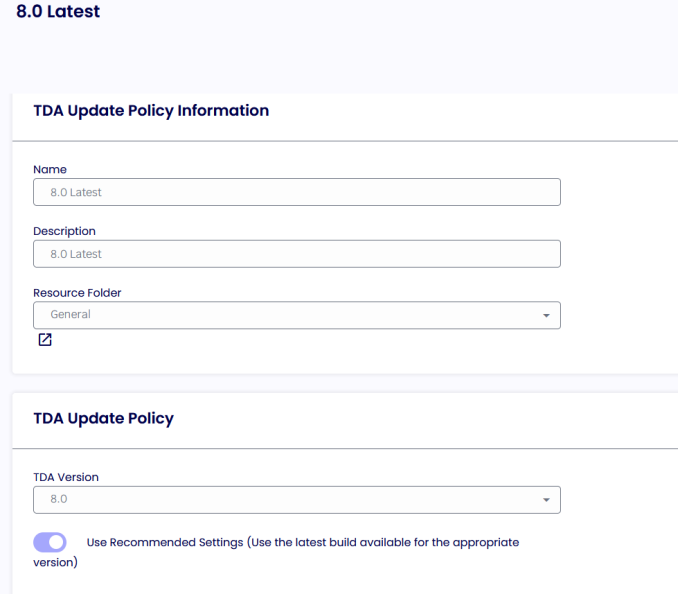
The TDA Update Policies serve as the primary hub for managing the automatic update functionality of the TDA client. Our advanced CDN technology hosted on Azure enables the global distribution of all TDA client versions.
Upon launching the TDA client, the software compares the locally installed version and the TDA Update Policies. If a newer version is available on the CDN, and the "Use latest build" option is selected or a specific version greater than the locally installed one is specified, the TDA client will automatically update itself.
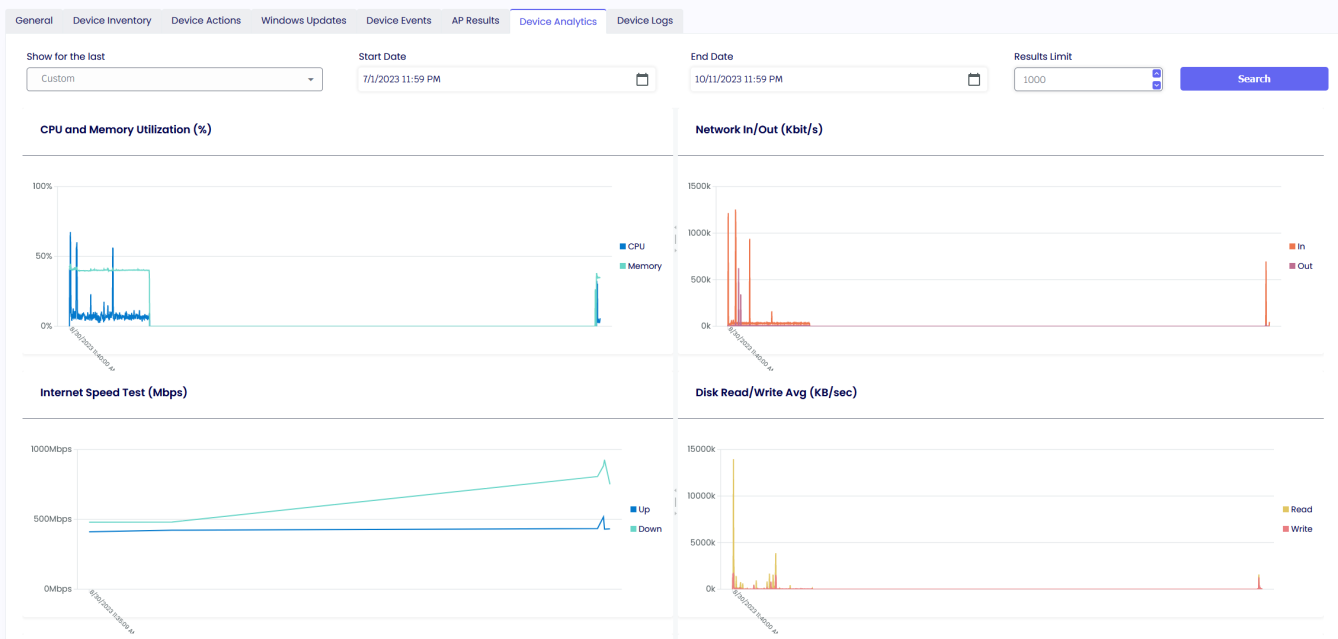
DEVICE ANALYTICS PROFILE
Device Analytics is an essential toolkit that empowers IT to be first responders in addressing critical device performance issues.
This comprehensive solution provides real-time insights into the health and performance of devices, both on an individual and estate-wide level.
Please review the KB articles for more info about the Log Analytics workspace and the Application Insights.
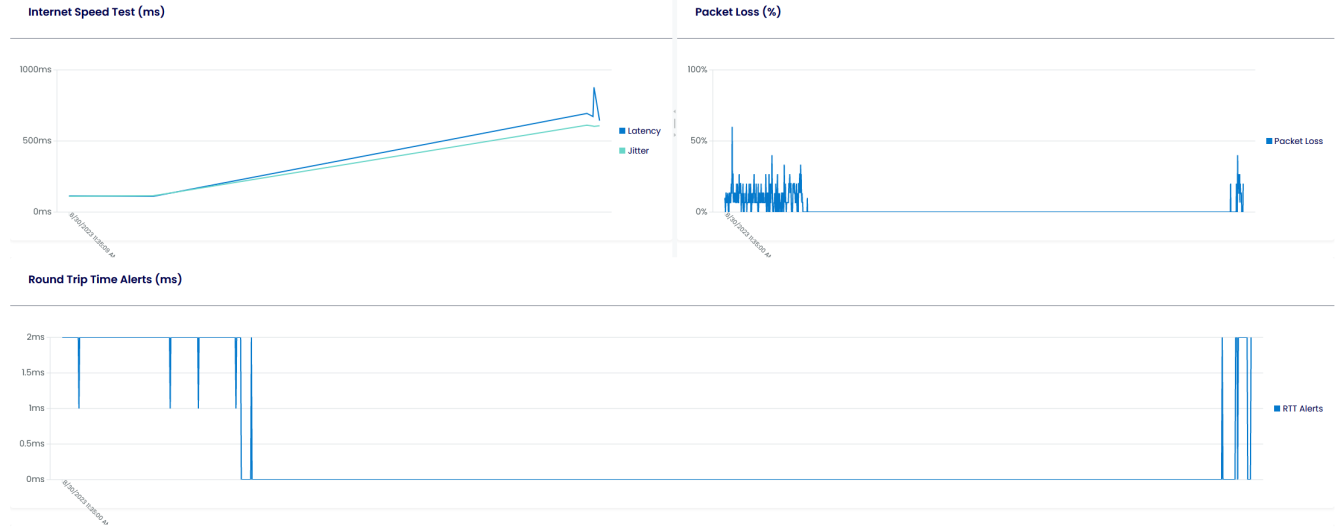
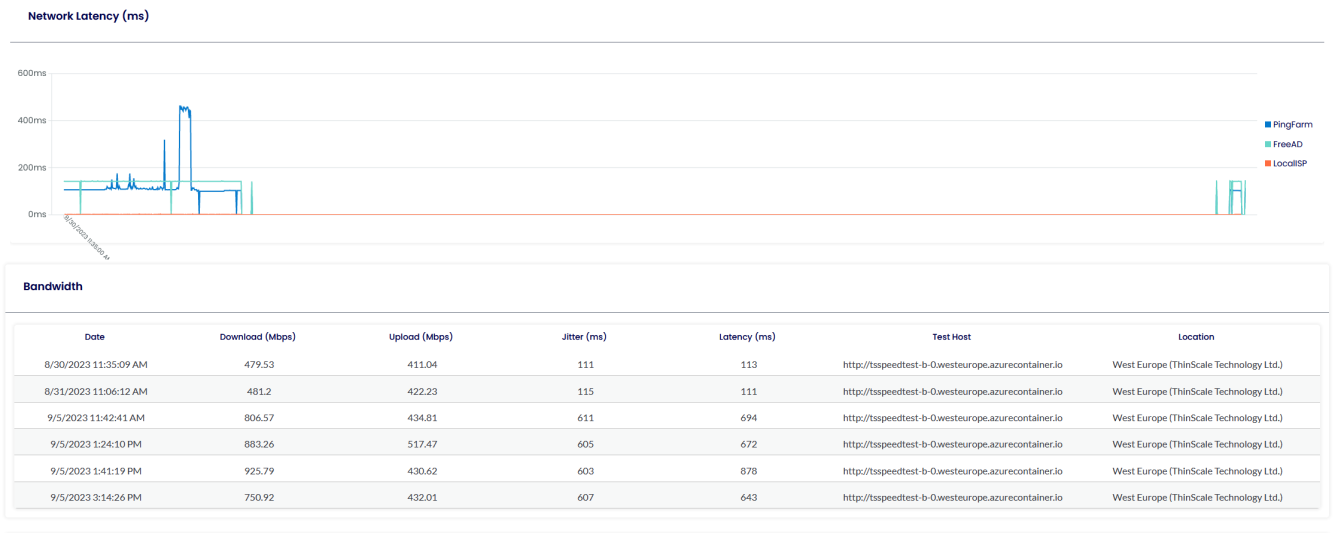

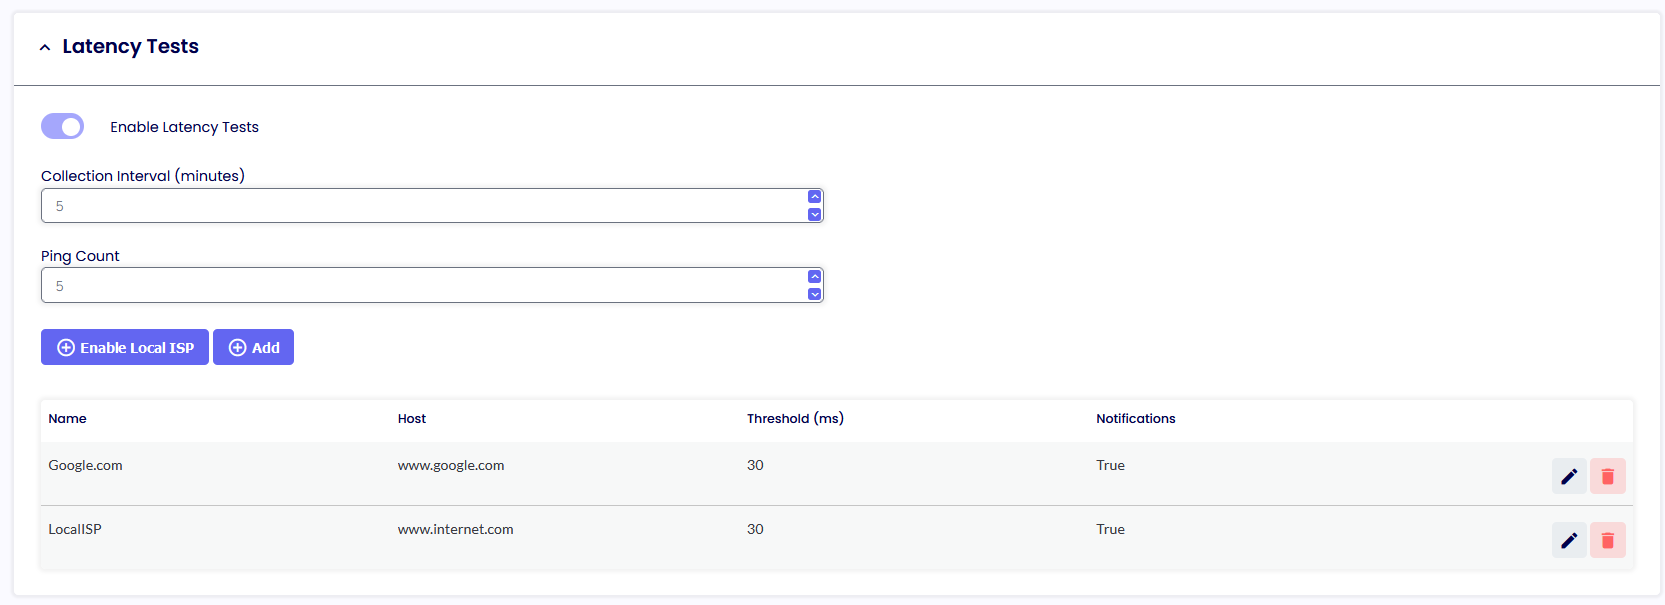
ENABLE LATENCY TEST
This is where you want your users to perform a speed test against specific URLs or IP Addresses.
INTERNET HOST CHECKS
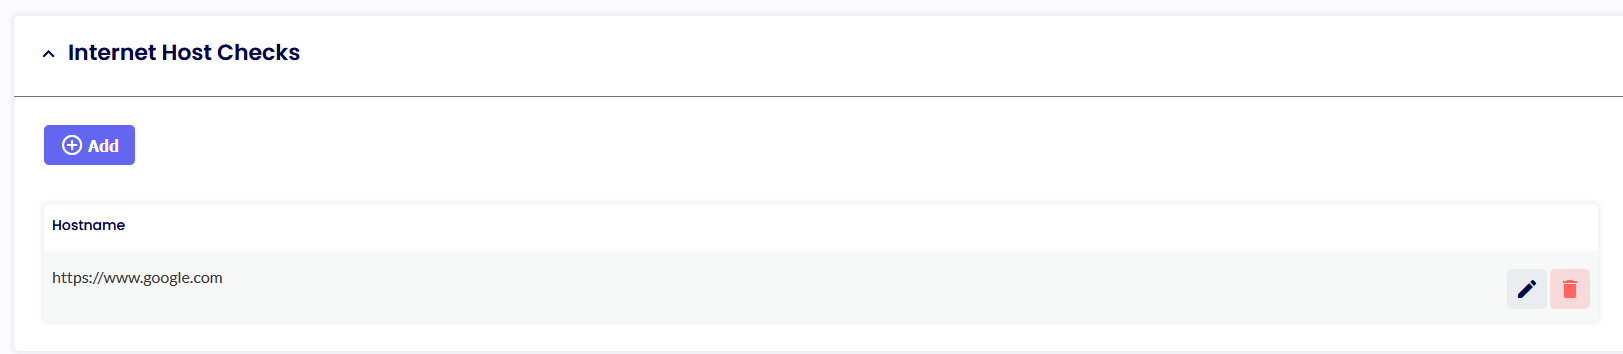
This option evaluates if the machine has or does not have an internet connection for local diagnostic purposes. A TCP port test of the URI will be logged in the local Machine Service log file.
COLLECT WINDOWS EVENT LOG DATA
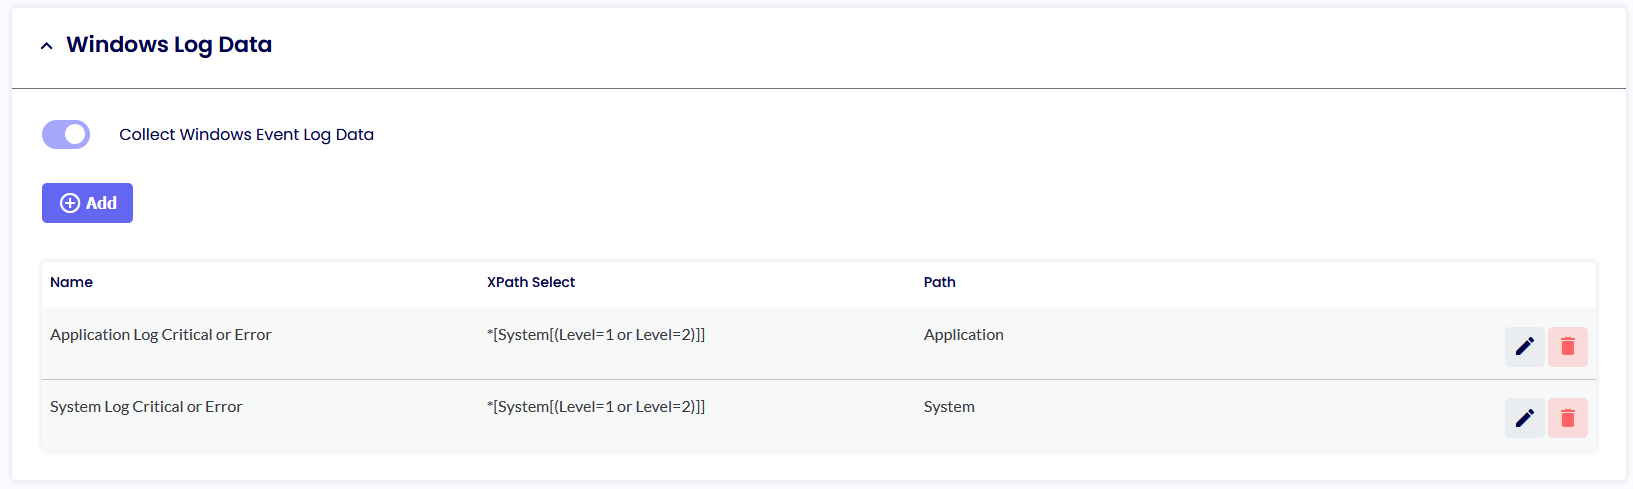
This option will set the Log Level of the Windows Event Viewer you want the clients to collect. By default, only Critical and Error Logs are saved in the Log Analytics Workspace. These can be modified using Windows standard XPath Select statements. The easiest way is via the “Computer Management” option.

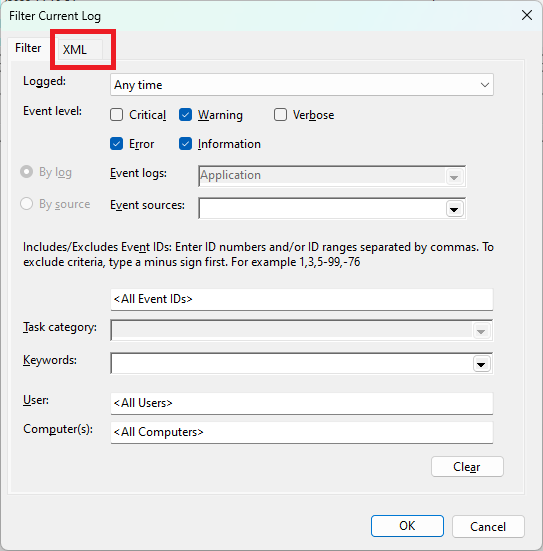
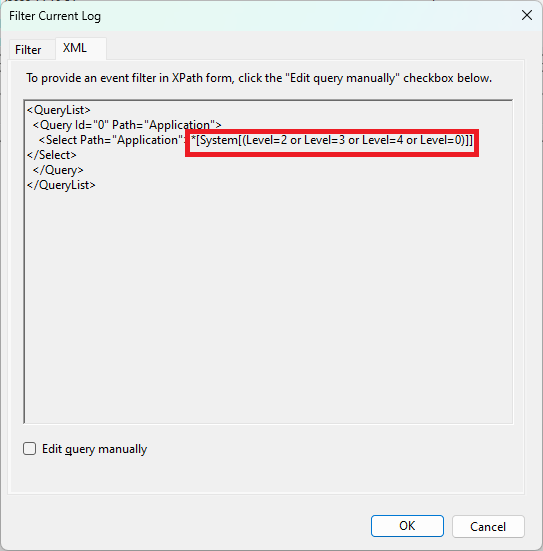
Click Filter Current Logs. Select the level desired and then simply copy the XML Value within the Management Console, like so.
ENABLE USER NOTIFICATION
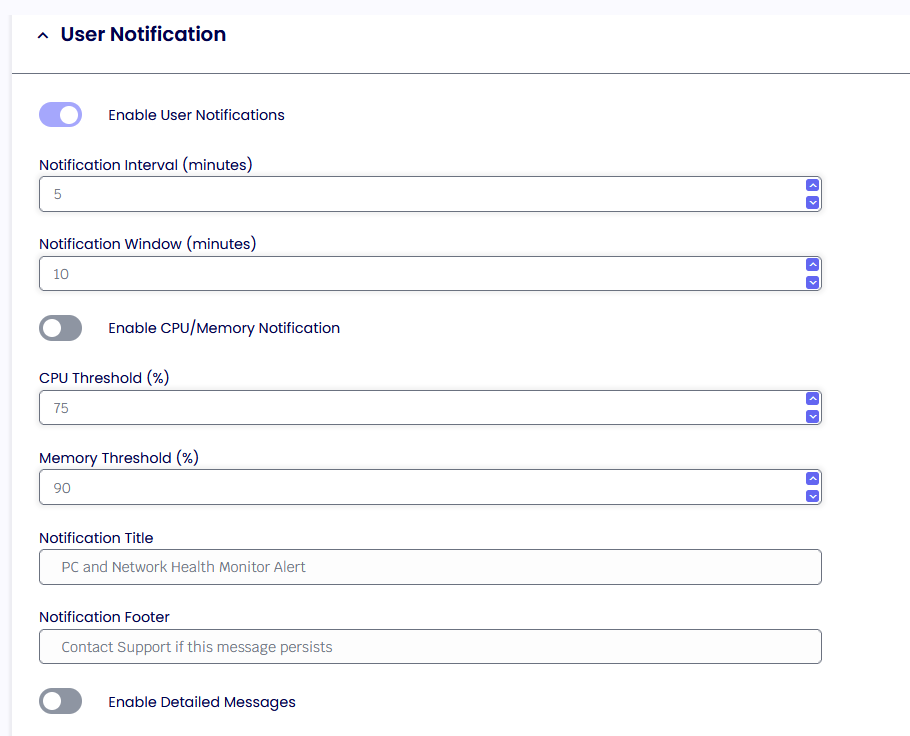
This option sets a specific collection interval and a threshold to show users a systray notification. When that threshold has been reached, an example notification will be displayed.
SPEED TEST
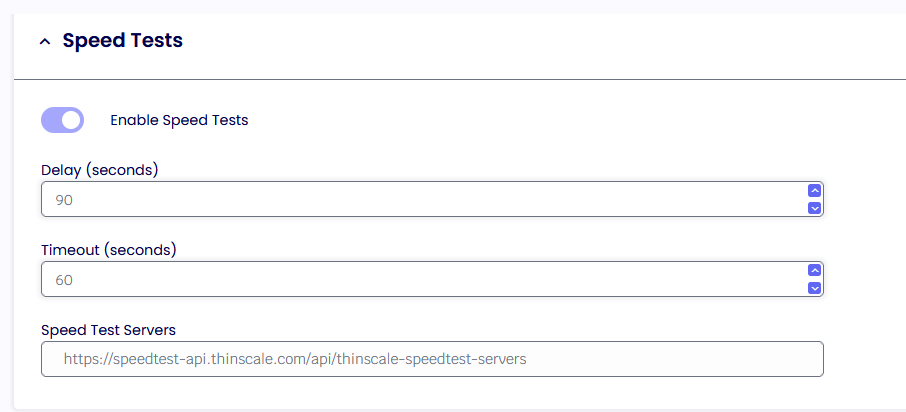
Please do not modify this value unless instructed by ThinScale Support.
https://speedtest-api.thinscale.com/api/thinscale-speedtest-servers
STANDARD DATA COLLECTION
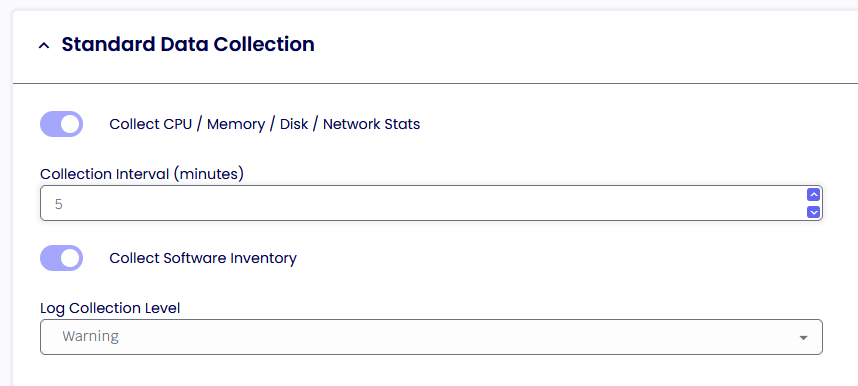
This is the interval in which the data will be collected.
COLLECTION SOFTWARE INVENTORY
Device Analytics will collect all the Installed Applications on the machine when enabled.
Note: AppData (user-based) applications are not collected with this version of the DA.